To understand the intricacies of home brewing, we tried to make beer ourselves. Used brewery Mr. Beer, a jar of Englishman's Beer Concentrate with a packet of yeast, a packet of corn sugar and a packet of One Step Cleaner. We filmed the whole process step by step on digital camera- so as not to forget how to act correctly when you want homemade beer again.
Olga Kuzmina brewed homemade beer.
STAGE 1: water preparation for young beer

Preparation of liquid, which became the basis for the life of the brewer's yeast culture. At the same time, care was taken not to introduce wild yeast into it.
We thoroughly wash the outside and inside of the barrel, the lid and the tap with dishwashing detergent.

We are putting together a brewery. It's very simple, you just need to put the faucet in place. To do this, insert it into the hole from the outside, put it on and tighten the nut from the inside. The rubber sealing ring on the faucet makes the connection reliable (our practice has confirmed this).

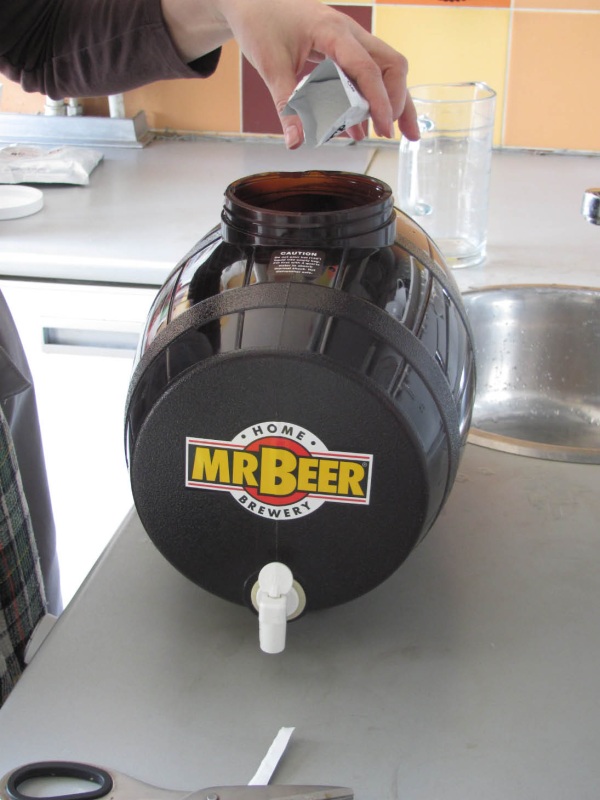

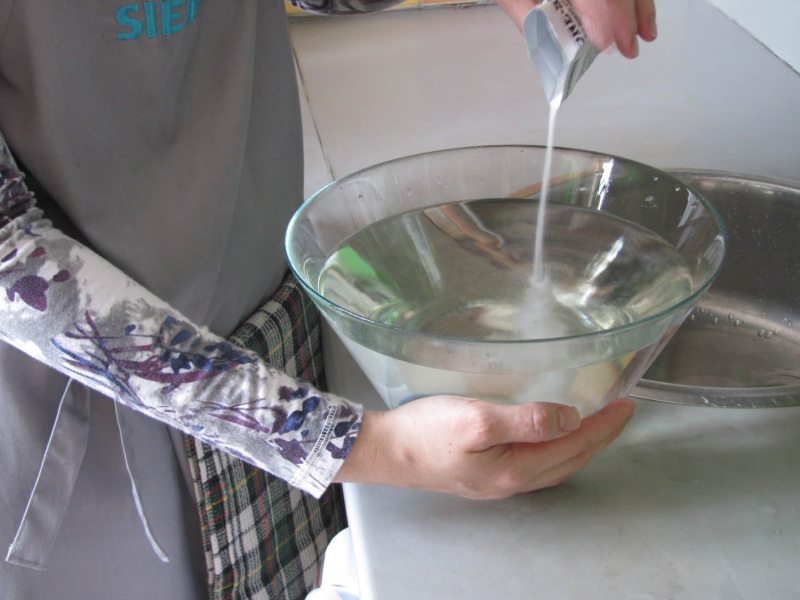
Disinfection. We collect 4 liters warm water into a barrel (measure required doses marks on back wall), pour out half a packet of One Step disinfectant, throw in a spoon with a long handle and a bottle opener.
We screw on the lid and begin to shake the barrel to wash all the walls and the lid.

We rinse the faucet by opening it several times, while placing a plate under the solution - it will be used for a spoon and a bottle opener. Now leave the barrel alone for 10 minutes. Then open the lid, take out our spoon and cutter, and put them on a plate. We drain the solution through the tap, rinse the barrel thoroughly, and again rinse the tap. After this manipulation to internal parts We will not touch the barrels, we will try to maintain microbiological purity.

Let's start preparing the drink. Pour 4 liters of water into the barrel (bottled mineral water was used).

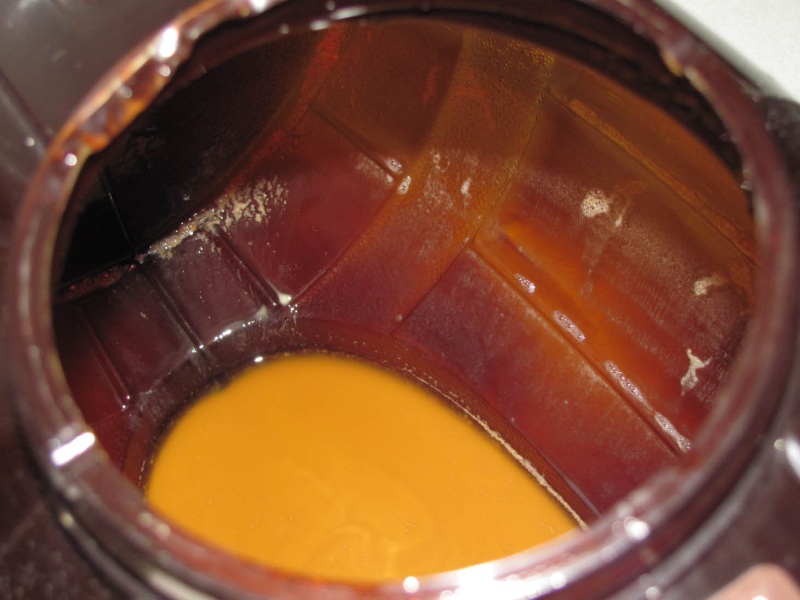
Remove the lid from the jar of malt concentrate; underneath there is a packet of yeast, set it aside for now. Pour into the vessel hot water and put the jar in it to warm up the malt, since it is quite thick, and when heated it will be easier to pour out.


A liter of water was poured into the saucepan, and there was just that much water left in the first bottle (so I ignored the developer’s advice and did not prepare, that is, did not disinfect, the measure). Rinse the spoon under running water. Pour sugar into the water and it will immediately dissolve. Keep it on the fire, stirring (I must say, the syrup behaves very well - it doesn’t burn). Bring it to a boil. The syrup turned out to be transparent and not very thick, the operation took a couple of minutes. Turn off the fire for now. Place the spoon on a rinsed, disinfected plate and rinse the opener.


Cook the wort. Open the jar and pour the contents into the syrup. Turn on the heat again, take a spoon and stir. The concentrate is easily mixed with syrup. The liquid is again heat-sensitive: nothing burns, you don’t even have to be so careful. Bring to a boil.

We put on gloves, take a saucepan and pour the wort into the keg so that the hot liquid does not get on the walls and damage the plastic.


Add water to the 8.5 liter mark. Take the spoon again and stir the future beer. The liquid is warm, but not hot.
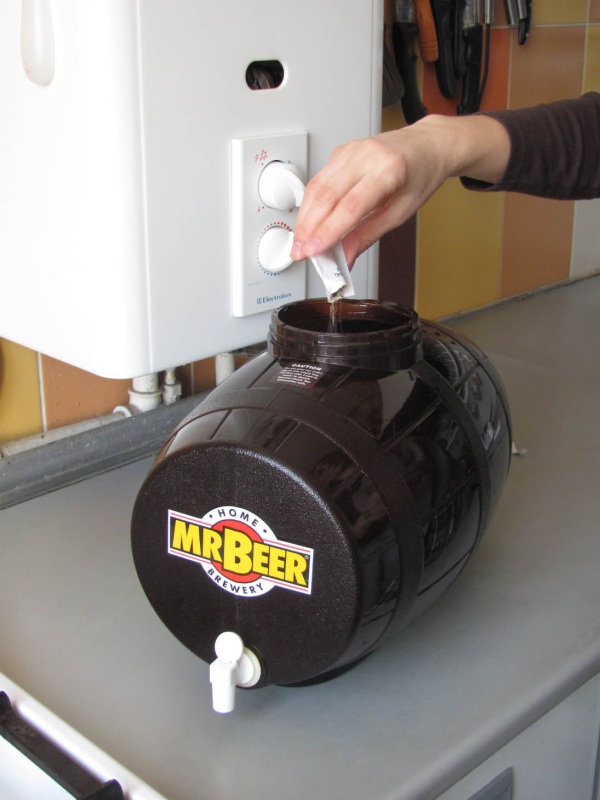

Pour brewer's yeast from the bag onto the surface of the liquid. Leave for 5 minutes, covering with a lid. Then stir with a spoon and screw on the lid. That's it, the first stage is completed, it was not difficult and took about 30 minutes. Now the barrel needs to be placed away from sunlight. Young beer will ferment for a week.
STAGE 2: send the young beer for further fermentation.
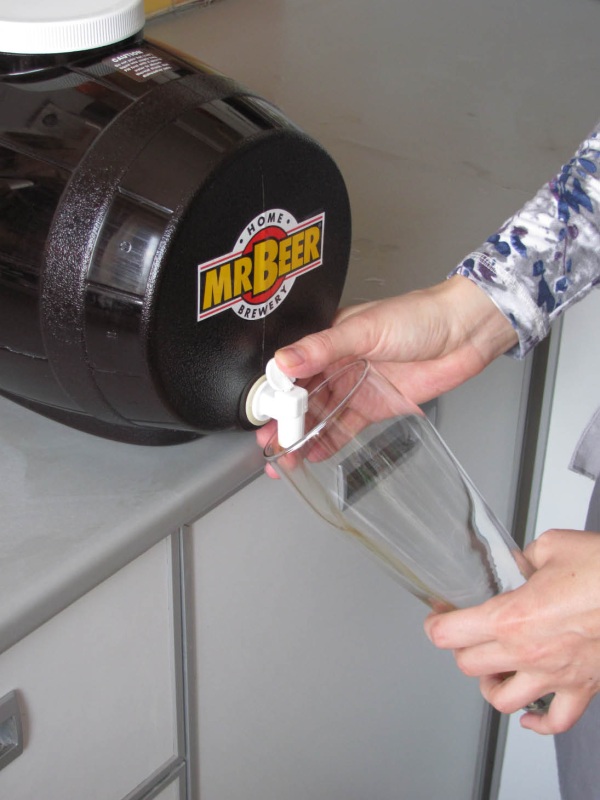
A week passed, the beer keg stood in a dark room, no one touched it. The day before the young beer was drained, it was transferred to the kitchen: the sediment raised during transportation should fall to the bottom again. To assess whether everything is going correctly, we take some young beer through the tap and try it - the drink already looks like beer with a bright bitterness. But for us, the absence of a sweet taste is more important; this is precisely what indicates that the beer can be drained. The beer does not contain suspended matter and is not cloudy.

You probably noticed that the technology involves bottling beer. The fact is that we have to prepare a drink that will not undergo pasteurization. And its safety is ensured by hermetically sealed closure. An open container of any size should be used up immediately, and bottles are almost ideal for this purpose.
Most often it is recommended to buy plastic bottles (or they are included in the kit); frankly speaking, it seemed to me that choosing plastic would discredit the very idea of home brewing. After all, we do it for the sake of a unique and not so harmful (I only partly believe in the healthfulness of beer - the pancreas is still not made of iron) drink, and serve it in plastic container just disrespectful.
In addition, regular bottles are not designed to be reusable. It is best to collect a set of glass bottles with special stoppers (like mine) or buy a crown stopper installer.
For the new beer, I took two types of bottles - half-liter glass bottles with ceramic caps and plastic ones for mineral water.
The work begins again with disinfection. But I simply washed and boiled the glass bottles - less hassle (I removed the rubber gaskets, then put them back on and put them directly into boiling water with the lids, closing the bottles before pouring beer). More better option with oven - disinfection when dishes are dry. By the way, such disinfection can be done in advance.


I had to tinker with plastic bottles. I prepared a solution from half a One Step sachet, then poured it into containers, screwed on the lids, shook well and set them on their sides. While the bottles lay there for the prescribed 10 minutes, I turned them over several times. Then I washed it again large quantities water.

At this stage, you begin to understand that the sterile excitement has subsided somewhat. Now we need to add a little sugar to each bottle, I disinfected the funnel and measure (also an interesting topic: disinfection is a wet process, but the sugar must be poured dry - we will wipe it, we can introduce unwanted flora!). The sugar itself could well become a carrier of wild yeast; it is simply impossible to sterilize it; all we have to do is rely on the power of our brewer’s yeast colony. I add sugar at the rate of 1 tsp. 0.5 l - for glass and 3.5 tsp. - for a 1.5 liter plastic bottle.

Let's start bottling young beer. The bottles must be held at an angle so that the liquid flows along the wall. At first everything was fine, but suddenly it turns out that the tap has some kind of absurd character: some streams do not go down, but to the sides. You have to press the neck against the tap, and the way the bottle behaves fades into the background.
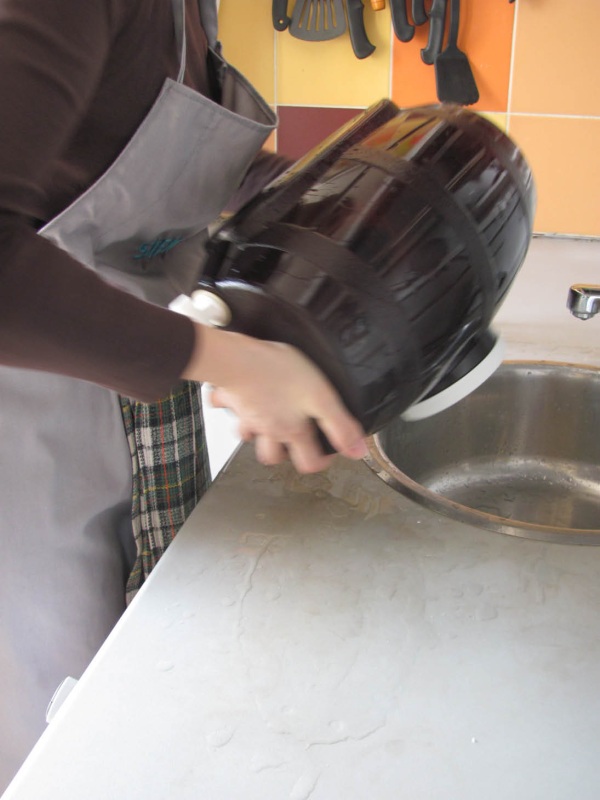
On the last bottle, the beer stops pouring out; its level is below the tap. I open the lid of the brewer and carefully tip it forward to catch as much as I can without any sediment. There was very little of it, and it is clearly visible.
By the way, I note that breweries without a tap, from which beer is drained using a siphon, are not so convenient; two processes must be controlled simultaneously - monitor the sediment and the bottles.

We cork each bottle. Then shake to completely dissolve the sugar. We drain the remainder separately, you can see how much it turned out. I thought there would be more. The bottles are again sent to a dark place: a week of fermentation + a week of standing. After a week, I will put one or two bottles in the refrigerator, the rest will remain at room temperature.

As soon as I started working on the topic, I began to be tormented by the idea of how to make a convenient and serious brewery at home, because what we have is always a plastic vessel of varying complexity, with or without a tap. I would like something more convincing. But all these thoughts fade into the background when you start washing this thing. My brewer fits easily in the sink, it is lightweight and, importantly, very simple, without any tricky parts. Now that the barrel is empty, it can be used again.
STAGE 3: tasting among like-minded people
The long-awaited tasting. I won’t hide the fact that we opened the first bottle not without trepidation! As you can see in the photo, our beer looks as it should be - a drink amber color with a large head of foam (although it quickly falls off).
When opening the bottle there was a burst of air. The taste is wonderful, bitter, rich, interesting, cannot be compared with mass-produced beer and, thanks to the malt, Englishman’s surpasses taste qualities more expensive varieties that our tasting participants had a chance to try.
The drink turned out clear with bubbles constantly forming (note that we had natural carbonation). In general, the experiment was not only a success, it confirmed that homemade beer lives up to its proud name and is not so difficult to prepare.

An interesting discovery for us was a bottle that had been aged last week in the refrigerator - this beer was recognized as the best (special thanks to Alexey Yeshukov, our consultant, who persuaded me to do this). All the beauty homemade beer it played brighter, the taste was rated as more noble, the color was darker, the drink came out more carbonated and gave more pleasure than others. By the way, the beer in each bottle has a slightly different taste.
Any “domestication” of processes that were hitherto only available to production requires time and, most importantly, some effort. Those who are ready to seriously plunge into the topic of home brewing would do well to acquire a special set of bottles with caps, find permanent place for a brewery, make a rack for a battery of bottles, and also, possibly, provide a separate mini-refrigerator for aging and storing beer.
Thoughtful recipes, the help of like-minded people and consultants will help turn brewing into a simple but exciting activity that your friends will especially appreciate. After all, an ordinary invitation to a beer will take on a new meaning for them.
Thanks to the company pivovarnya.ru and personally to Alexey Yeshukov for their help in diving into the topic and the brewery provided for the test.
You can buy beer in any store. However, at breweries, various dyes and preservatives are added to the drink so that the beer retains its presentation longer. If you don't trust beer companies, you can make beer at home.
Why is homemade beer better than store-bought beer?
You can prepare it at home. If you carefully read the label on the bottle, you will find that manufacturers often add preservatives, flavors and colorings to the drink. And if the addition of preservatives can be somehow justified (natural beer spoils quite quickly, but it still needs to be bottled and delivered to the store), then the addition of flavors and dyes is important for manufacturers only to improve the presentation of the product. Homemade beer also compares favorably with draft beer due to its thick foam and rich hop-malt taste. Also, factories often resort to clarification and pasteurization procedures, which decompose various vitamins and beneficial microelements.
There is an opinion that to produce good beer you need a lot of special, expensive equipment. This is a myth that is actively supported by many brewing companies. Homebrewing is not profitable for them. The only expensive tool you can't do without when brewing beer is an electronic thermometer. It will instantly determine the temperature of the liquid in which it is placed. It is really difficult to do without it, since at some stages of cooking it is necessary to maintain a strictly defined temperature.
Necessary equipment
To make beer we need the following tools:
25-30 liter saucepan for wort . Give preference to enamel pans without black burn marks. Before cooking, wash the pan thoroughly with detergent and then dry in the sun. It is important that there is no detergent left in the pan - this will ruin your drink.
Additional fermentation tank for 20-25 liters . Pots, bowls, and various pottery dishes are suitable for this purpose. You can ferment the wort either in one container or in several.
Thermometer. It is impossible to make good homemade beer without a thermometer. Moonshine and wine do not require compliance special regime. But in brewing you can’t do without a thermometer. Give your preference to an electronic thermometer with a long spout. Yes, a thermometer can be quite expensive, but this purchase will pay for itself.

Bottles for finished beer . Give preference to glass containers, as glass does not retain odor well. If there are no glass bottles, and purchasing them would be expensive, you can bottle the beer in plastic bottles.
Medium thin hose . Give preference to silicone hoses. We will need this component to remove the foam.
Beer wort cooler . For this purpose, you can use a large metal bowl filled with cold water. If you don't have a bowl required sizes- You can use a bathtub filled with ice or cold water.
Water seal . We will need it for fermentation.

Gauze for malt bag and filtration . The gauze size should be 3-5 meters. It's inexpensive.
Wooden or metal spoon . We will need it to stir the drink while cooking.
Iodine and clean white plate to take a sample (optional, you can do without it).
A device for measuring the density of liquids - a hydrometer (also optional).
What is beer made from?
A standard beer brewing kit looks like this:
- Water- 25-27 liters. We will brew hops and malt in it.
- Hop with acidity 4.5% - about 50 grams. Hops can be obtained at any market. Russian hops are suitable for homemade beer. Hops will add bitterness and aroma to the drink.
- Barley malt- about 3 kilograms. Barley malt can be obtained at any market or specialty store. However, remember - Russian malt is usually not of very high quality. Buy German or Czech malt. It can be ordered online. Malt will make the drink rich and tasty.
- Brewer's yeast- about 30 grams. Brewer's yeast can be obtained at any market or in a specialty store. You can also buy Russian yeast. We need yeast for fermentation.
- Sugar. We will need sugar at the rate of 8 grams of sugar for 1 liter of beer. Sugar is important for additional fermentation, as well as for saturating the drink with carbon dioxide.
How to Brew Homemade Beer in Six Easy Steps
There are many ways to make homemade beer. Next, we will look at how you can make beer at home in 6 steps. Even a beginner can master it.
First, carefully read all the preparation steps and tips, and only then proceed to the process itself.
Stage 1 - preparatory work
Check availability necessary components and equipment. Check the thermometer separately - to do this, boil water in a container.
Sterilize your instruments. This is necessary in order to avoid unwanted bacteria getting into the beer. Wash all equipment and dry it in the sun. While the equipment is drying, wash your hands with soap. Do not use alcohol or vodka as a sterilant - this will harm the drink. Sterilization is vital. If you don’t do this, there is a chance that you will introduce so-called “wild yeast” into the wort, which will turn your homemade beer into an unpalatable mash.
Pick up water. Give your preference to bottled or spring water. If it is quite expensive to get it, you can use tap water. If you are using tap water, the day before cooking, boil it, and then place it in a dry, cold place to settle. This must be done to get rid of various harmful components in the water. For example, tap water is often chlorinated, and during settling, the chlorine will leave the water within a day.

Prepare the yeast. If your yeast is pressed, break the yeast brick into small pieces, then pour them with clean warm water for 5-10 minutes.
Stage 2 - prepare the wort for brewing
Take the malt, put it in the pan. Then take a crusher and grind it to a powder. After this, the malt is ready for mashing. Sometimes malt is sold already crushed. However, experienced brewers do not recommend buying such malt, since it very often contains artificial additives like starch or even flour to increase the weight of the product.
 Twin Roller Malt Mill
 Make a small bag out of gauze. Place the ground malt there. The malt should not fall out of the bag. It is recommended to make the bag in 3 layers.
Pour 25 liters of water into a large saucepan and place it on the fire. Place the tip of a thermometer into it from time to time. When the temperature is around 80 degrees, turn the heat down.
Place the bag of malt in the water and cover the pan with a lid. Boil the malt for one and a half hours. The temperature should be maintained around 67 degrees. Remember that placing the malt bag into the pan will cause the temperature to drop dramatically, so sometimes brewers turn the heat up just a little bit higher.
Cooking at a temperature of 67 degrees will make the beer dense and soft in taste. Its strength will be about 4%.
After an hour and a half, do iodine test. It is done to determine the presence of starch in the drink. They make a test like this: take a few tablespoons (5-10 milligrams) of wort and pour them onto a white plate; After this, a few drops of iodine are dripped onto the wort. If the color of the liquid has not changed, then it is considered ready. If the color of the liquid turns dark blue, cook the wort for another 10-15 minutes. It is important that you don’t have to do an iodine test - just cook the wort for an additional 15 minutes.
 Good and bad iodine test results
 During brewing, the malt took part in natural fermentation. Now we need to stop this process. To do this, make the fire larger so that the temperature in the pan is about 80 degrees. Cook for 5 minutes.
After this, remove the bag of malt from the pan.
Stage 3 - boil the wort
Turn up the heat to bring the liquid to a boil.
Add 20 grams of hops there. Don't turn down the fire. After half an hour, add 15 grams of hops.
After another half hour, add the remaining 15 grams of hops. You need to cook the wort for another half hour.
Stage 4 - wort cooling
Our task at this stage is to very quickly cool the wort to 25 degrees. This must be done within 20 minutes so that wild bacteria do not have time to settle in it, starting wild fermentation.
- Turn off the pan with the wort, put on thick gloves, add some cold water.
- After that, take the pan with the wort and put it in the bathroom. After this, fill the bath so that water does not get into the pan. If there is ice in the refrigerator, add it to the bath.
- After 15 minutes, use a thermometer to measure the temperature of the wort. If the temperature is 25 degrees or lower, you can proceed to the next step. If not, wait a little.
- Now pour the cooled wort into the fermentation container, first passing it through cheesecloth several times.

Stage 5 - wort fermentation
Now you need to add the yeast. There are two types of them (depending on the temperature):
Top fermentation - add at 20 degrees.
Bottom fermentation - add at 10 degrees.
For our case, top-fermenting yeast is suitable (if you want to add “bottom” yeast, cool the wort additionally).
The following actions:
Using the instructions on the yeast packet, calculate the required amount of yeast.
Take a glass of cold water, pour yeast into it, stir it well.
After this, pour the glass of yeast into the pan with the wort, mix the resulting mixture well.
Place the pan with the yeast in a cool, dark place. Install a water seal to prevent excess oxygen from entering the container.
After about 12 hours, fermentation will begin. Active fermentation lasts about 2-3 days, after which the process begins to fade.
After a week, take out the pan, remove the water seal and use a hydrometer to check the density of the liquid.
After half a day, take the pan out again, remove the water seal and use a hydrometer to check the density of the liquid. If the numbers are the same, fermentation is over. If they differ, let the liquid ferment some more.
Stage 6 - clogging, adding sugar, producing carbon dioxide
Now it is necessary to carry out carbonization. This must be done so that the beer foams well and is carbonated:
- Take glass or plastic bottles and add 8 grams of sugar per liter to each. Once the beer is added, the sugar will cause a little additional fermentation, which will release some carbon dioxide.
- Pour beer into bottles and close the lid tightly. The distance between the beer and the lid should be up to 2 cm.
- When pouring bottles, do not shake them so as not to disturb the yeast. If you touch the yeast, the beer will turn out very cloudy (however, some people like it).
- Place the bottles in a dark, dry place where the temperature will not exceed 24 degrees. After three weeks the beer will be ready. The beer needs to be shaken thoroughly every week. After this, move the beer to the refrigerator. The beer is ready, you can drink it. In a good refrigerator, beer can be stored for up to 9 months. After opening the bottle, the drink is stored for three days.
To make home brewing easier, experienced brewers recommend the following:
- Russian malt is of rather low quality. Therefore, give preference to foreign malt, for example, German or Czech.
- Never buy ground malt, as sellers often add starch to it. Don't overpay for starch.
- You can let the beer mature. To do this, at the final stage of preparation, do not put the beer in the refrigerator, but let it sit for another month. As a result of maturation, the beer will acquire a caramel flavor.
- While brewing the malt, do not forget to stir the pan with the mixture with a spoon. This will enhance fermentation, which will have a good effect on the quality of the drink.
How to brew beer at home - a traditional recipe
4.7 (94.78%) 23 votedMalt. Hop. We brew beer.
Beer preparation occurs in several stages and on an industrial scale, of course, is almost completely automated. The person can only control the equipment. When brewing beer at home, things are completely different.
Of course, a lot of good and convenient equipment for brewing beer at home is now sold, but the price of this equipment can surprise, and sometimes even frighten. If you decide to try brewing beer at home, then I would advise you not to rush to spend money. The stages of brewing beer are the same both in industrial preparation and when preparing beer at home, but the approaches to these stages and the equipment are significantly different.
What do you need to brew beer at home?
Almost everyone has the most minimal set - a wooden spoon and an enamel or stainless steel pan. You will also need electronic kitchen scales and, as well as an ordinary sieve. This is the minimum kit for brewing beer at home.
What would be nice to have?
If you're brewing beer for the first time, then you shouldn't bother with a bunch of equipment. In general, you will also need a fermentation tank with a water seal, a malt mill and much more that you can do without. Since this article is aimed at those who decided to brew beer with their own hands for the first time, I will try to make do with a minimal set of tools and equipment.
Stages of brewing beer at home.
As I wrote above, beer preparation consists of several stages. Each stage has its own purpose and pursues a specific goal, so it cannot be said that one or another stage is more important than others - they are all needed, otherwise the beer simply will not turn out.
Stage one: Preparation.
At the preparation stage, our task is to find everything necessary equipment and wash it thoroughly. Next, you need to measure and grind the malt (you can buy ground), calculate the required amount of mash water and heat it.
Naturally, all proportions of malts, hops and water should be taken based on the recipe. You can choose any one from our website. All of them are verified and tested in practice.
Also, don’t be afraid of small deviations from the recipe in the amount of malt or water. However, with hops you shouldn’t deviate too much from the recipe.
When everything is prepared and washed, and the malt is ground, you can move on to the second stage.
Second stage: Mashing.
During the mashing stage, fermentation and saccharification of starch occurs. Since different enzymes work at different temperatures, when mashing malt, temperature breaks should be maintained in accordance with the recipe.
So, you have poured the required amount of water into the pan - this is mash water. Heat the mash water to the temperature of the first temperature pause and add ground malt (). At the same time, mix it all thoroughly with a wooden spoon to avoid clumping.
During the temperature pause, it is important to monitor the temperature of the mash; it should not rise, but it should not fall either, so the heating should be reduced or turned off completely. In this case, it is worth periodically stirring the mash and monitoring its temperature.
After the allotted pause time has passed, the heating is turned back on to maximum and home brewing continues. When the next temperature pause is reached, everything repeats again.
Usually, after a pause of 72 degrees, it is done, after which the temperature rises until the last pause and at this point the mashing stage ends.
The third stage of brewing homemade beer: Removing the sediment and boiling the wort.
Now that mashing is complete, the wort is poured into another container - this can be done through a simple sieve. The malt remaining after mashing is called spent grain. The spent grain is washed for extraction maximum quantity sugars At this stage, the amount of wort removed will be greater than the planned amount of finished beer.
Now you need to measure the density of the wort. If you don’t have a hydrometer and you followed the recipe, you can skip this, this measurement is not important when brewing homemade beer, it will still be tasty. To measure the density, take a small amount of wort and be sure to cool it to 20 degrees. After which a measurement is made. The rest of the wort is placed on the fire and brought to a boil. It is important that the boiling process occurs quite rapidly and without a lid. Otherwise, your beer will taste vegetable.
During cooking, hops are added in accordance with the recipe. After the end of cooking, the loss of wort will be about 20%-30%, so you can add hot water during boiling. It is important to control the density.
When cooking is completed, move on to the next stage.
Stage 4: filtration, cooling, adding yeast.
Hot wort must be cooled as soon as possible. You can use it for this, but if you don’t have it, just put the pan in a bathtub with cold water or in the snow. Stir the wort to cool it faster. During the process of cooling the wort, it can also be removed from the sediment by straining through a sieve, cheesecloth or other filters.
When the temperature of the wort is 20-24 degrees, you should take 10% of the wort for primer and put it in the refrigerator. You also need to take a small amount of wort to rehydrate the yeast (read how to do this here)
After adding yeast, the wort is poured into the fermentation tank and sent for fermentation.
Homemade beer fermentation stage.
When we brew beer at home, it happens that fermentation takes place in 2 days, and sometimes it starts only on the second day - don’t be alarmed. Usually fermentation lasts 3-4 days. After the yeast cap has settled, fermentation is complete and you can bottle it.
The final stage of brewing homemade beer.
A primer is added to the fermentation tank, the young beer is mixed well, left for 30-40 minutes and bottled. Try to minimize the amount of sediment in bottles. Next, the bottles are sent for further fermentation for 2-3 weeks.
After fermentation, your homemade beer, brewed with your own hands using malt and hops, is ready.
Reads: 1,987
Live beer homemade, aromatic and tasty, much better than store-bought, since you know exactly what products were used in the preparation process. It’s nice to treat friends and family with this beer, because home brewing is a very rare phenomenon in our lives.
How to quickly and easily brew beer at home?
There is an opinion that homemade cooking technology requires special equipment. In fact, it is not at all necessary to buy a home brewer; you can get by with ordinary utensils, unless, of course, you are going to open a brewery. There is no need to brew malt from barley or wheat and dry hop cones; it is much easier to buy ready-made ingredients in the store. Exist different recipes homemade beer, and to make the classic drink you will need malt or malt extract, hops, yeast and water. In some recipes you can see molasses, honey, salt, jam, cornmeal, black pepper, bread and other products, since beer is a multifaceted drink that allows you to experiment with flavors.
Homemade malt beer according to an old recipe

It is malt that gives beer fullness of taste, richness, pleasant color and persistent foam. To make beer, malt is mixed with water and heated to 75°C in a large saucepan. The resulting malt porridge is then filtered through a sieve to separate undissolved grain particles. This is how beer wort is obtained - plant raw materials, ready for fermentation, to which crushed hop cones are added. The wort is boiled for another 2–3 hours with constant stirring, and then cleaned again through a sieve - this time to remove any remaining hops. To save time and effort, you can put the hops into the wort in a gauze bag, then you won’t have to filter. The resulting drink is infused for several hours and then filtered again.
When it comes time to add yeast, you need to decide what kind of beer you want to brew - top or bottom fermentation. If yeast is introduced into the wort at a temperature of 20–22 °C, top fermentation begins, thanks to which the beer is prepared faster. Bottom fermentation lengthens the brewing process (and, accordingly, shelf life) and gives the beer a hoppy taste.
The ideal temperature for active yeast activity is 18 ° C, so cover the pan with a lid and leave the beer for a week. If after two days foam appears on the surface, it means you did everything correctly, but if it doesn’t, put the pan in a warmer place, remembering to periodically remove the foam. After about five days, the beer will acquire the familiar beer taste, and then all you have to do is pour it into bottles without shaking and leave it in a cool place for two weeks. There are different variations of malt beer: sugar, salt, raisins are often added to the wort, and hops are sometimes added to bottles after fermentation is complete; the order of adding products and fermentation methods may also change.
Homemade beer using unusual recipes

There are many technologies for making beer without malt, and such recipes are most suitable for home use. In many recipes, honey is dissolved in water, mixed with hops and boiled for an hour, then fermented and kept warm. Beetroot beer turns out to be very original - in this case, finely chopped beets are boiled in water with salt, then hop cones and juniper berries are added to the pan, then everything is boiled again and fermented for two weeks. Beer made with molasses has a rich taste, which is prepared using the same technology as classic beer, only molasses in this recipe replaces malt.
Beer without yeast has dark brown color and a spicy taste, as it is made from ground grains of wheat, barley and rye, fried in a frying pan. Next, the grain mixture is boiled in water with chicory, and then lemon zest, hops and sugar are added to it. After six hours of brewing, the beer is bottled and stored in a cool place. Sometimes hops are ground with flour and sugar, mixed with water and boiled, and yeast and molasses are added later.
You can make beer from pea pods, hops and sage, and for festive table Ginger beer or wine beer is suitable, orange juice and zest. Beer can be oatmeal, buckwheat, pumpkin, corn, carrot, smoked, chocolate, fruit and even milk. Brewing beer - creative process, in which any experiments are appropriate!
Brewing secrets

Water for beer must be fresh, clean and soft, so the best option- filtered or boiled water, and if possible, from natural sources. With bad water, beer turns out tasteless. The same goes for yeast, so to make beer you should buy special brewer’s yeast, fresh or dry, rather than food grade.
For brewing, both malt is used, obtained by sprouting barley, rye or wheat grains, and malt extract, which is an evaporated or concentrated malt emulsion. The choice of malt undoubtedly affects the taste and aroma of the beer. In addition to the traditional varieties - wheat, barley and rye - there are other varieties of malt. Caramel malt gives the beer sweet notes, simmered malt can have honey notes, smoked concentrate produces a drink with a campfire aroma, roasted malt has a coffee-chocolate flavor, and melanoidin malt has a bright and unique taste.
Beer wort is a favorable environment for the proliferation of microorganisms, therefore all utensils used for brewing beer must be pre-sterilized. Strict hygiene rules must also be observed during the preparation process.

During brewing, beer needs to be saturated with oxygen, which is facilitated by intensive stirring and pouring the wort into the pan from a great height. However, during and after fermentation, aeration will only do harm, so while the beer is fermenting, it should not be disturbed - transferred, stirred or opened the lid unnecessarily. The only thing you can do is skim off the foam, which can later be used as yeast.
Many recipes contain completely unimaginable amounts of ingredients for beer, for example, 30 liters of water and 3 kg of malt. You can reduce the proportions depending on how much beer you need to brew.
Properly prepared beer bottled in plastic bottles can be stored for 2 to 6 months, depending on its strength. In glass bottles with corks, beer stays fresh for up to a year, and best ways storing homemade beer - in the cellar and refrigerator. However, if you have learned how to brew homemade beer, you won’t have to store it for long, since this tasty and aromatic drink always runs out very quickly!
Recipes
Homemade beer without malt
Ingredients: 10 liters of water, 1/3 cup of hops, 1 cup of liquid brewer's yeast, 0.5 liters of molasses.
Cooking method:
1. Pour water into a saucepan, add molasses, mix well, bring to a boil and cook until the smell of molasses disappears.
2. Dip hops wrapped in cheesecloth into the liquid and boil for 10 minutes.
3. When the contents have cooled, add liquid yeast to the pan and mix very thoroughly.
4. Pour the beer into bottles and leave without closing the lids until foam appears on the surface.
5. Remove the foam, cork the bottles and leave them in a cool place for 4 days.
Beer Khmelnoye
Ingredients: 900 g sugar, 90 g hops, 1 kg malt extract (or 8 kg malt), 9 l boiling water, 50 g brewer's yeast.
Cooking method:
1. Pour boiling water over sugar, hops and malt and cook for an hour.
2. Add water to the original volume (9 l) and introduce yeast.
3. Leave the liquid for 3 days in a sealed container at a temperature of 18-20 degrees.
4. Strain, bottle, cork, secure the caps with wire and store for a week in a cool place.
Any hop beer recipe can be used in home brewing. You can cook it in a very ordinary saucepan. The volume of the container should be at least 10-20 liters. The inherent bitterness of the drink is regulated by the dosage of hops. For its preparation, only dry cones are used. They are inflorescences of female plants that contain essential oils, as well as bitter resins that form the specific bitter taste of the drink.
Why do we need hops?
At home, most often, the drink is brewed from natural raw materials. In industrial production, granulated hops are used. It acts as a stabilizer in the product. It affects the color of the beer and its clarity. IN folk medicine Hop infusion is used to treat sore throat. This is due to the antibacterial properties of the plant.
The classic recipe for homemade hop beer is an express method for preparing the drink. The traditional dosage of plant cones is 20 grams per 10 liters of beer.
Attention. Hops is natural antiseptic and a preservative. It has a direct impact on the degree of foaming of the intoxicating drink.
A hop beer recipe in most cases consists of simple and readily available ingredients.
Recipe No. 1
The simplest and most accessible recipe for homemade hop beer includes:
- 50 grams of yeast;
- 10 liters of boiling water;
- 100 grams of dry hop cones;
- 600 grams of granulated sugar;
- 200 grams of caramel molasses;
- flour.
Preparation of the drink begins with mixing and grinding hops, flour and sugar. The resulting mixture is poured into an enamel pan and poured with boiling water. The raw materials brewed in this way are mixed and left to infuse for 3 hours. At the end of this process, the liquid is filtered, cooled and poured into a special barrel. Yeast and molasses are added to it. The resulting extract is mixed and left to ferment for three days.
The fermentation process takes place under a closed barrel lid.
At the end of the fermentation process, the drink is bottled, corked and placed in a cold place for one week to mature.
Recipe No. 2
The method of brewing the drink is suitable for those who want to learn how to prepare  high-quality drink at home quickly and without special equipment. The preparation process begins with boiling 16 cones in 5 liters of water for 1.5 hours. After which 250 grams of sugar dissolved in water are added to it and the whole thing is boiled for another 20 minutes.
The brewed drink is filtered and cooled until room temperature. Yeast is added to the cooled product, after which it is sent for fermentation. The fermented beer is filtered, bottled, corked and sent to age.
The advantage of this method of preparing beer is its simplicity. This is one of the options for brewing homemade beer from hops without malt.
Beer hopping
Traditional technology involves carrying out the process in 3 stages. When used to prepare a natural intoxicating drink malt, hops are added at the very beginning of wort boiling.
The first hopping of the wort is done to add bitterness to the beer.
The second time hops are added to the drink 20-30 minutes before the end of wort preparation. It gives the drink a hoppy taste. The third stage of adding hops occurs 5 minutes before the end of the cooking process. It enhances the hop aroma of the drink.
How to properly prepare raw materials?
Beer is brewed only from cones. Experienced brewers determine the time of their harvest by grinding  fruits between the palms. If a trace of green-yellow resin remains on them, having bad smell, this means that the cones can be collected. It is very important that the plant intended for collecting beer material is at least 1 year old.
Homemade beer lovers grow hops in their summer cottages. Every year this climbing plant is pruned at the root. The cones of the plant are picked by hand or cut with scissors. Their drying should take place very quickly short time. To do this, they are laid out in a thin layer on burlap, which is placed in the shade.
Store raw materials in canvas bags. In such containers, hops can retain their properties for 3 years. The storage location must be dry and well ventilated. Hops that have black spots or veins should absolutely not be used in brewing.
Why does beer need to mature?
During the maturation process, the beer extract is enriched with carbon dioxide. The fermentation of sugars and the end of the ripening process do not occur at the same time. At the stage of product ripening, the amount of aromatic substances in it decreases, and yeast precipitates.
The optimal temperature of the product when maturing beer prepared at home is 18-22 0 C. The best container for fermentation is a wooden barrel or an enamel pan. The ripening process takes place under a closed lid. The container is filled with extract 4/5 of the total volume. The average duration of the ripening stage is 1 week. After which the product is filtered, bottled, sealed and sent for storage.
Making homemade beer with hops:
