It’s good if, when installing the box, all the partitions are erected at once. But more often the room is divided after the roof is covered and windows and doors are installed. The partition in the bath between the steam room and the sink performs very important function, so the approach to its manufacture must be very careful.
Material selection
The partition can be made from almost any building material, which can withstand high temperatures, without highlighting harmful substances. It could be:
- Wood frame construction. This option is perfect for both a bathhouse assembled in the same way and for a brick building. It can be erected fairly quickly and is the easiest to insulate.
- From a log house. It is better to plan and install a partition of this kind during construction. This is important because it is necessary to carry out bandaging with the entire structure. Afterwards it is almost impossible to do this.
- Foam blocks and aerated concrete can be installed in brick buildings, as well as wooden ones, when the foundation for the partition was planned in advance.
- Made of brick. For these purposes, it is better to use red brick, which is fireproof and retains heat well.
- From glass. To do this, you will have to order a design for specific dimensions made of temperature-resistant material. This is the most effective option.
This type of partition is one of the best. Does not require additional care. There is also no need to carry out insulation, because... Wood itself is an excellent insulator.


Note! For the “paw” joint, the procedure will be similar, except for the binding itself. Typically, blanks for this joining method - blocks - are made at the initial stage for all logs. Next, a tip in the shape of a trapezoid is made on the log and a sample of the same shape is made on the beam that will be laid perpendicularly.

Frame
For this option you will need an edged board. Its size should be equal to the width of the future partition. It can be 200x100 mm, 200x150 mm, 150x100 mm, 100x50mm. The thicker the partition, the better the heat will be retained. In order to calculate how much material will be needed, it is necessary to calculate the perimeter of the partition. Next, add as many more supports as needed if they have to be placed in increments of 60 cm.


Note! When choosing this method, you also get excellent sound insulation. This is achieved by tightly packing the insulation inside the wall.
Brick

Note! As we have already said, you need to make a foundation for such a partition in advance.
It's better to stock up in advance required material. The masonry can be done in half a brick. This will save money and also reduce the overall weight of the entire structure. It is desirable that the sand that will be used to prepare the solution be dry. This will help you calculate the ratio correctly and will promote good adhesion.

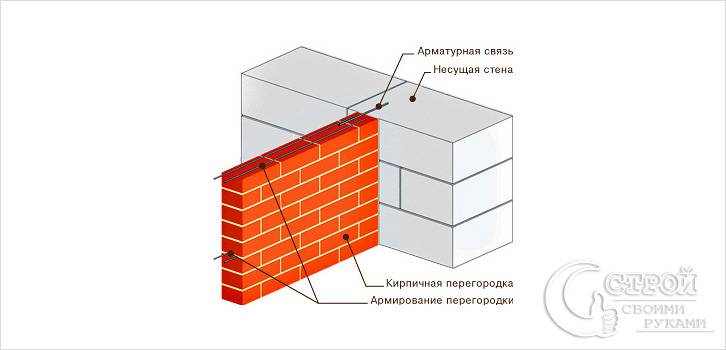
Note! To prevent the wall above the doorway from collapsing, it is important to lay several reinforcement rods. It is desirable that its diameter be from 12 mm. Its length should be at least 20 cm greater than the width of the opening. It is necessary to wall it up in the seam.
Foam block, aerated concrete

A partition wall made of this material is built according to the brick principle, but it has its own nuances.
- When purchasing, choose a material whose sides are as smooth as possible, this will make the whole process easier for you.
- It is better to use a special glue for the solution, which is more flexible and dries faster. If you want to prepare it yourself, then the proportions will be 4:1; in addition to sand and cement, you will also need a plasticizer and a foam additive (they need 50 grams per batch).
- The first row is tried on without glue. If one of the blocks needs to be trimmed, it is better to trim the two outer ones to the same size to get a good dressing.
- In the same way as in the previous case, ligation is carried out with load-bearing walls using reinforcement or metal plates.
- After two rows, a metal mesh is placed in the seam.
- The doorway and the partition above it are planned in the same way as in the previous version.
- Finishing is done using facing material or putty.

Note! Be sure to provide ventilation in all rooms. This will help prevent the growth of fungus and mold. To do this, you can install supply valves that will shut off. You can also install anemostats into the ceiling and draw leads from them through the ceiling to the roof.
Now you know how to make a partition in a bathhouse. There are no barriers to trying to build it yourself.
Video
The principle of installing partitions in wooden buildings is shown below:
The division of the internal space of the bathhouse is carried out using partitions. We will tell you about their types, features and structure in this article.
Designing partitions in a bathhouse

Before making partitions in the bathhouse, you need to determine the area of the planned premises. Their sizes depend on the dimensions of the building and the number of regular visitors. Based on these data, the plan relates the bulkheads to the existing walls of the bathhouse, indicating the axial dimensions. Then the location of the doorways and the amount of material required is determined.
The following can be used as partitions in a bath:
- Transformable structures - sliding, soft folding, rigid doors, sliding and screens.
- Stationary structures - brick, wood and glass partitions.
Each type of stationary bath partition has a number of advantages and disadvantages that must be taken into account when choosing the type and material of manufacture of a particular structure. Since the main part of the bath bulkheads is stationary, there is a need to talk about them in more detail.
Features of a brick partition in a bathhouse
Brick partitions are made not only in stone baths, but also in wooden log houses. This is especially true in cases where the furnace door of the furnace is removed from the steam room into the dressing room or rest room, and the dividing partition is combined with the heating device.
Advantages and disadvantages of brick partitions for baths

Their advantages are due to excellent physical characteristics:
- Brick partitions have good soundproofing properties. Half-brick bulkhead structures have a “noise” insulation index of 47 dB.
- Brick is a moisture-resistant material. With high-quality bath ventilation, the appearance of fungus and mold on such a partition is unlikely.
- Brick bulkheads are fire resistant and inedible by insects and rodents.
- Significant weight of the partition: with its thickness of half a brick, the mass of 1 m 2 of masonry is approximately 280 kg.
- Long production time for partitions made from piece material.
- The need to plaster the structure before finishing it.
The cost of 1 m 2 of brickwork is from $10 and above, the cost of work is from $7 per 1 m 2.
Installing a brick partition in a bathhouse

To construct such a partition, half-brick or brick masonry is used. Before starting work, you should stock up on: a sand sieve, a container for preparing the solution, a shovel, a hammer, a plumb line, a level and a trowel.
The installation process is carried out in the following sequence:
- The work site is cleared of unnecessary items and provided with lighting and necessary materials.
- The contours of the planned partition are outlined on the walls, floor and ceiling of the bathhouse.
- From sand and cement sifted using a sieve, a dry mixture is prepared in a ratio of 3:1, for example, 2 buckets of cement are taken for 6 buckets of sand. In the container, the resulting mixture is mixed with water until it becomes uniform and has a plastic consistency.
- Before starting work, the wooden covering must be removed from the floor, and the cladding from the walls at the junctions of the structures. Surfaces are cleaned with a wet broom.
- To lay the first row of masonry evenly, a cord is stretched along its edges, serving as a guide for the location of the bricks. The mortar of the first row is applied to the base of the partition, and the second and subsequent rows - to the surface of the previous row and the end part of the brick. The verticality of the masonry is controlled using a plumb line and a building level.
- The door frame in the partition opening is placed in advance and secured in it with the help of spacers, the brick is laid close to it.
- The partition is laid with ligation of the seams in the vertical direction. To achieve this effect, the second row of bricks must be started by laying half of the product.
- To ensure the strength of the masonry, every five rows of the mortar bed are reinforced with steel strips or rods.
- Above the door frame, as a lintel, you can install a piece of channel 30-40 cm longer than the width of the opening.
- The ceiling gap on the last row of masonry is eliminated by laying waste bricks soaked in mortar, small cracks are sealed with tow.
- To lay communications in a brick partition, it is necessary to provide for the installation of embedded sleeves. The material for them can be pieces of plastic pipes with a length corresponding to the thickness of the partition. The voids between the sleeves and the masonry are filled with polyurethane foam.
On the side of the washing compartment, the partitions are usually covered with tiles, which protect the brick from moisture. In the steam room, such a partition is insulated, sheathed with foil heat-reflecting and waterproof material, and then lined with natural wood.
Features of a wooden partition in a bathhouse
Wooden bulkheads can be single, double or framed. For baths, due to their “extreme” operating conditions, frame-sheathing structures are more suitable.
Pros and cons of wooden partitions for a bath

The advantages of such partitions are very significant:
- The material used to make them is environmentally friendly.
- The possibility of making a frame partition in the bathhouse with increased strength that can withstand more than 150 kg of load.
- Lightweight wooden partition. With a thickness of 150 mm, the weight of 1 m 2 of the structure is 90-92 kg.
- Good sound insulation, its index reaches 41 dB.
- Wooden structures are afraid of water, so they need waterproofing.
- The material of the partitions is edible for rodents and insects; impregnation of wood with antiseptics can eliminate this problem.
- Wooden partitions are flammable, their fire resistance is 0.2 hours. Partial protection against fire is impregnation of the partition elements with a fire retardant.
The cost of 1 m 2 of wooden partition ranges from $20 and above, it depends on the cladding material.
Construction of a wooden partition in a bathhouse
Let's consider the construction of a wooden partition between the steam room and the sink in the bathhouse. The step-by-step process looks like this:
- Assembly and fastening of the frame. This is the most labor-intensive stage of the work. For the frame, timber 50x50 mm or 50x100 mm is used, its assembly is carried out on site. Two bars for the ceiling and floor, with a length of each of them corresponding to the width of the partition, are fixed to the corresponding structures using dowels. The same should be done with the bars for the walls. They are cut to the height of the room and fixed between the floor and ceiling bars in increments of 600-120 mm. The doorway is formed using transverse bars. For rigidity, it is additionally equipped with intermediate posts on both sides.
- Insulation of the partition. Insulation is placed between the frame posts. The material for it can be basalt wool with a slab thickness of 50 mm and a width of 600 mm.
- On the insulation side of the steam room, the frame is sheathed with foil, the heat-reflecting side of which should face the inside of the room. The material is stapled to the frame posts. The seams between the panels are taped with metal tape.
- On the side of the washing compartment of the bathhouse, the insulation is covered with an Izospan-type waterproofing membrane. Its fastening and sealing of seams is carried out similarly to the previous option.
- Partition lining. To obtain a ventilation gap between the back side of the future sheathing and the waterproofing layer, thin slats 15 mm wide are placed across the racks. The lining is attached to them. The same operation is performed from the side of the steam room using foil material. All wooden frame elements must be treated with an antiseptic.
Features of a glass partition in a bath
Unlike Soviet times, today's glass partitions are a fashionable design element with a variety of decorative solutions.
Advantages and disadvantages of glass partitions

Modern glass partitions in a bathhouse can be made from glass blocks - a kind of transparent “bricks” made of glass 6-10 mm thick. Their surface can be corrugated, smooth, matte, transparent and colored.
Manufacturing glass partitions has certain advantages:
- The partitions look impressive, are durable, strong enough, and fire resistant.
- They have good heat and sound insulation characteristics.
- They transmit light, for transparent blocks this value is up to 80%, for matte and colored products - up to 50%. The patterns of corrugated blocks give a bizarre play of light and shadow.
- The material of glass partitions can withstand temperature changes from -40 to +50 degrees. In the event of a fire, a structure made of transparent blocks can contain the spread of smoke and flame for two hours.
- Glass partitions are easy to clean and do not absorb odors; they are not afraid of rodents and insects.
- The internal surface of the partitions excludes the laying of any communications - electrical wiring, plumbing, etc.
- You cannot hang shelves or pictures on a glass wall.
- A separate block is not cut when installing the partition.
The cost of glass blocks depends on their type. Industrial products are the cheapest, their price is 40-60 rubles/piece. Colored blocks are more expensive - 160 rubles/piece. The most expensive are blocks with a pattern obtained by sintering glass different colors. Their price is more than 1500 rubles/piece. The cost of installing a partition is more than $20 per 1 m2.
Installation of a glass partition in a bathhouse

Installing a glass partition is not an easy task for a beginner. For laying glass blocks, cement-sand mortars with a fine filler fraction or “liquid” nails are used. There are two installation methods: on adhesive cement mortar and in modular cells.
The first method is similar to bricklaying, it is quite labor-intensive and time-consuming:
- The base is cleaned of dust, debris and dirt, and then leveled.
- The first row of blocks is set by level. Plastic crosses are placed between them to create seams of the same thickness.
- The masonry is reinforced horizontally and vertically with iron rods with a diameter of 6 mm through two blocks. It is recommended to lay no more than 3 rows per day due to the weight of the products - the damp lower seams of the masonry may shift due to the weight.
How to make a partition in a bathhouse - watch the video:
The question of bath partitions is quite extensive. We hope that the information provided in the article will help you choose a material and even make a partition in the bathhouse with your own hands.
The bathhouse includes several separate rooms, which are separated by partitions. Thus, the partition in the bath between the steam room and the sink can be made of different materials. The installation method directly depends on the selected building material. This article will discuss some options for arranging partitions, as well as technologies for their installation.

There are several types of baths that are considered wooden:
- Made from rounded logs.
The partition in a log bath can be made using five-wall log technology. However, this will require a large amount of money and the help of qualified specialists. If this is not possible, you can make a partition from brick, gas blocks, etc.
Although we will look at different technologies for making a partition between a steam room and a washing room, the priority option in a wooden bath is a partition made of wood, while on the other hand, made of brick, it will be more durable and less susceptible to negative influence moisture.

A frame partition means a structure made of a wooden frame, which is insulated with mineral wool and covered with clapboard. The partition is mounted on a concrete curb. The process of installing a frame partition consists of several stages. Next, each stage will be considered in detail.

The first step is to make a border. Its height should be 100 mm and width 125 mm. This border is needed to strengthen the structure, as well as to lay it along ceramic tiles. It will completely isolate the tree from water. The threshold is made when pouring the screed (if the floor is concrete). You can also do this work during the installation of the partition. To do this, install formwork from boards. It is important not to forget about the presence of a doorway, according to the standard 940 mm. The base is treated with a deep penetration primer for better adhesion. To ensure that the poured border is not damaged, before pouring, drill holes inside the formwork and hammer in small pieces of wire or screw in dowels 1/2. When the poured concrete has dried, it is necessary to lay two layers of roofing material on top.
At the beginning preparatory work take a chainsaw and cut a groove measuring 4x21.5 cm in the walls. The height will depend on the room, but usually it is 250 cm.

At this stage, blanks for the base of the frame are first made. The dimensions should be as follows:
- 6x10x210 cm;
- 6×10×176 cm.
Drill holes in the blanks for anchors and lay the bars on the curb. So, the base of the partition is fixed to the floor with anchors. On average, each workpiece will require 3 anchors. The side posts are mounted in longitudinal grooves made in the walls and screwed in with screws. After this, you need to make a supporting frame for the structure. Place the outer stands, the size of which is 6x10x235 cm, on the base and secure with screws. Be sure to place a washer under each screw!
It is better to make the grooves in the racks longitudinal and oval. Due to this, the frame will not interfere with the shrinkage of the log house. The screws will slide along with the walls. As a result, there will be no interference during shrinkage of the log house. And the frame will also not be under load.
It's time to design the doorway. For the frame, place two vertical posts measuring 6x10x206 cm. Secure the frame frame with jumpers using self-tapping screws. As for the top beam of the frame, at the top it is necessary to leave a gap of 30 mm between the ceiling. Due to this, the expansion or settlement of the log house will be compensated. For this reason, the side grooves in the walls are made at full height.
The frame dimensions must be accurate. After all, the quality of the entire partition will depend on this. Therefore, before fixing this or that element, check the horizontal, vertical and dimensional conformity.

As for thermal insulation, for this you can use mineral wool 10 cm thick. Cells of 120 × 60 cm should be made in the frame. This size corresponds to the standard size of mineral wool slabs. The cotton wool is covered with polyethylene on both sides. It is secured with a stapler. These actions achieve several goals at once:
- Protection against moisture penetration.
- Thermal insulation.
- Noise insulation.
At the final stage of manufacturing the frame partition, the lining is attached to the sheathing (the sheathing is made from 2.5x5 cm beams). The lathing can be secured on top of the film and secured with self-tapping screws to the frame.

If the resulting opening has a size of 82x206 cm, then the frame should be 80x205 cm. So, there will be a gap of 1 cm on each side. When the frame is installed, fill all the cracks with foam. Cut off the excess frozen foam with a construction knife.
Considering the fact that the standard frame has a width of 11.5 cm, the open part of the opening should be covered with a planed board measuring 60x30 mm. It is very important that the plane of the outer edge of the lining matches the outer edges of the boards.

When the partition frame is ready, the washing room should be tiled. Although this process can be performed after laying the lining. Installation of the lining is very simple using the tongue-and-groove technology. The lower beam of the sheathing from the sink side is attached to the curb, and from the steam room to the floor. It only needs to be attached to vertical posts. The lining is attached to the sheathing using clamps.
The gap between the ceiling and the frame partition is sealed with any thermal insulation material. At the end of the work, it is also recommended to close each screw with wooden pins of a suitable size.
Skirting boards, trim and final finishing

This is the technology used to install a frame partition between the steam room and the washing room. If you follow it step by step, you will succeed.

Another method of separating the steam room and the washing room is to build a brick partition. There are two ways to lay bricks:
- Spoon masonry in 1/2 brick.
- A whole brick.
Considering the weight of the brick, the partition will be very massive. Therefore, to reduce the weight of the structure, use hollow bricks.
Below will be given detailed instructions how to make a brick partition.
Preparation
The first step is to do all the preparatory work. You should start from the work surface. It is necessary to remove all plank elements from the floor, right down to the foundation. Sweep the base with a broom and wet it. It is also necessary to equip the work area with good lighting. Excess items should be removed. At the end of the preparatory work, you outline the contours of the future structure.

To work with cement mortar, you will need:
- Sander;
- sieve;
- shovel;
- mixing container.
So, first you sift the sand from foreign objects. The mesh should have small cells. Next, place the container for mixing the solution so that it has a stable base. Mixing ratio 3:1. To prevent the solution from drying out, make a small batch, for example, two buckets of cement and six buckets of sand. It must be mixed with water. This volume of solution will be enough for you to work for an hour. The consistency of the mixture should resemble thick sour cream.
During work, the solution tends to shrink and harden. Don't rush to add water. It is enough to stir every 10–15 minutes.

For construction you will need the following set of tools:
- level;
- plumb line;
- rule;
- trowel;
- pick.
The entire work process follows this scenario:
- Stretch the rope as a guide. Lay out the solution and use a trowel to level it. It takes some time for it to set.
- Place a second layer on top of it and begin laying the first row of bricks.
- Place the first brick against the wall. Apply the solution to its end part and press it against the wall. Align the brick along the stretched rope, lightly tapping it. Immediately remove excess solution.
- When laying brick, you immediately need to decide where the doorway will be. It must be installed immediately. It should be leveled and only then covered with bricks.
- The brick should be laid close to the box. For ligation with the frame, you can use metal plates or reinforcement. One end is screwed to the frame, and the other between the brick row.
When the first row is ready, the subsequent ones are laid according to this principle. Be sure to check each row for level.
The use of dressing is an important condition. In this case, the existing load will be evenly distributed, and the partition itself will be quite strong. To further strengthen the masonry, place reinforcement or metal strips in the seam every five rows.
A similar connection must be made to the wall. A channel for reinforcement is installed on top of the door frame. Fill the gap between the ceiling and the last row of masonry with scrap bricks and mortar. As you can see, there are no special secrets when building a brick partition. All the work can be done with your own hands. The only thing you need to consider is a few important nuances:
- If you do not plan to plaster the wall, then the quality of the masonry should be appropriate. If plaster is applied, then it is important to monitor only the vertical level of the wall.
- If the wall is to be plastered, craftsmen often use used bricks. This reduces several times financial expenses for the purchase of material.
- If you plan to carry out certain communications through the partition, then you can install a small piece of plastic pipe into the wall. Its diameter must correspond to the actual need. In this case, there is no need to cover the pipe with solution; you just need to blow it out with foam. This is important, because after a while something may change and thanks to this the structure of the wall will not be disturbed.

Building materials such as foam block or aerated concrete are very popular. A partition made of foam block is made much faster, unlike brick. The standard size of one block is 300×600 mm. When it comes to thickness, there is a wide choice. As a rule, blocks with a thickness of 75, 100 and 150 mm are chosen for the construction of partitions.
Depending on the thickness of the foam block, the price will vary. Therefore, to calculate your budget, think about this nuance in advance.
The process of manufacturing a partition from aerated concrete has several successive stages, compliance with which will help you complete all the work yourself.
Marking
Just as with brickwork, the floor and walls should be prepared. Next, mark the doorway and pull the cord. In accordance with the markings without mortar, lay out the first row and, if necessary, cut the block to size. Afterwards, you remove the blocks and waterproof the masonry site.
You can cut foam blocks with a grinder or a hacksaw. If these tools are not available, a regular hacksaw will do.

Special glue is used for laying gas blocks. The glue is mixed using an electric drill with a mixer attachment. Apply the adhesive mixture to the blocks in a layer of 3 mm. Next, install the block and lightly tap it. Be sure to check the vertical/horizontal level. For better strength, move the block 1/2 and start the second row of masonry. When connecting the partition to the wall, perform the dressing, just as in the case of brickwork. To do this, make holes in the wall up to 5 cm, and place the blocks directly on them. This dressing can be done every 4-5 rows.
Before laying the last row, lay out reinforcement Ø1.6 cm along the entire length of the partition. On top of it is a layer of glue and the last row of blocks to the ceiling. This will serve as a kind of armored belt.

Before plastering, carry out all necessary communications. Next, install the beacons and perform plastering. As a solution, you can use the same mixture as for masonry. When the plaster has dried, the surface is puttied and painted or covered with decorative tiles.
By observing this simple diagram, you won't have any special problems. Please note the following useful tips:
- When buying blocks, pay attention to the quality of the product. The smoother they are, the easier it will be to process them.
- The density of the blocks does not matter. The size of the blocks depends on the specific room.
- It is better to buy those blocks whose production is based on cutting.
- To increase the density of the masonry, wet the blocks before laying.
- To avoid a vertical seam, offset each row by 1/2 block.
- Leave a small gap between the partition and the wall and fill it with foam.
Glass partition

For beginners, installing a glass partition is not an easy task. If you decide to use glass blocks, then their installation is carried out using mortar or liquid nails. Glass partitions are also installed in modular cells.
If you decide to lay a glass partition according to the principle of bricklaying, then the work looks like this:
- Clean the base of the floor from dirt, dust and debris. Level the floor and, if necessary, perform a small screed.
- Lay out the first row of glass blocks strictly according to the level. To ensure that the seams are the same, place a plastic cross in each seam.
- Reinforce the masonry vertically and horizontally, every 2 rows, with iron rods Ø6 mm.
As for the method of installing a glass partition in cellular grilles, everything is much simpler here. Cells can be made of wood, MDF and plastic. They are attached to the ceiling, wall and floor. The blocks themselves are installed on a sealant, the base of which should be rubber.
So we've looked at possible options making a partition between the steam room and the washing room. If you have carried out such work, then share your experience with our readers by leaving comments at the end of this article.
Video
From the video provided, you can learn about some details of the finishing of the steam room:
The partition between the washing and steaming compartments of the bath can be made in several ways. The most common option is the manufacture of a wooden frame; in second place is a solid timber partition, the manufacture of which is quite expensive. And the last way to separate two rooms involves arranging a solid brick wall half a brick thick.
Optimal partition design
We will consider a frame partition made of wood as the easiest to manufacture. Metal racks are also used as the basis of the frame partition, but this option is used much less frequently, since the metal is prone to destruction under prolonged exposure to high humidity.
A wooden partition is made quickly enough and does not require large financial and labor costs, in comparison with solid walls made of timber or brick. At the same time, the air space in the voids between the frame elements causes condensation to form at the points of temperature difference between the heated steam room and the colder air inside the partition.
An important question when choosing the type of partition is to insulate it or not? Here again we can return to comparing different types of piers. In front of a solid partition made of timber, brick or block, this question does not arise at all. The dense material of such walls itself will sufficiently protect the washing compartment from overheating. At the same time, it does not have high enough thermal insulation properties to prevent heat from leaking into the washing room at all.
How to make a partition with your own hands?
The first step is to make a wooden frame, when arranging it Special attention you need to pay attention to its attachment to the walls. This is important when the bathhouse is made of fresh timber or logs. These types of buildings inevitably shrink over time, which must be taken into account when creating any internal partitions.
The partition in the photo above is installed on the walls using special metal fasteners designed to create a so-called “sliding partition”. The corner is fixed motionless on the partition block, and installation to the log house wall is carried out using stainless steel screws so that they can move inside the vertical fastening groove.
An alternative would be to install a wooden sliding structure, without the use of metal corners.
The partition is fixed to the ceiling with a metal fastener with vertical grooves. By analogy with wall corners, stainless steel screws are screwed into them, which over time will move along these grooves.
A foil vapor barrier on kraft paper is laid on top of the wooden frame on the steam room side. All joints of the material are sealed with foil tape. There should be no unclosed holes or damage in the vapor barrier layer to prevent moisture from penetrating into the wall.
As you can see in the photo, the surface of the wall near the floor has a small plinth made of tiles. The tiles are mounted on top of SML or DSP boards using special glue. The slabs are attached directly to the frame or to a sliding structure if there are abutments to the walls of the log house.
The finishing of the partition from the steam room side is installed on the lathing, in in this case this is a lining.
An important point is where the walls meet the floor. Here you need to carefully ensure that the vapor barrier layer is continuous.
To insulate or not?
About frame insulation It is worth saying that here you should look at the circumstances, taking into account the characteristics of a particular bathhouse. First of all, you need to determine how much the washing room needs to be warmed up. If in the design of the bathhouse the washing room along the perimeter of the external walls has good thermal protection or a brick shield or part of a brick steam room stove is placed in the wall between the washing room and the steam room, then it is obvious that the washing room does not need additional heating.
If there is no need to additionally heat the washing room, thermal insulation can be placed in the frame between it and the steam room. This will make it possible to retain more heat in the steam room, as a result of which it will warm up faster and cool down more slowly. In addition, the use of an insulated partition guarantees protection of the sink from overheating, which often happens in bathhouses that have good thermal insulation of the outer walls of the structure.
In the bathhouse, both the washing room and the steam room have high humidity and in each of these rooms, as a rule, a vapor-proof film is installed to protect the wooden frame from large quantity moisture in the air of both compartments. If there are mineral wool slabs in the wall, then even if a sealed protection from moisture is created on both sides, they will still collect moisture, and there is nowhere to evaporate it.
Thus, we can conclude that if sufficient thermal insulation of the washroom from overheating is needed, you should install a solid partition made of timber or thick boards without cracks and free space inside the wall. This design will isolate the washing room from active heat coming from the steam room and will not create a danger of excessive condensation.
The lack of insulation in the wall in most bathhouse buildings is rather a necessity. This is due to the fact that it is the steam room that actively warms up the entire building and the washing room needs heat no less than other rooms, but rather even more. The wash compartment, as a rule, is colder than we would like, and the heat coming from the steam room just compensates for this shortcoming.
The partition between the sink and the steam room in the bathhouse is the optimal design
The partition between the sink and the steam room in the bathhouse can be made in several ways. The most common option is the manufacture of a wooden frame, in second place is a solid timber partition
How to make a partition in a bathhouse
A partition is a special structure that divides a common room into its individual parts, such as rooms or compartments. At the same time, the materials used to manufacture the main frame and its walls may differ significantly from each other. Proper manufacturing of bulkheads ensures that the basic style of the structure is preserved.
Designing partitions in a bathhouse
Before making partitions in the bathhouse, you need to determine the area of the planned premises. Their sizes depend on the dimensions of the building and the number of regular visitors. Based on these data, the plan relates the bulkheads to the existing walls of the bathhouse, indicating the axial dimensions. Then the location of the doorways and the amount of material required is determined.
- Transformable structures - sliding, soft folding, rigid doors, sliding and screens.
The type of planned partition depends on the requirements for it. If the space of the bathhouse is divided for a long time while ensuring reliable thermal and sound insulation of the premises, a durable stationary partition design is used. In other cases, you can get by with mobile or collapsible versions, for example, to separate the locker room from the bathhouse rest room combined with it.
Features of a brick partition in a bathhouse
Advantages and disadvantages of brick partitions for baths

Their advantages are due to excellent physical characteristics:
- Brick partitions have good soundproofing properties. Half-brick bulkhead structures have a “noise” insulation index of 47 dB.
The disadvantages include:
- Significant weight of the partition: with its thickness of half a brick, the mass of 1 m 2 of masonry is approximately 280 kg.
Installing a brick partition in a bathhouse

To construct such a partition, half-brick or brick masonry is used. Before starting work, you should stock up on: a sand sieve, a container for preparing the solution, a shovel, a hammer, a plumb line, a level and a trowel.
- The work site is cleared of unnecessary items and provided with lighting and necessary materials.
If the brick partition located in the bathhouse needs to be plastered, you don’t have to pay attention to the masonry seams. But if it will serve as a natural element of the design of the room, it is necessary to carry out jointing of the masonry with special care with a special tool.
Features of a wooden partition in a bathhouse
Pros and cons of wooden partitions for a bath

The advantages of such partitions are very significant:
- The material used to make them is environmentally friendly.
There are also disadvantages:
- Wooden structures are afraid of water, so they need waterproofing.
- Read the review complex means for hemorrhoids Proctonol
- How to lose weight by 20 kg – real reviews about Guarchibao
Construction of a wooden partition in a bathhouse
Let's consider the construction of a wooden partition between the steam room and the sink in the bathhouse. The step-by-step process looks like this:
- Assembly and fastening of the frame. This is the most labor-intensive stage of the work. For the frame, timber 50x50 mm or 50x100 mm is used, its assembly is carried out on site. Two bars for the ceiling and floor, with a length of each of them corresponding to the width of the partition, are fixed to the corresponding structures using dowels. The same should be done with the bars for the walls. They are cut to the height of the room and fixed between the floor and ceiling bars in increments of 600-120 mm. The doorway is formed using transverse bars. For rigidity, it is additionally equipped with intermediate posts on both sides.
Such a wooden partition in a bathhouse can be installed in one day.
Features of a glass partition in a bath
Advantages and disadvantages of glass partitions

Modern glass partitions in a bathhouse can be made from glass blocks - a kind of transparent “bricks” made of glass 6-10 mm thick. Their surface can be corrugated, smooth, matte, transparent and colored.
- The partitions look impressive, are durable, strong enough, and fire resistant.
Despite the outstanding advantages, there are also disadvantages of glass partitions:
- The internal surface of the partitions excludes the laying of any communications - electrical wiring, plumbing, etc.
Installation of a glass partition in a bathhouse

Installing a glass partition is not an easy task for a beginner. For laying glass blocks, cement-sand mortars with a fine filler fraction or “liquid” nails are used. There are two installation methods: on adhesive cement mortar and in modular cells.
- The base is cleaned of dust, debris and dirt, and then leveled.
The second method works faster. Cellular grids made of plastic, MDF or wood are attached to walls, ceilings and floors. They are then filled with blocks using sealant or rubber gaskets.
The question of bath partitions is quite extensive. We hope that the information provided in the article will help you choose a material and even make a partition in the bathhouse with your own hands.
Do-it-yourself partition in the bathhouse
The division of the internal space of the bathhouse is carried out using partitions. We will tell you about their types, features and structure in this article. Contents: Design of partitions in
Since the steam room and the sink perform completely different missions, special attention should be paid to how to make partitions in the bathhouse.
First of all, you need to decide on the material from which the intermediate wall will be built, be it wood, brick or foam block.
The choice of material for the partition depends on the style in which the entire bath room is made and what type of heating is used in it.
Wooden partition

Wooden partition in the bathhouse
If the main material used in the construction of the bathhouse is wood, then a partition should be built from it.
To perform this work, you will need beams up to five centimeters thick, with a cross-section of at least 5x5 centimeters.
This will provide good insulation of moisture and heat, and not just a screen that blocks visibility into the adjacent room.
To make a wooden partition with your own hands, you need to follow the step-by-step instructions:
- First of all, you need to take measurements and mark on the surface of the walls and ceiling, using straight lines, where the middle of the partition is located.
- Then the main frame is made from the beams. It is better to connect wooden boards into a structure and attach them to the walls using tenons and a drill. If this is not possible, regular wood screws or nails without heads will also work. Between the bars you need to leave about eighty centimeters of free space.
- Wooden boards are attached to the manufactured frame. For this, the same materials are used as for making the frame - self-tapping screws or nails without heads (another option is wooden lining).
- Sheathing with boards should be done on both sides of the frame. To provide better insulation of heat and moisture, you can fill the empty space of the partition with mineral wool. Thanks to it, the dressing room will be a cool room, and the steam room will retain valuable heat.
To build a partition in a bathhouse, it is better to use boards from deciduous trees such as aspen or linden. They need to be processed before use. by special means antiseptic action.
The most important thing in constructing a wooden partition is to assemble the frame correctly. The stability and functionality of the entire structure depends on how smooth and proportional the frame frame is.
To make the partition more stable and durable, at the very beginning of its construction you can make a small concrete threshold, reaching no more than fifteen centimeters in height and twelve centimeters in width. If you make a strong frame and securely cover it with boards, you can attach hangers to the partition and place towels, bathrobes and other things on them.
Brick partition

Brick partition
If you want to make a partition from brick, you can use the laying of whole material or the spoon method of placing blocks (0.5 bricks).
To prevent the wall from being too heavy, you can use hollow bricks.
However, it must be resistant to high temperatures and high humidity.
Therefore, in the construction of a bathhouse and partitions in it, it is better to use red bricks rather than silicate bricks.
How to make partitions in a bathhouse with your own hands is explained in the following step-by-step instructions:
- First, if the floor is covered with planks, they must be removed to reach the foundation. The entire surface on which work will be carried out must be cleared of excess items and swept with a damp broom.
- The room is prepared for work - good lighting is provided, working tools are prepared.
- The contours of the partitions are outlined.
- The solution is mixed. To do this, you need to use a sieve, a grinder, a shovel and a mixing container. The mixing ratio is 3:1 (for example, three buckets of sand and one bucket of cement). Water should be added until the mixture reaches a creamy consistency. To avoid premature hardening of the solution, it should be stirred regularly, but no more water should be added.
- The partition is erected using a level, a pick, a trowel, a plumb line and a rule. To make the wall even, you should stretch the string. First, two layers of mortar are applied to the floor, and then you can begin to lay out the brick. You need to start work from the wall. To make the structure more durable and firmly connected to the main walls, during masonry you need to use strips of metal or reinforcement rods.
- The second row should start with a half brick. And the third - from the whole, and so alternate them constantly.
In the case where a brick wall plays an integral role in maintaining the interior of the room, it should be laid out carefully, always removing excess mortar in time to prevent it from drying out. But when the wall decoration completely covers the brick base, then you don’t have to worry too much about appearance seams between rows and individual blocks.
When you plan to apply a layer of plaster to a brick partition, you can even use used bricks for construction, which will significantly save money.
If the partition has doors, their frame should be installed before bricklaying begins.
Foam block partition
One of the generally accepted options for making partitions in a bath between the steam room and the sink is to lay it out of a foam block.
Advantages of using foam blocks:
- They have much less weight than bricks.
- Foam blocks are produced large sizes, due to which the laying of walls with their use progresses very quickly.
- This material has a fairly low cost.
The standard dimensions of the foam block are 30x60x30 centimeters. There are also other solutions for the width, height and length of the blocks, depending on the room in which they are planned to be used.
The process of creating a partition from a foam block is similar to brickwork. But there are some differences in it. The work process is as follows:
- The surface of the floor and walls should be prepared In a similar way, as for brickwork. Then you need to stretch the cord along which the wall will be oriented and outline the contours of the doorway.
- The first row of blocks should first be laid out dry. To ensure the width required in the bathhouse, foam blocks can be sawed using a grinder or a hacksaw.
- It is used as a gluing solution for laying foam blocks. special composition, which is diluted according to the instructions. A construction mixer is used to mix it.
- Approximately three millimeters of adhesive mixture should be applied to the surface of the block. After this, it is installed in its place in the row. For the strength of the partition, the second row should start with a half block, and the third - with a whole one, and alternate them to the very top.
- To connect the partition more firmly to the main walls, you need to use reinforcement or large nails. They should be inserted into holes in the wall (made in advance), lubricated with an adhesive solution. The length of the reinforcement must be at least five centimeters.
- When the partition is laid out to the level of the top crossbar of the door jambs, two reinforcement rods (1.6 centimeters in diameter) should be laid. They must be at least ten centimeters larger than the width of the opening. Then the next row of foam blocks is laid on top of these metal additions, right up to the ceiling.
You can plaster a foam block partition with the same adhesive mixture that was used to connect the rows. If there is such a need, you can create paths for installing communications such as electricity or plumbing.
When the work with plaster is completed, the partition needs to be dried, puttied, painted and covered with tiles that will decorate the bath room and make staying in it as comfortable as possible.
If the partition is constructed not from a solid foam block, but from a half-block, then its weight will be light. In this case, it is possible to install the structure on a wooden floor without tearing down the boards right down to the foundation.
In order for the construction of a partition from foam blocks to be successful, it is advisable to take into account a few more valuable tips:
- When purchasing foam blocks, you should pay special attention to their surface. If it is even and smooth, the finishing will go faster and will be done with better quality.
- Calculating the size of the blocks depends entirely on the type of room in which they will be used. When constructing a partition in a bathhouse, it is better to use light and less wide blocks. In this case, the density of this material does not matter.
- Blocks obtained by cutting are considered to be of higher quality. This manufacturing technology is now more developed and progressive.
- To make the masonry more dense, it is better to moisten the blocks with water before starting it.
- In order for the partition to be strong and durable, it should not have continuous vertical seams. To do this, blocks or bricks should be shifted in each new row.
- At the top of the structure, between the last row of the foam block and the ceiling, it is better to leave an opening up to ten centimeters wide. At the end of the work, it should be closed using polyurethane foam.

Decorating the partition with stone
In many ways, the choice of material for the partition depends on the heating method in the bathhouse.
If it is a brick oven, then it must be supplemented with a wall made of the same material.
If the bathhouse is heated with an iron stove, then a wooden structure is also perfect.
But in this case, it must be located at a distance of more than ten centimeters from the heating center.
How to make partitions in a bathhouse strong and beautiful: best options and methods for their implementation
There are several options for making bath partitions beautiful and durable. The technology for their construction is quite simple, the main thing is to follow a few
Partition in the bath between the steam room and the sink

It’s good if, when installing the box, all the partitions are erected at once. But more often the room is divided after the roof is covered and windows and doors are installed. The partition in the bath between the steam room and the sink performs a very important function, so the approach to its manufacture must be very careful.
Material selection
The partition can be made from almost any building material that can withstand high temperatures without emitting harmful substances. It could be:
- Wood frame construction. This option is perfect for both a bathhouse assembled in the same way and a brick structure. It can be erected fairly quickly and is the easiest to insulate.
- From a log house. It is better to plan and install a partition of this kind during construction. This is important because it is necessary to carry out bandaging with the entire structure. Afterwards it is almost impossible to do this.
- Foam blocks and aerated concrete can be installed in brick buildings, as well as wooden ones, when the foundation for the partition was planned in advance.
- Made of brick. For these purposes, it is better to use red brick, which is fireproof and retains heat well.
- From glass. To do this, you will have to order a design for specific dimensions made of temperature-resistant material. This is the most effective option.

This type of partition is one of the best. Does not require additional care. There is also no need to carry out insulation, because... Wood itself is an excellent insulator.
- When laying the foundation, you need to provide an additional lintel on which the partition will stand. If it is a pile or columnar foundation, then supports should be located under the partition every 1-1.5 m.
- Logs are being prepared that will match the future wall. The length must be calculated taking into account the presence of the doorway.
- The method of articulation with load-bearing walls will correspond to that chosen for the overall structure. If this is a “bowl” connection, then the partition will be mounted in the same way.
- The first crown is specially trimmed a little from the base side in order to be more stable. After strengthening the casing, the installation of the partition wall begins immediately.
For this option you will need an edged board. Its size should be equal to the width of the future partition. It can be 200x100 mm, 200x150 mm, 150x100 mm, 100x50mm. The thicker the partition, the better the heat will be retained. In order to calculate how much material will be needed, it is necessary to calculate the perimeter of the partition. Next, add as many more supports as needed if they have to be placed in increments of 60 cm.
- If, when laying the foundation, a supporting part was provided for the internal wall, then waterproofing must be done before starting installation. To do this, lay a double layer of roofing material or bikrost.
- For a brick building, it is necessary to additionally make a threshold that will prevent water from flowing from one room to another. The height of the threshold must be at least 10 cm. In order for it to be securely intertwined, it is necessary to drill holes with a diameter of 8 mm along its length and lay pieces of reinforcement in them. After setting up the formwork and pouring the solution.
- Next, the bottom board is laid according to size. It is mounted to the base using dowels. At the same time, it is advisable to comply horizontal plane. You can determine it with a building level or a laser level.
It is better to stock up on all the necessary material in advance. The masonry can be done in half a brick. This will save money and also reduce the overall weight of the entire structure. It is desirable that the sand that will be used to prepare the solution be dry. This will help you calculate the ratio correctly and will promote good adhesion.
- The level of the surface on which the laying will be carried out is checked. Using a laser level, a line is projected onto two walls and the distance to the floor is measured from it. If the difference is up to 10 mm, then it can be compensated by thickening the seam in some places in the first rows. If the difference is larger, it will be necessary to perform equalization.
- A wooden frame is installed in the shape of the future door. It will serve as a guide.
Foam block, aerated concrete
A partition wall made of this material is built according to the brick principle, but it has its own nuances.
- When purchasing, choose a material whose sides are as smooth as possible, this will make the whole process easier for you.
- It is better to use a special glue for the solution, which is more flexible and dries faster. If you want to prepare it yourself, then the proportions will be 4:1; in addition to sand and cement, you will also need a plasticizer and a foam additive (they need 50 grams per batch).
- The first row is tried on without glue. If one of the blocks needs to be trimmed, it is better to trim the two outer ones to the same size to get a good dressing.
- In the same way as in the previous case, ligation is carried out with load-bearing walls using reinforcement or metal plates.
- After two rows, a metal mesh is placed in the seam.
- The doorway and the partition above it are planned in the same way as in the previous version.
- Finishing is done using facing material or putty.
Now you know how to make a partition in a bathhouse. There are no barriers to trying to build it yourself.
Partition in the bath between the steam room and the sink - how to make a partition
Find out how to build a partition between the steam room and the sink. Partition made of brick, foam blocks, log house.
Suppose you came to a restaurant, had a good time, but when the bill arrived, you were surprised to learn that it was impossible to pay with a card. There can be different reasons, for example, the terminal is broken, communication problems, etc. If you have a sufficient amount of money in your wallet, all this is not critical; it is much worse if the wallet is empty and there are no ATMs nearby. The nuances of this situation were highlighted by trial lawyer Denis Ulyanov.
Does a visitor have the right not to pay if he was not informed in advance about the impossibility of paying with a card due to technical problems?
Denis Ulyanov: Of course not. You have to pay for any service. To avoid getting into trouble, it is better to immediately ask about possible ways payment. After all, a small cafe can operate without a terminal at all; technical failures can occur in any establishment.
If it’s a long way to get to an ATM, you can leave a receipt - a document that will indicate the amount of debt, the term of settlement with the institution and the service to be paid. However, this option will only work with the consent of the cafe representative.
- Does it make sense to complain about a restaurant that has problems with the terminal?
Of course, you can complain to Rospotrebnadzor, but this will not scare the restaurant administration. Rospotrebnadzor employees will most likely call the establishment and recommend that they warn customers in case of problems with the terminal, which is what the sanctions will be limited to. It’s another matter if the establishment does not have a cash register at all: in this case, it may be closed.
- It turns out that the administration is not responsible for failures in the operation of the terminal?
A serious violation can only be recorded if cards are not accepted on a regular basis, although they should be.
Let's assume we are talking about systemic violations. For example, they refuse to accept cards every weekend, when the flow of visitors is maximum. What to do then?
This is quite possible, since transactions by Russian banks cost restaurants 1.5-3%. If they simply don’t want to accept the card, and the broken terminal is a fictitious reason, then the actions of the staff are illegal. You can look for the truth in Rospotrebnadzor, but it is advisable to have documented facts that violations are systematically occurring in the establishment.
Sometimes, after reporting a non-working terminal, the client is offered to use an ATM that is located nearby, but will not service the visitor’s card for free. Is it possible to ask the staff to reimburse the cash withdrawal fee?
Unfortunately no. The commission is your problem. If you don’t want extra expenses, look for a free ATM or try to negotiate differently.
One of alternative options- this is Sberbank-online, but in this case you will have to do without a check. Is this justified?
If you transfer money through Sberbank-online, you will not receive a confirmation document. Although in practice, people often prioritize convenience of payment, so they do without formalities.
- What risks could there be in this case?
The client puts himself at a disadvantage because he may later be told that there was no payment. But this is theoretical. In practice, people willingly use online transfers; I also sometimes pay for taxi rides this way.
If we are talking about a large amount, it is still advisable to exercise caution. Suppose a person paid for a serious purchase in a store using an online transfer, but then it turned out that the product was defective. In this case, it will be difficult to return the money spent, because you will have to prove the fact of purchase in this store. And without a warranty card and a cash receipt, this will be problematic.
- It turns out that a non-working terminal is solely a problem for clients?
You can't say that either. You just need to be careful. If you come to a new restaurant, it is better to immediately ask if their terminal works. It’s even better to take cash with you in addition to the card.
