IR receivers of infrared radiation have become widespread in television, household, medical equipment and other equipment. They can be seen in almost any type of electronic equipment; they are controlled using a remote control.

Typically, an IR receiver microassembly has three or more pins. One is common and is connected to the power supply minus GND, the other to the plus V s, and the third is the output of the received signal Out.

Unlike a standard IR photodiode, an IR receiver is capable of not only receiving, but also processing an infrared signal in the form of pulses of a fixed frequency and a given duration. This protects the device from false alarms, background radiation and interference from other household appliances emitting in the IR range. Fluorescent energy-saving lamps with an electronic ballast circuit can create quite strong interference for the receiver.
The microassembly of a typical IR radiation receiver includes: PIN photodiode, variable amplifier, bandpass filter, amplitude detector, integrating filter, threshold device, output transistor

A PIN photodiode is from the family of photodiodes, in which another region of its own semiconductor (i-region) is created between the n and p regions - this is essentially a layer of pure semiconductor without impurities. It is this that gives the PIN diode its special properties. In the normal state, no current flows through the PIN photodiode, since it is connected to the circuit in the opposite direction. When electron-hole pairs are generated in the i-region under the influence of external IR radiation, current begins to flow through the diode. Which then goes to a variable amplifier.
Then the signal from the amplifier goes to a bandpass filter that protects against interference in the IR range. The bandpass filter is set to a strictly fixed frequency. Typically, filters are used that are set to a frequency of 30; 33; 36; 36.7; 38; 40; 56 and 455 kilohertz. In order for the signal emitted by the remote control to be received by the IR receiver, it must be modulated with the same frequency to which the filter is configured.
After the filter, the signal goes to an amplitude detector and an integrating filter. The latter is necessary to block short single signal bursts that may appear from interference. Next, the signal goes to the threshold device and the output transistor. For stable operation, the amplifier's gain is adjusted by an automatic gain control (AGC) system.

The housings of IR modules are made of a special shape that facilitates focusing of the received radiation onto the sensitive surface of the photocell. The housing material transmits radiation with a strictly defined wavelength from 830 to 1100 nm. Thus, the device uses an optical filter. To protect internal elements from external influences. fields an electrostatic screen is used.
Below we will consider the operation of an IR receiver circuit, which can be used in many amateur radio developments.
There are different types and designs of IR receivers depending on the wavelength, voltage, packet of transmitted data, etc.
When using a circuit in combination with an infrared transmitter and receiver, the wavelength of the receiver must necessarily match the wavelength of the IR transmitter. Let's consider one of these schemes.

The circuit consists of an IR phototransistor, a diode, a field effect transistor, a potentiometer and an LED. When the phototransistor receives any infrared radiation, current flows through it and the field effect transistor turns on. Next, the LED lights up, instead of which another load can be connected. A potentiometer is used to control the sensitivity of the phototransistor.
Checking the IR Receiver |
Since the IR signal receiver is a specialized microassembly, in order to ensure its operation it is necessary to apply a supply voltage to the microcircuit, usually 5 volts. The current consumption will be about 0.4 - 1.5 mA.
If the receiver does not receive a signal, then in the pauses between bursts of pulses the voltage at its output practically corresponds to the supply voltage. It's between GND and the output signal output can be measured using any digital multimeter. It is also recommended to measure the current consumed by the microcircuit. If it exceeds the standard one (see the reference book), then most likely the microcircuit is defective.
So, before starting the module test, be sure to determine the pinout of its outputs. Usually this information is easy to find in our mega-directory of electronics datasheets. You can download it by clicking on the picture on the right.
Let's check it on the TSOP31236 chip; its pinout corresponds to the figure above. We connect the positive terminal from the homemade power supply to the positive terminal of the IR module (Vs), and the negative terminal to the GND terminal. And we connect the third OUT pin to the positive probe of the multimeter. We connect the negative probe to the common GND wire. Switch the multimeter to DC voltage mode at 20 V.

As soon as packets of infrared pulses from the IR microassembly begin to arrive at the photodiode, the voltage at its output will drop by several hundred millivolts. In this case, it will be clearly visible how the value on the multimeter screen decreases from 5.03 volts to 4.57. If we release the remote control button, the screen will again display 5 volts.
As you can see, the IR radiation receiver responds correctly to the signal from the remote control. This means the module is OK. In a similar way, you can check any modules in an integrated design.
Now many people have satellite dishes for receiving television, this is especially common in rural areas. A satellite television reception system usually consists of an antenna (“dish”) and a receiver located indoors. All tasks of the radio channel for signal reception fall on this receiver, and the TV only actually works as a monitor.
The disadvantage of the system is that you can only connect one TV, or you need to buy a separate receiver for each TV, which is very expensive. Although, of course, you can easily connect two or even three TVs to one receiver, through a simple splitter, which is what everyone usually does, but they will show the same thing.
However, you can put up with this, the other thing is bad - in order to change the channel you will need to run to where the receiver is installed. This is especially unpleasant in a country house, where the receiver and additional TV may even be on different floors.
The topic of this issue seems to have been troubling the minds of the “radio engineering community” for a long time. Almost all radio magazines had articles on this topic, and many on the Internet. There are usually two types of solutions available - corded extension and RF.
I don’t want to offend anyone, but the radio frequency option seems complete nonsense to me personally. Well, look, the signal from the receiver to the additional TV is supplied via cable, and this cable is already laid somewhere, in a cable channel or simply shoved under the baseboard or platband. And if one cable has already been laid somewhere, then you can put another one there for remote control. So why bother with radio modules?
Thus, the wired option is optimal. From what has been published, this is usually a standard photodetector on one end of the cable and an IR LED on the other. Somewhere else there is a circuit on a microcircuit or transistors (I even saw it on a microcontroller) and a power source.
IR receiver connection diagram
I decided to take a slightly different path, perhaps “barbaric,” but no less, and even more effective.
Rice. 1. Approximate schematic diagram of turning on the IR receiver in receivers.

Rice. 2. Block diagram of the TSOP4838 photo receiver.
Figure 1 shows the connection diagram for the remote control photodetector of the Topfield 5000СІ receiver. The circuit consists of an integrated photodetector TSOP4838 and several parts. Almost all similar circuits of other receivers are made in exactly the same way, the only difference is which integrated photodetector, at what frequency, and the pinout may differ.
Moreover, all integrated photodetectors, regardless of brand, type, pinout and housing, are functionally identical, and their structural diagrams are almost the same (not counting the pin numbering).
Figure 2 shows the block diagram of the TSOP4838 photodetector. As you can see, at the output there is a transistor switch connected to the power supply positive through a 33 kOm resistor. It seems that 33 kOm seemed a lot, and in the circuit in Figure 1 another 10 kOm resistor is connected in parallel with it.
Well, what’s stopping me from simply connecting an additional photodetector in parallel with the main one, as shown in Figure 3? Yes, nothing interferes. And this is confirmed by experiments. Two photodetectors work and do not interfere with each other, of course, if the control signal from the remote control is received only by one of them. Well, how could it be otherwise, because the additional photodetector will be in another room.

Rice. 3. Schematic diagram of connecting an additional photodetector to a satellite tuner.
Almost everything was done as follows. You need to open the receiver case and solder three multi-colored mounting wires to the photodetector terminals, directly to the printed tracks; I have them in white, green and blue. Then take them out through a previously made hole in the receiver body. Cut up and temporarily insulate.
You will also need a three-wire cable of the required length for electrical wiring with grounding, preferably the thinnest one. This cable is good not only because it has three wires, but also because these wires are of different colors, in my case - white, green and blue.
I lay the cable in the same way as the cable was laid to supply the signal to the TV. Then, at the end near the TV, I cut the cable and solder the leads of the additional photodetector to it. I insulate with electrical tape.
The additional photodetector itself was attached to the TV body with ordinary electrical tape.
At the other end, at the receiver, I cut the cable and connect it to the wires that were previously routed from the main photodetector located on the receiver board. I insulate with electrical tape. The multi-colored wires prevent you from making mistakes when connecting.
Conclusion
That's all. No radio channels, microcircuits, IR LEDs or additional power supplies. One drawback - I had to climb into the receiver.
But if the warranty period has expired, or you are a master yourself, this does not create any problems.
By the way, if you wish, you can make everything more “cultural” by installing a three-pin connector on the receiver body to connect a cable from an additional photodetector, and place the additional photodetector in some kind of stand case and place it near an additional TV, or hang it on the wall.
Arkanov V.V. RK-2016-04.
ARTICLE NOT FINISHED
Surely many have already heard about the so-called TSOP-sensors. Let's try to get to know them better, figure out how to connect them and how to use them.
A little history.
Already in the 1960s, the first household appliances, televisions and radios, with remote control, began to appear. At first, control took place via wires, then remote controls with light or ultrasonic control appeared. These were already the first “real” wireless remote controls. But due to sound or light interference, the TV could turn on or change channels on its own.
With the advent of inexpensive Infrared LEDs in the 1970s, it became possible to transmit signals using infrared (IR) light, which is invisible to humans. And the use modulated IR signals made it possible to achieve very high noise immunity and increase the number of transmitted commands.
An IR photodiode or an IR phototransistor is usually used as an IR radiation receiving element. The signal from such a photocell must be amplified and demodulate.
Since the photodiode, amplifier and demodulator are an integral part of the IR receiver, these parts began to be combined in one package. The case itself is made of plastic that transmits infrared rays. Thus, over time, the well-known TSOP infrared signal receiver was created, which is used in 99% of all household equipment for remote control.
Types of TSOP receivers.
Since integrated IR receivers were produced in different “eras” and by different companies, there are many different types of them. The main types of housings are shown in Fig. 2.

Rice. 2. Types of IR receiver housings.
1)
IR receiver from SHARP. Designation GP1Uxxx. Inside the tin shell is a small printed circuit board with an IR photodiode and a chip. Such a photodetector can be found on the boards of old TVs and VCRs.
2)
In this case, IR receivers are most common. They were produced back in the mid-1999s by Telefunken with the designation TFMSxxx. Now they are produced by Vishai, among others, and have the designation TSOP1xxx.
3)
IR receiver in a smaller body. Marked as TSOP48xx, ILOP48xx, TK18xx.
4)
A very rare IR receiver housing. Previously produced by Sanyo. Denoted as SPS440 -x.
5)
IR photodetector in SMD case from Vishai. Designation: TSOP62xx.
("x" in the notation means a number or letter.)

Rice. 3. Pinout, bottom view.
The pinout of each type of TSOP, as usual, can be found in the corresponding one for a specific brand of IR receiver. Please note that IR receivers numbers 2 and 3 have different pinouts! (Fig. 3):
Vo- IR receiver output pin.
GND- common output (minus power supply).
Vs- positive supply voltage output, usually from 4.5 to 5.5 volts.
Principle of operation.

Rice. 4. TSOP block diagram.
A simplified block diagram of a TSOP receiver is shown in Fig. 4. A conventional N-P-N transistor is used as the output element inside the TSOP. In the inactive state, the transistor is closed, and a weak high voltage level is present at the Vo pin (log "1"). When infrared radiation with a “fundamental” frequency appears in the sensitive zone of the TSOP, this transistor opens and the output pin Vo receives a low signal level (log. “0”).
The "fundamental" frequency is the frequency of the infrared radiation (light) pulses that the internal TSOP demodulator filters out. This frequency is usually 36, 38, 40 kHz, but it can be different; you need to find out about this in the datasheet for the specific type of TSOP receiver. To increase the noise immunity of the IR communication channel, modulated transmission of IR light is used. Temporary s e modulation characteristics for anti-interference transmission are given in the datasheet for a specific TSOP receiver. But in most cases it is enough to follow simple rules:

Rice. 5. The principle of impulse transmission.
1) the minimum number of pulses in a packet is 15
2) the maximum number of pulses in a packet is 50
3) minimum time between packs - 15*T
4) the pulse frequency in the burst must correspond to the main frequency of the TSOP receiver
5) the LED must have a wavelength = 950 nm.
"T"
- period of the “main” frequency of the TSOP receiver.
By adjusting the length of the pulse burst within certain limits, binary signals can be transmitted. A long pulse at the output of a TSOP receiver can mean “one”, and a short pulse can mean “zero” (Fig. 5). Thus, subject to modulation rules, the transmission range of digital signals in the line of sight between the LED and the TSOP receiver can reach 10-20 meters. The transmission speed is not high, about 1200 bits per second, depending on the TSOP receiver used.
Using TSOP as a sensor.
TSOP receivers can be used as other types of sensors:
In both cases, it is necessary to use light-proof tubes that will limit the beam of infrared rays in undesirable directions.
The infrared spectrum of light, like visible light, obeys the laws of optics:
-
radiation can be reflected from various surfaces
-
radiation intensity decreases with increasing distance from the source
These two features are used to build so-called “IR bumpers” - contactless obstacle detection sensors. To exclude false positives or false Not When such bumpers are triggered, it is necessary to emit bursts of pulses, as when transmitting commands from the control panel.
Pulse trains can be generated using conventional logic chips or a microcontroller. If the design uses multiple sensors based on TSOP receivers or multiple emitting diodes, selective polling of the sensor “triggering” should be provided. This selectivity is achieved by checking that the TSOP receiver fires only at the moment when a packet of IR pulses intended only for it is transmitted, or right after her transmission.
The triggering distance of the IR bumper based on the TSOP receiver can be adjusted in three ways:
1)
changing the fundamental frequency of IR radiation pulses,
2)
changing the duty cycle of the fundamental frequency of IR light pulses
3)
by changing the current through the IR LED.
The choice of method is determined by the ease of use in a particular IR bumper circuit.
Contactless bumpers based on TSOP receivers have a significant drawback: the “operation” distance of such a bumper greatly depends on the color and roughness of the reflective surface of the object. But the very low price of TSOP receivers and the ease of their use are of great interest to novice electronics engineers for building a variety of sensors.
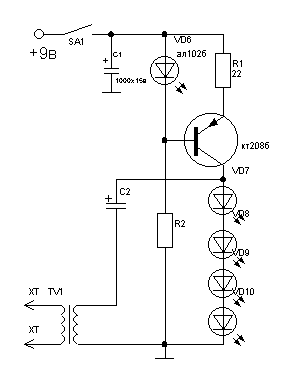
diagram from the magazine "Young Technician".
An interesting direction in radio electronics, which has supplemented this electronics with new advantages of “invisible” light (infrared light). So I propose a circuit of a simple (for example) receiver and transmitter based on infrared rays. Basis: operational amplifier k140ud7 (I have ud708 here), emitting and receiving IR photodiodes, ULF (k548un1a (b,c - indices) - for two channels) (although where to “turn on” the second channel of the amplifier is up to you to decide - the transmitter circuit is designed for one channel, i.e. mono). Power supply for the device: I generally recommend it with decent current stabilization (otherwise the “dandy” adapter irritates the background of the “network”). Method: the amplitude-modulated signal of the transmitter is amplified by the receiver 1000 times.
How the device works. I suggest you watch a short video testing the IR remote control “by ear”. You can quickly check the functionality and signal strength by sound.
IR receiver and IR transmitter circuit
When assembling, capacitors C1 and C2 should be as close to the amplifier as possible! You can connect high-impedance headphones to the output (low-impedance ones require a separate ULF). Photodiode FD7 (I have FD263: “tablet” with a focusing lens); 0.125W resistors: R1 and R4 set the signal amplification factor by 1000 times. The receiver is set up simply: the photodiode is directed to a source of IR radiation, for example, a 220V-50Hz lamp: the filament will be fonit with a frequency of 50Hz or the remote control from the TV (video, etc.). The sensitivity of the receiver is high: it normally receives signals reflected from the walls .
The transmitter has AL107a IR LEDs: any will do. R2 2 kOhm, C1 1000μFx25V, C2 200μFx25V, any transformer too. Although it is quite possible to do without a transformer - supply an amplified audio signal to capacitor C2.

Device diagram
IR receiver circuit with ULF
Recently, out of necessity, I assembled an IR receiver for testing IR remote controls (TVs and DVDs). After finalizing the circuit, I installed a mono ULF TDA7056. This amplifier has good gain characteristics of about 42 dB; operates in a voltage range from 3V to 18V, which allowed the IR receiver to operate even at a voltage of 3V; TDA gain range from 20 Hz to 20 kHz (UD708 passes up to 800 kHz) is quite enough to use the receiver as audio accompaniment; has short circuit protection on all “legs”; protection against "overheating"; weak self-interference coefficient. Overall, I liked this compact and reliable ULF (our price is 90 rubles).
There is a detailed description for it. Figure 1 shows an example of using an amplifier.

Photo TDA7056

Fig.1. Amplifier circuit with TDA7056
The result is an IR receiver, Fig. 2, which operates in the voltage range from 3V to 12V. I recommend using batteries or rechargeable batteries to power the receiver. When using a power supply, a stabilized source is required, otherwise the background of the 50Hz network will be heard, which amplifies the UD708. If the device is located near a source of mains voltage or radio emissions, interference may occur. To reduce interference, it is necessary to include capacitor C5 in the circuit. The TDA7056 is designed for a 16 Ohm output speaker, unfortunately I don’t have one. I had to use a 4 ohm 3 watt speaker, which was connected through a one watt 50 ohm resistor. Too low speaker coil resistance causes excess power and overheats the amplifier. In general, due to the additional resistor, the ULF does not heat up, but provides quite acceptable amplification.
The IR receiver is a standard device that connects to the COM (RS-232) port and serves to remotely control the robot.
One of the possible IR receiver circuits. Any 5-volt infrared receiver used in household equipment (TVs) will be suitable for the IR receiver. For example: TSOP1836, IS1U60L, GP1U52X, SFH506-36 or our domestic TK1833. The KREN5A voltage stabilizer is necessary to power the IR receiver with 5 V voltage, because 12 volts are supplied from the 7th pin of the COM port. The resistor can be selected from the range of 3-5 kOhm, capacitor 4.7-10 μF. Any low power diode.
In the above diagram, the output signal is supplied to 1 pin of the COM port (DCD). This contact is not used by a standard mouse for a COM port, so if you do not have enough free COM port, this circuit can be used in parallel with a mouse (but not with a modem)! The output signal can be sent not only to the DCD, but also to other pins, such as CTS or DSR. All these parameters can be set in a program that works in the IR receiver. There are several program options, the most common is WinLIRC. I can also recommend using the Girder program.
Pinout and appearance of the main elements of the circuit

From left to right - two types of 5-volt IR receivers, and a KREN5A voltage stabilizer chip.
COM port pinout
Pinout and description of COM port contacts (25 pin).
The IR receiver plays an important role in our everyday life. With the help of this microcircuit, we are able to control modern household appliances, a TV, a stereo system, a car radio, and an air conditioner. This allows us to do this, the remote control (RC), let's take a closer look at its operation, circuit, purpose and testing. In the article, how to check the IR receiver yourself.
What is an IR receiver and how does it work?
This is an integrated circuit, its direct and main task is to receive and process the infrared signal, which is what the remote control emits. This signal is used to control the equipment.
This microcircuit is based on a pin photodiode, a special element, with a p-n junction and an i region between them, an analogue of the base of a transistor, as in a sandwich, so here is the abbreviation pin, a unique element in its own way.
It is turned on in reverse and does not allow electric current to pass through. The IR signal enters the i region, and it conducts current, converting it into voltage.

The next stages are an integrating filter, an amplitude detector, and at the finish line, output transistors await them.
As a rule, there is no particular point in buying a new IR receiver in a store, since it can be easily unsoldered from various electronic boards. If you are assembling a device for checking the remote control from scrap materials, without knowing the exact marking of the device, then you can determine the pinout yourself.

We will need a multimeter, a power supply or several batteries, connecting wires, installation can be done hanging.
It has three outputs, one is GND, plus 5 volts is supplied to the second, and the out signal comes out from the third. We connect the power to the first and second legs, respectively, and remove the voltage from the third.

It is in a state of waiting for a signal from the remote control, and on the multimeter we see five volts. We begin to switch channels or press other buttons by pointing the remote control at him.
If it is working, then the voltage will drop by about 0.5-1 volt. If everything happens as written here, the device is working, otherwise the element is faulty.
How to determine the pinout of an infrared receiver
For example, I took a microcircuit completely unknown to me, which was lying in a box with elements, the “minus” was determined by the point that is on the back of the element, the “plus” was experimentally determined through a resistor. I didn’t risk anything, since he was initially a worker, there was no hope.
To determine the pinout of the IR receiver, if it is soldered into the board, look at it, there may be pin markings. If nothing is written there, inspect the element itself, look for its name, and then look on the Internet for characteristics and data, this is a very competent way of doing things. Following the instructions, how to check the IR receiver yourself.
diagram from the magazine "Young Technician".
An interesting direction in radio electronics, which has supplemented this electronics with new advantages of “invisible” light (infrared light). So I propose a circuit of a simple (for example) receiver and transmitter based on infrared rays. Basis: operational amplifier k140ud7 (I have ud708 here), emitting and receiving IR photodiodes, ULF (k548un1a (b,c - indices) - for two channels) (although where to “turn on” the second channel of the amplifier is up to you to decide - the transmitter circuit is designed for one channel, i.e. mono). Power supply for the device: I generally recommend it with decent current stabilization (otherwise the “dandy” adapter irritates the background of the “network”). Method: the amplitude-modulated signal of the transmitter is amplified by the receiver 1000 times.
How the device works. I suggest you watch a short video testing the IR remote control “by ear”. You can quickly check the functionality and signal strength by sound.
IR receiver and IR transmitter circuit
When assembling, capacitors C1 and C2 should be as close to the amplifier as possible! You can connect high-impedance headphones to the output (low-impedance ones require a separate ULF). Photodiode FD7 (I have FD5.. some kind of “tablet” with a focusing lens - I don’t remember the exact name); 0.125W resistors: R1 and R4 set the signal amplification factor by 1000 times. The receiver is set up simply: the photodiode is directed to a source of IR radiation, for example, a 220V-50Hz lamp: the filament will be fonit with a frequency of 50Hz or the remote control from the TV (video, etc.). The sensitivity of the receiver is high: it normally receives signals reflected from the walls .
The transmitter has AL107a IR LEDs: any will do. R2 2 kOhm, C1 1000μFx25V, C2 200μFx25V, any transformer too. Although it is quite possible to do without a transformer - supply an amplified audio signal to capacitor C2.
Device diagram
Recently, out of necessity, I assembled an IR receiver for testing IR remote controls (TVs and DVDs). After finalizing the circuit, I installed a mono ULF TDA7056. This amplifier has good gain characteristics of about 42 dB; operates in a voltage range from 3V to 18V, which allowed the IR receiver to operate even at a voltage of 3V; TDA gain range from 20 Hz to 20 kHz (UD708 passes up to 800 kHz) is quite enough to use the receiver as audio accompaniment; has short circuit protection on all “legs”; protection against "overheating"; weak self-interference coefficient. Overall, I liked this compact and reliable ULF (our price is 90 rubles).
There is to him with. Figure 1 shows an example of using an amplifier.

Photo TDA7056

Fig.1. Amplifier circuit with TDA7056
The result is an IR receiver, Fig. 2, which operates in the voltage range from 3V to 12V. I recommend using batteries or rechargeable batteries to power the receiver. When using a power supply, a stabilized source is required, otherwise the background of the 50Hz network will be heard, which amplifies the UD708. If the device is located near a source of mains voltage or radio emissions, interference may occur. To reduce interference, it is necessary to include capacitor C5 in the circuit. The TDA7056 is designed for a 16 Ohm output speaker, unfortunately I don’t have one. I had to use a 4 ohm 3 watt speaker, which was connected through a one watt 50 ohm resistor. Too low speaker coil resistance causes excess power and overheats the amplifier. In general, due to the additional resistor, the ULF does not heat up, but provides quite acceptable amplification.
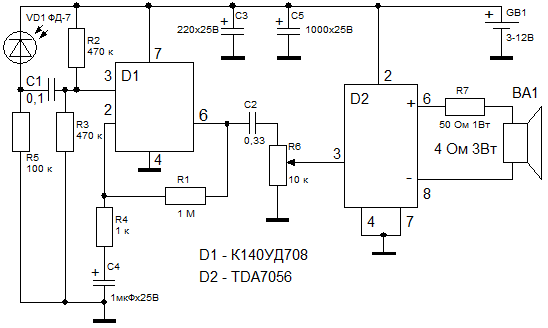
Fig.2. IR receiver circuit with ULF

Photo of IR receiver
In this lesson we will look at connecting an IR receiver to Arduino. We will tell you which library should be used for an IR receiver, demonstrate a sketch for testing the operation of an infrared receiver from a remote control, and analyze commands in C++ to receive a control signal.
IR receiver device. Principle of operation
Infrared radiation receivers are widely used in electronic technology due to their affordable price, simplicity and ease of use. These devices allow you to control devices using a remote control and can be found in almost any type of equipment.
The operating principle of an IR receiver. Processing the signal from the remote control
The IR receiver on Arduino is capable of receiving and processing an infrared signal in the form of pulses of a given duration and frequency. Typically, an IR receiver has three legs and consists of the following elements: a PIN photodiode, an amplifier, a bandpass filter, an amplitude detector, an integrating filter, and an output transistor.
Under the influence of infrared radiation in a photodiode, which has between p And n regions created an additional region of semiconductor ( i-region), current begins to flow. The signal goes to an amplifier and then to a bandpass filter, which protects the receiver from interference. Interference can be caused by any household appliance.
The bandpass filter is set to a fixed frequency: 30; 33; 36; 38; 40 and 56 kilohertz. In order for the signal from the remote control to be received by the Arduino IR receiver, the remote control must be at the same frequency as the filter in the IR receiver is set to. After the filter, the signal goes to an amplitude detector that integrates the filter and the output transistor.
How to connect an IR receiver to Arduino
The housings of infrared receivers contain an optical filter to protect the device from external electromagnetic fields; they are made of a special shape to focus the received radiation on a photodiode. To connect the IR receiver to the Arduino UNO, three legs are used, which are connected to the ports - GND, 5V and A0.
For this lesson we will need the following details:
- Arduino Uno board;
- Bread board;
- USB cable;
- IR receiver;
- Remote control;
- 1 LED;
- 1 resistor 220 Ohm;
- Wires "folder-folder" and "folder-female".
 Connection diagram of the IR receiver to the Arduino analog port
Connect the IR receiver according to the diagram and the LEDs to pins 12 and 13 and upload the sketch.
#include // connect the library for the IR receiver IRrecv irrecv(A0); // indicate the pin to which the IR receiver is connected decode_results results; void setup () // procedure setup ( irrecv.enableIRIn (); // start receiving an infrared signal pinMode(13, OUTPUT); // pin 13 will be the output pinMode(12, OUTPUT); // pin 12 will be the output pinMode(A0,INPUT); // pin A0 will be the input (eng. “intput”) Serial.begin(9600); // connect the port monitor) void loop () // procedure loop ( if (irrecv.decode (&results)) // if the data has arrived, execute the commands( Serial.println(results.value); // send the received data to the port // turn on and off the LEDs, depending on the received signal if (results.value == 16754775) ( digitalWrite (13, HIGH); ) if (results.value == 16769055) ( digitalWrite (13, LOW); ) if (results.value == 16718055) ( digitalWrite (12, HIGH); ) if (results.value == 16724175) ( digitalWrite (12, LOW); ) irrecv.resume (); // receive the next signal on the IR receiver } }
Explanations for the code:
- The IRremote.h library contains a set of commands and allows you to simplify the sketch;
- The decode_results statement assigns the variable name results to the received signals from the remote control.
What to pay attention to:
- To be able to control the inclusion of the LED, you need to turn on the port monitor and find out what signal is sent by this or that button on the remote control;
- The obtained data should be entered into the sketch. Change the eight-digit code in the sketch after the double equal sign if (results.value == 16769055) to your own.
IR receiver device, operation and testing
IR receivers of infrared radiation have become widespread in television, household, medical equipment and other equipment. They can be seen in almost any type of electronic equipment; they are controlled using a remote control.
operation and block diagram of the IR receiver |

Typically, an IR receiver microassembly has three or more pins. One is common and is connected to the power supply minus GND, the other to the plus V s, and the third is the output of the received signal Out.

Unlike a standard IR photodiode, an IR receiver is capable of not only receiving, but also processing an infrared signal in the form of pulses of a fixed frequency and a given duration. This protects the device from false alarms, background radiation and interference from other household appliances emitting in the IR range. Fluorescent energy-saving lamps with an electronic ballast circuit can create quite strong interference for the receiver.
The microassembly of a typical IR radiation receiver includes: PIN photodiode, variable amplifier, bandpass filter, amplitude detector, integrating filter, threshold device, output transistor

A PIN photodiode is from the family of photodiodes, in which another region of its own semiconductor (i-region) is created between the n and p regions - this is essentially a layer of pure semiconductor without impurities. It is this that gives the PIN diode its special properties. In the normal state, no current flows through the PIN photodiode, since it is connected to the circuit in the opposite direction. When electron-hole pairs are generated in the i-region under the influence of external IR radiation, current begins to flow through the diode. Which then goes to a variable amplifier.
Then the signal from the amplifier goes to a bandpass filter that protects against interference in the IR range. The bandpass filter is set to a strictly fixed frequency. Typically, filters are used that are set to a frequency of 30; 33; 36; 36.7; 38; 40; 56 and 455 kilohertz. In order for the signal emitted by the remote control to be received by the IR receiver, it must be modulated with the same frequency to which the filter is configured.
After the filter, the signal goes to an amplitude detector and an integrating filter. The latter is necessary to block short single signal bursts that may appear from interference. Next, the signal goes to the threshold device and the output transistor. For stable operation, the amplifier's gain is adjusted by an automatic gain control (AGC) system.

The housings of IR modules are made of a special shape that facilitates focusing of the received radiation onto the sensitive surface of the photocell. The housing material transmits radiation with a strictly defined wavelength from 830 to 1100 nm. Thus, the device uses an optical filter. To protect internal elements from external influences. fields an electrostatic screen is used.
Checking the IR Receiver |
Since the IR signal receiver is a specialized microassembly, in order to ensure its operation it is necessary to apply a supply voltage to the microcircuit, usually 5 volts. The current consumption will be about 0.4 - 1.5 mA.
If the receiver does not receive a signal, then in the pauses between bursts of pulses the voltage at its output practically corresponds to the supply voltage. It's between GND and the output signal output can be measured using any digital multimeter. It is also recommended to measure the current consumed by the microcircuit. If it exceeds the standard one (see the reference book), then most likely the microcircuit is defective.
So, before starting the module test, be sure to determine the pinout of its outputs. Usually this information is easy to find in our mega-directory of electronics datasheets. You can download it by clicking on the picture on the right.
Let's check it on the TSOP31236 chip; its pinout corresponds to the figure above. We connect the positive terminal from the homemade power supply to the positive terminal of the IR module (Vs), and the negative terminal to the GND terminal. And we connect the third OUT pin to the positive probe of the multimeter. We connect the negative probe to the common GND wire. Switch the multimeter to DC voltage mode at 20 V.

As soon as packets of infrared pulses begin to arrive at the photodiode of the IR microassembly, the voltage at its output will drop by several hundred millivolts. In this case, it will be clearly visible how the value on the multimeter screen decreases from 5.03 volts to 4.57. If we release the remote control button, the screen will again display 5 volts.
As you can see, the IR radiation receiver responds correctly to the signal from the remote control. This means the module is OK. In a similar way, you can check any modules in an integrated design.
