Cigarette consumption is increasing. Some people use them to quit smoking, others simply switched to a cheaper and less harmful method of smoking, and others simply like to indulge in the tasty and fragrant vapor from an electric cigarette.
Due to the current dollar exchange rate, electric cigarettes have a decent price, and, as practice shows, they last from one to several months. Personally, I have already purchased three of the most common electronic cigarettes, each of them served me for one month, and each time I was forced to buy a new electric cigarette with the money I saved on buying regular cigarettes. In the end, I decided to buy myself a cigarette that was more expensive and of better quality, I went to a store where they offered me a mech mod that did not have any electronics, I thought about it and decided to make a mech mod myself from an ordinary flashlight.
How did I do it?.. I’ll tell you now
To build the mod we will need:
Pocket flashlight
Battery standard 18650 or 26650 (difference in diameter and capacity)
Piece of PCB
Soldering iron, flux, solder
Connector from an old cigarette
Evaporator (it’s difficult to make yourself, I had to buy it in a store)
Photo of what we have first

We disassemble the flashlight and take out all the insides from it

It took a long time to get the button, but we managed to do it anyway.
And so we see: Flashlight body, glass, LED module, spring to support the module and to ensure contact, and a plate to fix it all in the flashlight body.

We need to trace the piece of glass on the textolite in order to later cut out of it a circle of the same size and diameter as the piece of glass.

Cut it out, straighten it out and this is what you should get

Ready.
Now in this mug we need to drill a hole for the connector from an old cigarette; I didn’t have a drill of a suitable diameter. I drilled a smaller hole and then bored it out with a file.

We insert our connector into our “puck”


We tin the PCB and solder the connector to the PCB


And in place of the wire that is soldered to the middle contact of the connector, we solder a more powerful wire since we will use low-resistance loads that are close to a short circuit and can burn the standard wire that is on the connector, and the microcircuit that is in digital mode can be damaged.

Next, we unsolder the LEDs from the board of our flashlight and solder a wire from the central connector to the microswitch, which was soldered from the old TV, and from the switch to the central contact of the board, where the spring is soldered (positive terminal)


And we solder the negative terminal from the connector of the future cigarette to the negative contact of the board from which we soldered the LEDs.
We drill holes in the flashlight covers and in the reflector so that they coincide; they are needed to insert the microswitch into the housing.

(I had an idea to insert a microswitch at the bottom, but as the experience of my previous electronic cigarette showed, this is not entirely convenient)
We make a square hole out of a round hole and you can start assembling.
We insert it all into the flashlight cover and put it on hot glue, fix everything with a special washer that is included in the flashlight kit.


And so, we have a positive terminal, install a negative one and you’re done.
I used the negative bus from the flashlight kit, but instead of a spring I stuffed a 25-kopeck coin on the bottom.
Knowing the structure of an electronic cigarette and more or less understanding the technology, you can even assemble... a homemade vape. Why is this necessary? Firstly, the device can be made from cheap materials, saving money. Secondly, creating something with your own hands is always more interesting than buying it.
For or against
To decide whether to make a homemade vape, you need to carefully weigh all the pros and cons. If we talk about the advantages of home-made, then such a device will be:
By making a vape yourself, the master takes full responsibility for its quality, capabilities and safety. However, the slightest error in assembly can lead to an explosion or fire of the device. But no one will have this. And knowing all the “stuffing” from the inside, the owner of an exclusive can easily repair it.
Under no circumstances should you start making a device if you do not have experience in such matters and do not understand electronics!
Manufacturing
Before you learn how to make a vape with your own hands, you need to have an idea about the structure of an electronic cigarette. In principle, the manufacture of this device involves the construction of a box mod (battery) and an atomizer (evaporator).
 It's not that difficult to make a mechanical box mod. This is a device that supplies voltage from the battery to the atomizer when you press a button. Everything you need to create it can be bought at a radio store or ordered online. You will need:
- 14 AWG Copper wire;
- connector 510;
- mosfet;
- button;
- battery compartment.
Well, and, strictly speaking, the battery itself is a high-current 18650 format, from 20 amperes and above. Sony and Samsung have similar ones. This is the most expensive part of the device.
A considerable amount of the cost of an electronic device is consumed by the cost of its housing. A homemade product can be made from inexpensive materials - plastic, metal, or at least thick cardboard. You can show your imagination and make, for example, a wooden case, decorating it with carvings. This box must have holes for gas venting.
The atomizer is inexpensive, so it’s easier to buy a ready-made one and attach it to a homemade mod.
However, many craftsmen bother making not only atomizers, but also assembling a battery from batteries connected by wire.
Conditions, including an evaporator (atomizer) of your own design, using available materials and tools.
This evaporator has served me “faithfully” for two years now. Schematically it should look like this.
Tools and materials
-Used disposable cigarette "Pons"
-Used disposable cigarette "UXLITE"
-Silica cord diameter = 2 mm.
-Nichrome wire diameter=0.15 mm.
-Single-core copper wire diameter = 0.5 mm.
-Soft stranded wire
-Set of connectors "Tulip"
- Flashlight housing for two AA batteries
-Four AA batteries 1.2 v, 1700...2800 mA (two in operation, two in charging)
-Heat shrink tube diameter=4mm.
-Cable sheath (cambric) diameter = 3.5 mm.
-Ruler (vernier caliper)
-Medical syringe with two needles with a diameter of 1 mm
-Wooden toothpick (round - diameter = 2.5 mm.)
-Hacksaw blade for metal
-Files (needles): flat and round
-Soldering iron, solder, phosphoric acid
-Drills with a diameter of 1.5…2 mm. and 8 mm.

Step 1. We disassemble the disposable used Pons cigarette. We remove both plugs and squeeze out the “giblets” from the LED side.

Step 2. Remove the padding polyester, battery, processor board and leave only what we need.

Step 3. Remove the decorative sticker, since we will need a transparent body. Remains of glue on the body can be easily washed off with diesel fuel or vegetable oil.

Step 4. We make a tool for fitting the “Tulip” connector into the evaporator housing. The body of the "UXLITE" cigarette is made of stainless steel. We sharpen the edge with a file.


Step 5. By rotating the connector and applying pressure, we cut out a cylindrical section on it. The diameters of both cases are the same, so it will be inserted into the atomizer body symmetrically and will look neat.


Step 6. We cut the cable cores, separate them to the sides and solder them.

Step 7. We disassemble the main part of the evaporator - the silica wick and the nichrome spiral. “Native” is designed for a voltage of 4 volts, but we need 2.2 V. Also, the wick itself is thin, designed to work with padding polyester.

Step 8. Making the heater. For a voltage of 2.2 v - a working section of nichrome with a diameter of 0.15 mm. should be 22 mm.(+/- 1 mm.). It should be borne in mind that when lengthened, the amount of steam will be less and vice versa.
It is not advisable to shorten the nichrome too much - there will be a burnt taste. Also, the length of nichrome depends on the diameter of the wire. The indicated values were obtained experimentally as optimal.
Copper-nichrome connections can be made using the crimp method, but I prefer soldering with phosphoric acid as it is more reliable.

Step 9. Carefully wind the nichrome onto the silica cord, straightening the turns with a syringe needle. Cut to size.

Step 10. We insert a cambric into the central hole of the liner “A” as a base for seating the central braided heat-resistant tube.

Step 11. The material of the inserts has good elasticity, so using medical tweezers or a clamp, the spirals can be easily pierced with copper conductors.

Step 12. We put the central heat-resistant tube on the inserted cambric and thread the wick with the spiral into a special cutout.

Step 13. We put a heat-shrink tube on the cutout and heat it until it seals. To do this, just hold the section over a hot 60-watt soldering iron, slowly turning it along the longitudinal axis.

Step 14. Solder soft conductors to the terminals.

Step 15. Determine the cut point, i.e. total length of the evaporator. In our case - 63 mm. We cut off the metal with a hacksaw blade and carefully process the cut with a file (need file).

Step 16. After inserting the heater and soldering the soft wires to the connector, drill an air hole with a diameter of 1.5....2 mm. near the insert.

Step 17. Carefully insert the insert “B” and the “Tulip” connector. To ensure that it fits tightly into the body, if necessary, wrap the cylindrical part with a turn of black electrical tape (adhesive tape) before inserting it.
As a mouthpiece tip, you can use: 1. A decorative plug, drilling a hole in the center with the same drill. 2. Use a cap from a "UXLITE" cigarette, cutting a hole in the center.


Step 18. The atomizer is ready. Now we remake the flashlight body. In this model, the reflector and LED were mounted on a disk made of durable nylon, tightly seated in the recess of the duralumin tip.
Diameter of "Tulip" (mother) - 8.3 mm. So I drilled the hole 8mm. and “dispersed” it with a round file to approximately 8.2 mm. The connector fits in very tightly and sits without any additional fastening.

Step 19. Remove all electronics parts from the spring contact board and solder: the “minus” of the connector body to the outer ring of the board, and the “plus” to the outer ring of the spring. It is better to do this to reduce current losses, because The nickel-plated steel spring has a certain resistance, which is noticeable at a relatively high current of the device. For the same purpose, it is better to solder the outer end part of the board itself.
It will, of course, be pressed into the bushing more tightly, but will provide a larger contact area in the negative circuit. It is better to “short-circuit” the spring in the “wrap” on the back of the flashlight with a stranded soft wire.

Step 20. You will have to redo the button too, because... it works in fixed mode. Having removed the parts of the latch, I inserted in their place a cut-out scarf with a button from an old VCR.

Step 21. Before refueling: insert a drainage tube - a shortened syringe needle (to allow air to escape) with a minimum tip coming out of the liner, insert a round toothpick into the central hole of the liner.
Use a syringe with liquid in the remaining small hole and slowly fill the atomizer. During refueling, be sure (!) to pinch the side air hole with your finger to prevent liquid from penetrating into the air channel.
The idea of creating an electronic cigarette has been around for a long time, but only after some time I finally decided to create this thing. Buying a ready-made cigar somehow affected the amateur radio self-awareness, so I took on the development of the project myself. Here's what she can do:
- on/off with one tact button
- sound notification when power on/off
- It is not possible to turn on the coils at the battery threshold value
- LED indication of battery status and discharge status
- sound signal when battery is discharged
- setting the battery threshold in 0.1 Volt increments
- There are 7 color schemes
- The screen goes blank after about 15 seconds when the menu buttons are inactive
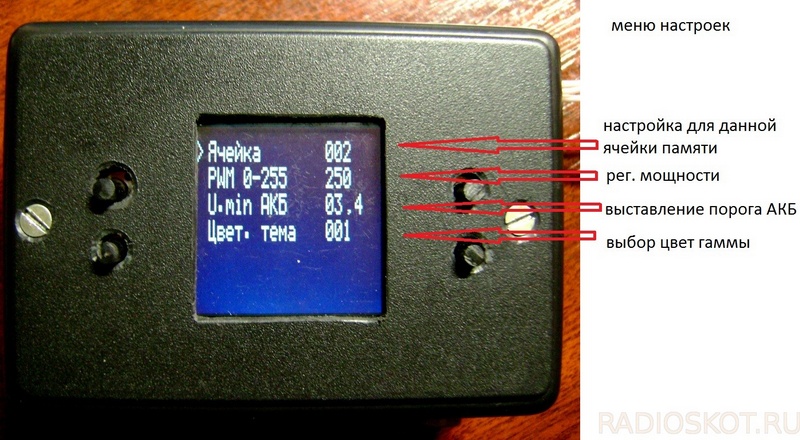
- has a settings menu
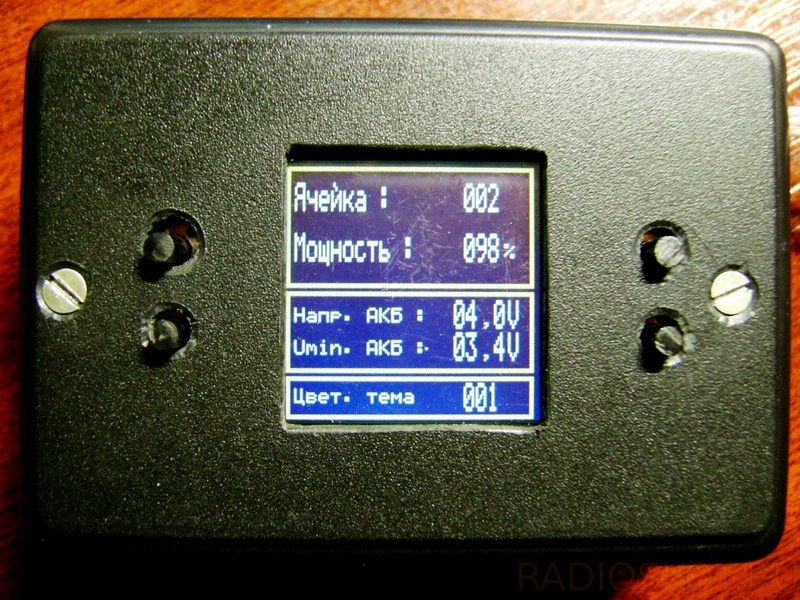
Display indication:
- memory cell number from 1 to 10
- Filling PWM for a specific memory cell from 0 to 255 in steps of 1
- current battery voltage
- minimum set battery cut-off voltage
- There are only 7 colors
First I decided what I was going to soar with. I would like to vape with both an atomizer and a dripper, so the controls should be universal.
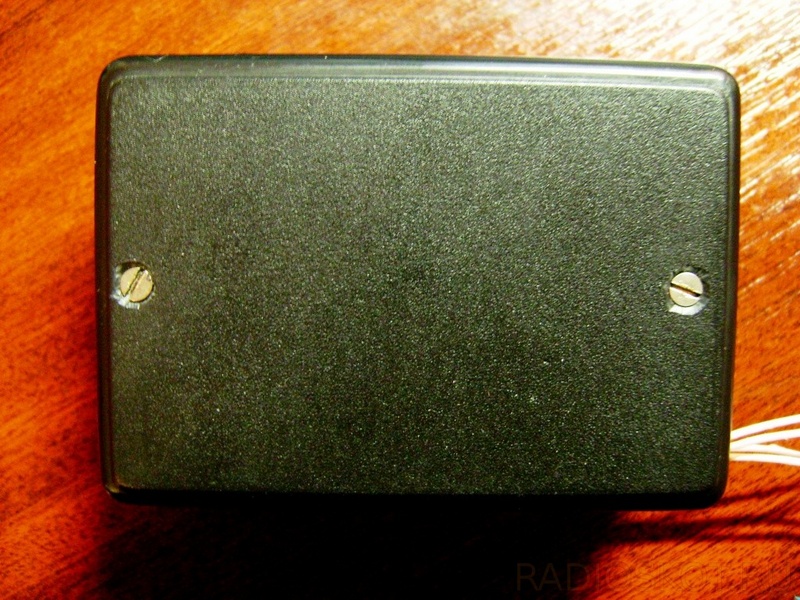
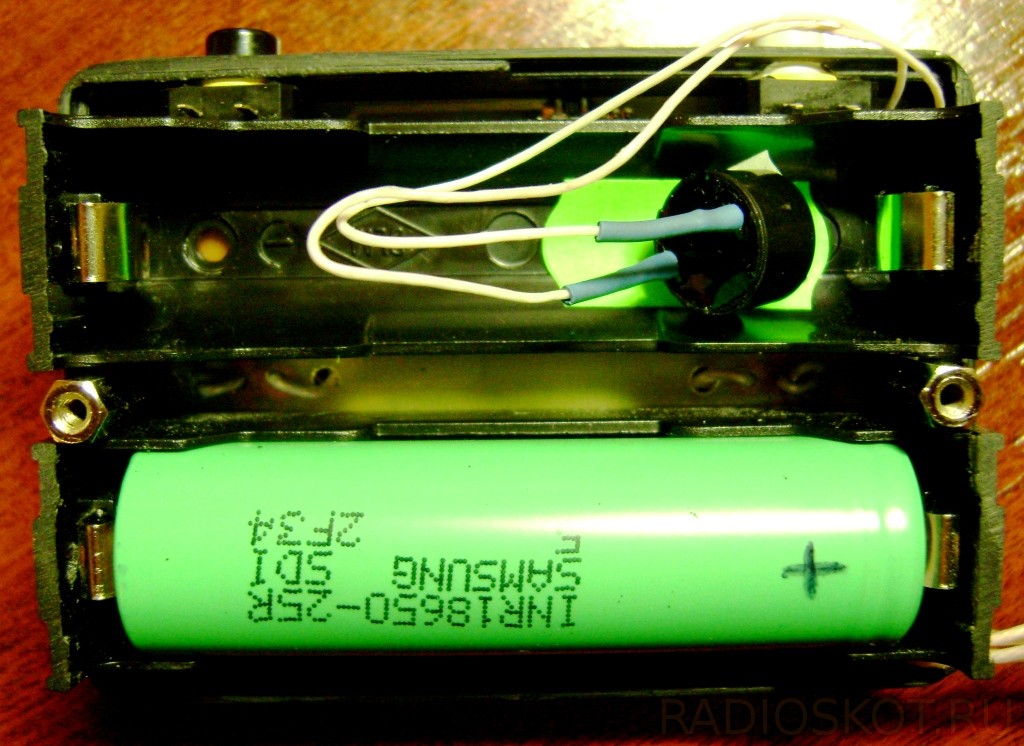
The case will contain two 18650 25R batteries and the actual circuit board of the cigarette with parts.

Power switches are designed for significant current and it is possible to connect to the mod both simple atomizers and drips with a different number of coils and their resistance. Thanks to the presence of PWM adjustment, it is possible to adjust it to a specific winding option and the number of coils, so as not to swallow fumes.
The calculated long-term power output is about 150 Watts, which is of course a lot, but there should be potential. The five-second output power is about 370 Watts, to be honest this is useless, but the potential is also there.

I push it into the case, the extra 0.2 mm in height does not allow the “suitcase” to close tightly.

In work, the adapter for the drip tip is made of stainless steel, since there is catastrophically little space, the adapter is planned as one piece with the drip tip and having a 510 connector inside.
I pushed everything into the Z23 case, it barely fit, but it still fit. Since the stand was in the middle, I had to cut it down and fasten everything with a draft through the metal of the stand; later the body will be finished off externally, but for now it’s something like that. Here you can see the back of the case:
In this photo, the back half of the case is removed, there is only one battery left, you can see that there is a buzzer hanging on the wire, there is nowhere to put it - there is no place, it will be pressed between two batteries.
There are two buttons at the end, the left one is to turn on/off the power, the right one is to turn on the spiral. The left LED, red, indicates the battery operating mode, the right green LED lights up when the coil heats up.

This photo shows the main screen, mode control with four buttons (SET, OK, +/-).
Here is the menu of the electronic cigarette, controlled by the same buttons.

While our brothers promise to send me an atom, for now I had to attach just such a “pacifier” (which was not expensive).

Due to the lack of space in the case, it was necessary to machine an adapter from stainless steel for a drip tip with a diameter of 23 mm. And finally, a little more about management:

The device works really well, so far there is only one battery, which lasts for 3 days of intense vaping. For details on the circuit and firmware, please contact the author of this commercial project. GOVERNOR.
Discuss the article ELECTRONIC CIGARETTE WITH YOUR OWN HANDS
The question itself: “how to make an electronic cigarette?” not particularly difficult. You can easily verify this by reading our article to the end. If you are not a supporter of DIY crafts, then after studying this material, (at least) you will know what the “electronics” consist of and how they are repaired in workshops. There are other advantages that we will also consider immediately before the instructions.
Advantages
- Despite the fact that most devices are not so expensive, they are still not affordable for everyone. Plus, it’s worth considering that the cost of any original/branded product includes warranty service and other extra charges. From which there is no escape. That is why, making electronic cigarettes with your own hands, as an option (in a quiet home environment), is profitable. Moreover, this process is not so complicated.
- Quite “tricky” (branded) parts, batteries (and chargers for them) very often break down (due to “economical” Chinese production). And this is where the problems begin. Firstly, they are not cheap, but that doesn’t matter. And secondly, it’s difficult to get them (especially if the device has already been discontinued). Therefore, one of the main advantages of all self-made devices is the absolute availability and low cost of all spare parts.
- Most people don’t even look for answers to the question: how to make an electronic cigarette with your own hands? It is easier to buy a ready-made device. But experienced vapers (especially foreign fans) sometimes have a completely different opinion. Indeed, in this case, you can not only understand the intricacies of your favorite device and the mechanism of its action (i.e., learn the whole process “from the inside”), but also create a masterpiece “tailored” to your personal preferences. The envy of all your friends! Don't believe me? Read foreign articles on this topic.
Example: how foreigners make electronic cigarettes (with their own hands)!
Precautionary measures
As practice has shown, the most dangerous thing in making electronic cigarettes yourself is a rash idea - to create a flavored liquid at home. Therefore, if you do not have a good education as a chemist, then do not even try to do something. This is fraught not only with facial burns (at best), but also with serious damage to the respiratory tract (including not only burns, but also dangerous diseases). Today you will save money, and tomorrow you will spend 10 times more on treatment (at least).
So, how to make a homemade electronic cigarette?
What will we need for this exciting event?
- 3 “D” batteries or 4 pcs. type "C".
- Hollow cardboard tube.
- Black electrical tape (it is much better than blue in terms of “stickiness”).
- Wire (any metal except aluminum).
- Alligator clip.
- Big scissors.
- Regular pliers or pliers.
- And, of course, the electronic cigarette cartridge itself.
Practical guide - DIY cigarette
We bring to your attention step-by-step detailed instructions (with pictures) on how to make a homemade electronic cigarette (i.e., with your own hands) in normal home conditions.
#1 Buy batteries, look for the right wire

The best option: 3 batteries of “D” format or 4 pieces of “C” (as indicated in the picture above). An important point: the insulated wire (not aluminum) should be a few centimeters longer in length (3-4 cm is enough) than the length of the batteries laid out in series.
#2 Carefully prepare the wire

Using pliers, remove the insulating coating from both ends of the wire. At one end 2-2.5 cm, at the other 7-7.5 cm. If the wire is of a twisted type, then you just need to straighten it with your hands.
#3 Making a contact spiral

How to do it? From the longer (7-7.5 cm) bare end of the wire, we create a spiral (as shown in the image above). Bend it, perpendicular to the direction of the wire itself. On the other, shorter end (2-2.5 cm), we attach a “crocodile” (i.e., a special form of clamp).
#4 Installation of the spiral on the lower battery

With our own hands we make the “connection” of the previously created spiral to the “minus” of the lowest battery in the circuit. Next, we “glue” it properly using electrical tape (necessarily black - good “sticky”, and not blue).
#5 Create the device body

For this task, we need a regular cardboard tube (you can buy it at a hardware store - plumbing section). There is another option for choosing the material, which can be seen in the video below “how to make an electronic cigarette from a wide pen.”
But we'll get back to the tube. So, cut it along the entire length. This is necessary so that the batteries fit inside it without unnecessary free space/play.
For the bottom hole of the tube, make a round plug/cap, then glue it. Secure the outer part of the tube with strong rubber bands (5-6 pcs.)
#6 Insert batteries into the case

We perform the following list of actions. First, we “lower” the lowest battery of the circuit into the tube (at the bottom of which the spiral is fixed). Next, add the remaining batteries one by one (- / + / - / + / - / + / - / +). The part of the wire with the alligator clip must “peek out” from the top of the housing.
#7 Manipulating the cartridge plug

If your cartridge already has a normal plug, then with a feeling of relief, you can safely skip this step of the instructions.
If you are less fortunate, then we “turn on” creative thinking and create a homemade plug. For this purpose, we use a screw (or nail), which we carefully and beautifully wrap with electrical tape. Ready!
Next, from a small piece (for example, lying around in a toolbox) of sheet metal, we cut out the letter “T” and bend it around our (recently improvised) “plug”. How this looks in practice can be seen in the image above.
#8 Collect and use!

Now the final moment has come for assembling a homemade electronic cigarette. In order for it to be ready “for battle,” touch the “plug” (i.e., the former screw) to the positive pole of the topmost battery. Immediately, a characteristic hissing sound will be heard. After vaping, be sure to disconnect this contact (otherwise the cartridge will overheat).
Also, make sure that the crocodile does not accidentally touch the batteries - this can lead to a short circuit. In general, try to secure the device normally: bend the wire (away from the contacts) If necessary, make another letter “T” (with wider “wings”) so that the crocodile is further away from the contact. That's basically all you need to know.
Video - making an electronic cigarette from a pen
