Not many mobile network operators provide unlimited access to the Internet, so we, as a user, have to set a limit for Internet traffic. Many users may say that this will require downloading special applications, and to some extent I agree with them. But now I'm going to talk about a method for which you don't even need to download any applications, because Android has such an opportunity.
So let's look at how to set a limit for Internet traffic and how to use it correctly.
To do this, you need to take a few simple steps:
- Step 1: go to system settings and find the item "Data transfer";
- Step 2: in the menu that opens, select the desired network (in two SIM versions of smartphones there will be two of them, as in this case);

- Step 3: put a tick next to "Set limit" and agree with the displayed notification;

- Step 4: now it remains to set the Internet traffic limit on the graph, the one you need. The orange line is responsible for warning, and the red line is for turning off the Internet when the set limit is reached.
This method allows you to set the Internet traffic limit for the whole month. If you need a daily limit, then you will need to change the start date of the statistics period every day, and set the limit itself as you need it for one day. Yes, do not forget to adjust the Internet traffic limit according to the tariffs of your operator.
Example 1. Your ISP provides you with 5 GB of Internet traffic per month. Everything is simple here, go to the settings, put the checkbox "Set limit" and set the required Internet traffic limit on the graph.
Example 2. Let's offer your mobile operator gives you 50 MB per day. We put a tick in front of "Set limit", set the desired limit for the day (first set a warning, and then the value of the limit), and then set the date of the statistics period for the day that you need. Do not forget to translate the start date of the statistics period every day.
But that's not all the possibilities. In this menu, you will have access to detailed statistics of Internet traffic consumption, for this you need to scroll down. Using these statistics, you can find out which of the applications uses the most traffic. Oh yes, I almost forgot, there is also such an item in the limit settings - "Show when blocking". This item is activated automatically when the limit is enabled. With this option, an air circle appears on the lock screen displaying information about the traffic consumption. For myself, I always leave this option enabled.


This is the kind of functionality that Android has in itself. I hope the article was useful for you. If you have any questions, feel free to ask them in the comments.
Stay tuned, there is still a lot of interesting things to come.
Hello dear friends! Already many articles have been written by me on setting up Wi-Fi, about various errors, problems, etc. And now you leave a lot of comments to these articles, with various questions in which I am trying to help you. And very often from the comments left by you, I find topics for new articles. Several times in the comments I have come across a question about limiting the speed through a Wi-Fi router.
Someone needs to limit the speed only for Wi-Fi, someone only for certain devices (computers, laptops, phones), or make a speed limit for all devices that work through a router. Today I decided to write an article in which I will tell you about how you can limit the speed of the Internet through a router. I will show on the example of a TP-Link TL-MR3220 router (just working through it now)... But my instructions are suitable for all routers of the company. TP-Link.
TP-Link routers have a special item in the settings Bandwidth Control, it is designed specifically for setting the speed limit of the Internet connection. Now we will look at how you can set a limit on all devices that work over Wi-Fi and over a network cable. We will also consider a method of limiting the speed only for certain devices by IP. And in order to limit the speed by IP, you need to bind the IP address to the MAC address. And you also need to make sure that the client does not change the MAC address and does not bypass the speed limit. We will consider everything, it will be a funny article :).We limit the speed for all devices that work through a router
As I wrote above, TP-Link routers use IP addresses that are assigned to each connected device to limit the Internet speed. In order to configure the restriction, it is desirable that the router automatically distribute IP. This business in the router is handled by the service DHCP... By default, it is enabled and works, if you did not disable it then everything is fine, but if you don’t remember already, then let's check it out.
We go into the settings of the router. If you don’t know how to do it yet, I’ll tell you :). Type in the address bar of your browser the address 192.168.0.1 , or 192.168.1.1 and follow it. A password and login request will appear to enter the router settings. If you have not changed them, then this admin and admin.
In the router settings, go to the tab DHCP and see what the status would be marked Enable... This means DHCP is enabled.

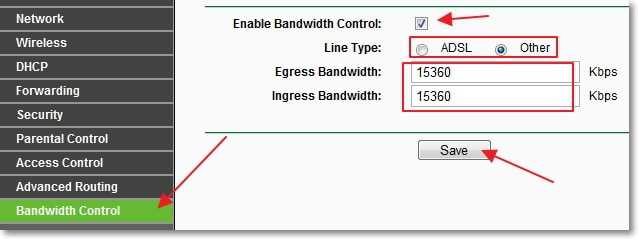
Checked out. Now go to the tab Bandwidth Control... We need to enable this service and specify some settings.
Against Enable Bandwidth Control check the box, thereby enabling this service.
Near Line Type you need to select the type of connection. If you have ADSL, then we mark this item. If you have a different type of Internet connection, then set the item Other.
In field Egress Bandwidth you need to specify the maximum outgoing speed (when transferring files to the Internet)... I advise you to set the speed provided by your provider at this point. For example, I have 15 Mbps... Therefore, I need to register 15360 (1 MB = 1024 KB, 15 * 1024).
And in the field Ingress Bandwidth you need to specify the maximum (allocated by the provider) incoming speed (when you receive information from the Internet)... I have the same 15 Mbps so I indicated 15360 Kbps.
We saved the changes, now go to the tab Bandwidth Control – Rules List... Click on the button "Add New ...".
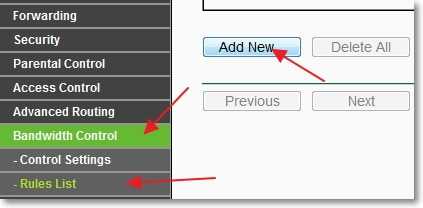
Check right away what would be opposite Enable a check mark has been set.
In field IP Range you must specify a range of IP addresses. If you want to limit the speed for all devices connected to the router, then you need to specify the same range as in the DHCP tab. Port range skipping, near Protocol you can select a limitation for a specific protocol, but it is better to leave there ALL.
Now we set the maximum, outgoing and incoming speed for this rule.
In field Egress Bandwidth - Max Bandwidth (Kbps) indicate the maximum outgoing speed (when you upload files to the Internet)... For example, I want to limit the speed to 3 Mbps... Therefore, you need to write in this field 3072 (3 * 1024 = 3072 Kbps).
In field Ingress Bandwidth - Max Bandwidth (Kbps) we prescribe the maximum incoming speed (when you download from the Internet).
Press the button to save. "Save".

Everything, the rule has been created. Now I will explain a little what we have done. We are for all devices that receive an IP address from the router in the range from 192.168.0.100 before 192.168.0.199 limited the speed to 3072 Kbps(3 Mbps). To edit or delete a rule, click on the links Modify, or Delete.

Limiting internet speed for specific devices
Let's now take a look at how to set internet speed limiting on certain devices. Today there was a comment when it was necessary to set a limit on two laptops that took the Internet via Wi-Fi, and a computer that worked via a cable should receive full speed, without restrictions. True, the author did a little differently, he just on the tab Wireless decreased the indicator near the parameter Max Tx Rate... But I will write a method that I think is correct.
Since the limitation is set by IP, then first you need to bind the IP address to MAC address of a specific device. For example, we will bind a specific IP to the MAC address of a laptop, for example 192.168.0.120 ... And when this laptop is connected, it will receive this IP all the time (will be identified by MAC)... And already on this IP we will set a restriction.
To do this, go to the tab DHCP – Address Reservation... Click on the button "Add New ...".
Against MAC Address enter the MAC address of the device to which we want to bind the IP address. And in the field Reserved IP Address enter the IP address that we want to bind to the device. Status leave Enable... Push the button Save.

How to find the MAC address?

Reboot your router. Tab System Tools – Reboot, button "Reboot".
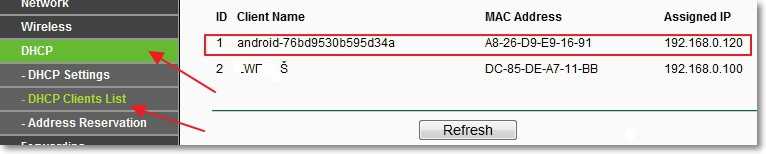
After rebooting, go to the tab again DHCP – DHCP Clients List and check if the IP is assigned to the required device.
Now go to the tab Bandwidth Control – Rules List and press the button "Add New ...".

Against Enable- check mark. In the first box, opposite IP Range we register the IP address of the device for which we want to set the restriction. Port range and Protocol leave unchanged.
In field Egress Bandwidth: - Max Bandwidth (Kbps) indicate the maximum outgoing (uploading to the Internet) the speed you want to set for this device.
In field Ingress Bandwidth: - Max Bandwidth (Kbps) you must specify the maximum incoming speed. The speed is set at Kbps... This means that in order to indicate the maximum speed, for example 3 Mbps, you need to write in the field 3072 (3 * 1024 = 3072). Click the button Save to save changes.

If you get an error while saving this rule:
Error code: 27009
The rule you add conflicts with the existed rule, please input again.
This means that you have already created one rule that contradicts this. Just delete the rule you created earlier.
If everything is fine, then you will see the rule we have created.

This rule means that for a device with an IP address 192.168.0.120 we limited the speed up to 3 Mbps... The rule can be deleted or changed by clicking on the links Delete and Modify.
In this way, you can create many rules for different devices. It doesn't matter if it's a laptop, phone, tablet, etc., they all have MAC addresses.
What if the client changes the MAC address?
Yes, if the client changes the MAC address (it is very easy to do this on a computer), then it will not be assigned the IP address specified by us. And if an IP is not assigned, then the speed limit that we have set will not work.
Well, nothing, now we will make it so that when the MAC address is changed, the client's Internet will not work at all. Here I am so cruel :).
However, if you often connect new devices, then this method is not very convenient. It's just that the Internet will work only on those devices whose MAC addresses we will register in the router settings.
Go to the tab Wireless – Wireless MAC Filtering... Push the button "Add New ..."... First you need to add the MAC address of the computer from which we configure the router. Otherwise, we will close access to ourselves.

Near MAC Address enter the MAC address of the host computer in the field Description- description. Status leave Enabled... Click the button "Save".

Now check the box next to Allow the stations specified by any enabled entries in the list to access (this means that only those devices whose MAC addresses are in the list will be able to connect to the router).
Click the button Enable to activate filtering by MAC addresses.

Now only one device on the list can connect to the router. To add new devices, just click the button "Add New ...".
MAC addresses of connected devices can be viewed on the tab DHCP – DHCP Clients List
In order to disable filtering by MAC addresses, on the tab Wireless – Wireless MAC Filtering press the button Disabled and remove the added addresses.
By the way, this filtering is one of the best ways to protect a wireless Wi-Fi network.
Afterword
I don't know if you will also need to install filtering by MAC addresses, but just in case I wrote it. And the method of limiting the speed itself is very good and I think that it will be useful to you. To be honest, I don't know how other router manufacturers are doing with this. But on TP-Link routers, this is done as I wrote above.
If you have any questions or additions, then leave them in the comments. Good luck!
More on the site:
How to limit the speed of the Internet through a Wi-Fi router? On the example of a router from TP-Link updated: February 7, 2018 by the author: admin
Hello dear friends! Today I would like to tell you, over WiFi or in a local network for computers through a router.
This may be required in different situations, for example, my friend lives in a hostel, he has a wired Internet connection, and he manages to distribute WiFi in the hostel through a router for a fee!
He has his own list of clients, and they pay him a monthly fee to use the wireless Internet as a provider.
So that users would not greatly overload the channel, and they could use the Internet most comfortably, I helped him configure the download speed limit for other computers.
He has installed WiFi router Tp-Link WR841ND, with support for the function Bandwidth Control(shaper) responsible for traffic distribution. It was on it that I made the setting, which I will discuss below.
By the way, almost all modern routers of the company TP-Link support this option, and the firmware interface is similar for all models, so don't worry if you have a different model, just follow the instructions and everything will work out.
Internet speed control for all computers
So, first of all, we will consider setting up a speed limit for all computers connected to the router via a wireless network or a local one.
I want to note that for setting it is desirable that the DHCP service of dynamic assignment of IP addresses for devices. Usually, it is turned on by default, but it will not be superfluous to check. Go to the settings of the router through the browser, type in the address bar 192.168.0.1 or 192.168.1.1 ... A pop-up window will appear in which you need to enter your username and password, usually this admin and admin if you haven't changed anything.

Let's go to the menu on the tab DHCP where opposite DHCP server there should be a checkbox Turn on.

Check the box next to Enable bandwidth control.
The line type in my case I chose Other if you have ADSL, then indicate this option.
Into the fields Outgoing and incoming bandwidth enter the maximum values corresponding to your tariff plan. If you do not know, then check with your provider. If I have 100 Mbps, then I enter 102400 Kbps.

After saving the changes, open the tab - List of rules and click Add new.

Put a tick opposite Turn on.
Into the fields IP address range enter the address range as in the settings DHCP, which will allow us to control all connected devices. Port range let's skip Protocol let's leave All .
Next, we indicate in the fields Outgoing bandwidth minimum and maximum outgoing speed (this is when you upload your files to the Internet). For example, I set the limit to 5 Mbps. Therefore, in the minimum we set 0, and in the maximum we enter 5120 Kbps (5 * 1024 = 5120).
In the fields Incoming bandwidth(when you download files from the Internet) I wrote in the same way.

Now all devices with IP addresses from 192.168.0.100 to 192.168.0.199 connected to the router will be assigned a speed of 5 Mbps. If in the future you need to remove or change this restriction, click on the links Change or Delete.
Now it remains to reboot the router for the settings to take effect, to do this, go to the tab System Tools-. After reboot check your internet speed to make sure this constraint works.
Limiting traffic rate for individual devices
The limitation for individual devices is set by IP address, and before that you need to bind this address to the MAC address of the desired device. For example, I made an IP binding to the MAC address of the user's computer "N" 192.168.0.129 , therefore, this PC, when turned on, will always receive only these numbers from the router.
Binding an IP address to a MAC address
So, we go to DHCP – Address Reservation and press the button Add new .
In field MAC address enter the desired value. In field Reserved IP address enter the corresponding IP address. State- we leave it on. Press the button Save.

Where can I get the MAC address of the required computer?
If this computer or other device is connected to our router, then go to the tab DHCP-, where all connected clients to the router will be displayed. Select the one you want.

After the performed operation, you should do reboot the router... Open the tab System Tools – .
When the hardware restarts, go back to DHCP- and check if the IP is bound to the desired device.

Then open the tab already familiar to us Bandwidth control – List of rules and press Add new .
We put opposite Turn on checkmark in the first field Range of addresses enter the desired IP address, Port range and Protocol let's leave it unchanged.
In field Outgoing bandwidth enter the required outgoing speed (when we upload files to the Internet).
In field Incoming bandwidth enter the required incoming speed (when we download files from the Internet). In both cases, I entered the maximum 5 Mbps (5 * 1024 = 5120 Kbps). Click the button Save when you're done setting up.

If you suddenly appear any errors while saving, check if you have created any more rules. They can conflict with each other. Just delete the previously created one.
If everything went well, a created rule will appear that will limit the speed to 5 Mbps for one device with IP 192.168.0.129.
When there are many devices, then create such a rule for each, the parameters may be different everywhere.
Protection in case the client changes MAC address
Now we know how to reduce internet speed for individual devices, but if one of the clients changes the MAC address, it will bypass the speed limit. Whatever this happens, you can install a filter by MAC address, thanks to which, if the client decides to cheat, his Internet will be completely lost.
This method will be a little inconvenient for those who constantly connect different devices to the router, so that the Internet can work on them, you will need to add their MAC addresses to the whitelist.
And, as it seems to me, it is not always necessary to use this option. For example, somewhere in the office it will be more suitable than ever, but for the home, I think it will be superfluous.
Open the tab Wireless mode- and press Add new .

First of all, add the address of the computer from which you are configuring, otherwise you will block yourself!
In field MAC address enter the appropriate data in the field Description enter a short name for the mark, Status put Included... Then we press Save .

Now you should check the box opposite Allow stations listed in included entries to access then click on the button Turn on to activate the filter.

After the settings are made, only one PC will have access to the Internet, to add other devices, computers, laptops, smartphones, click Add new and repeat the above operation to add devices.
The list of MAC addresses can be checked on the menu tab DHCP – .
Be very careful, follow the instructions strictly, or you can block yourself and lose access to the settings. Then you will have to do a system reset.
To disable the MAC address filter, on the tab Wireless mode- click on the button Disable opposite the inscription Filtering by MAC addresses.
If you don't know how to distribute WiFi through a laptop, read.
Well that's it, dear friends, now you know how to limit internet speed through a router. If you have any questions, ask in the comments, I will try to help!
It is not uncommon for several people to use the same Internet connection at the same time. For example, this is most often the case with home sharing. Because of this, sometimes you have to deal with a natural consequence - the problem of low speed.
In practice, everything looks like this. Suppose that there are two computers at the same time using the same connection to. requests and / or initializes them first. In simple terms, if someone includes downloading a file using a torrent client, then the other user, at best, can be content with reading texts and checking mail. But if you enter then this problem can be easily solved. And quickly and easily. In addition, understanding how to limit the speed of the Internet, it is quite possible to organize the distribution of traffic to several users, while saving on payment for the provider's services. This is how knowledge can be profitable.
How to limit internet speed
So, there are two ways to manage traffic: software and hardware. Moreover, the first is subdivided into two groups: by the built-in means of the operating system and by means of third-party applications. Both the first and the second method allow you to limit the speed of the Internet, however, they have a number of characteristic features. So, the hardware is practically independent of the computing capabilities of the computer components and can work effectively even with old systems. But the second is more flexible and relatively cheap (although this is not a rule). The choice depends on the user's requirements, the ability to work with devices / programs and financial capabilities. By the way, Internet traffic accounting is easily configured in both cases.

Hardware method
To implement it, you need a special device - a router. Prices for budget models start at $ 10-15, which makes them an interesting proposition. If there are few users, then it makes sense to register a unique IP address on each computer. Then you need to go to its settings (the address for the browser is indicated in the instructions or on the sticker) and select "DHCP - Address Reservation" from the list. Here you need to add each computer, specifying unique MAC and IP addresses (you can see in the properties After restarting the router, check the "DHCP client list" - all computers should be visible. To now limit the Internet speed for each IP address, you must go to "Control bandwidth - List of rules. ”Here you need to add an address and register downloads and uploads.
It is also recommended to configure the filtering of MAC addresses in the wireless mode section, which will secure the connection from receiving full speed by any user who, for his part, changed the ID of the network card.

Programmatic way
In this case, preference should be given to specialized programs (rather than built-in Windows solutions like QoS). You can install a local HandyCache proxy server and specify a limitation in it. The disadvantage is that you have to configure the network in such a way that other computers can access through one - the main one, on which the proxy is installed. The Traffic Shaper XP program is also quite famous. It allows you to set speed limits. Once configured on each computer, you can begin using a single connection.
If you are an active Internet user, then you are familiar with the situation when the amount of spent traffic turns out to be more than you wanted. To save yourself from such troubles, it is enough to set a limit on the amount of Internet traffic consumption in megabytes that you plan to use over a certain period of time.
The limitation measure will be useful if you need to spend, say, no more than 50 MB per day, which you order for a specific purpose, or if they are provided under the terms of the tariff plan. This will allow you not to go beyond, and not be left with a zero balance or, even worse, negative. This will also be relevant if at the beginning of the month there are several gigabytes of free traffic that needs to be distributed in equal parts.
How does the traffic limitation process take place?
The limit is set in the appropriate settings item, as well as using special applications that can be downloaded from Google Play. Thus, it is possible to highlight the tools built into the phone and third-party applications.
Built-in tools
If you decide to use the standard Android capabilities, then open: Menu - Settings - Data transfer (the path may differ depending on the device model and the software shell). In the “data transfer” section, there may be a “mobile” tab.
Here, the number of megabytes used by this or that application per day in a certain period of time is displayed quite informatively. To activate the restriction function, you must mark it with a tick in the mobile network tab.
It is not possible to set a limit for Wi-Fi, since it is assumed that the traffic is unlimited.
The main advantage of this method but, lies in the absolute simplicity and the absence of the need to download additional software. You can specify the volume, upon reaching which the access to the network will be terminated. And so that it does not happen suddenly, the predetermined boundary limit will warn about reaching the limit.
Of the shortcomings we can highlight the inconvenient adjustment of parameters, as well as the absence of a repetition of the event. This means that you need to visit the settings every day and indicate the day when the restriction will be in effect.
Third party funds
Limiting Internet traffic in My Data Manager - planning Internet package consumption
What you will love most about My Data Manager is the sheer amount of settings and options compared to standard Android tools. You can set the conditions of your tariff plan, and the program will automatically calculate consumption for a given period (month, quarter, half-year), or set it to repeat the day, week, month. It is possible to exclude applications with zero traffic accounting (some social networks or navigation maps for which the operator does not charge a fee), select the time and place where the scheduled tasks will be triggered, as well as monitor the consumption from the status bar or widget.
Limiting Internet traffic in My Data Manager - different settings
If you do not want to spend a lot of money on mobile Internet, then use the ways to save Internet traffic.
Outcome
The superiority of third-party software over the standard traffic limitation method is more than obvious. Flexible parameters will allow you to adapt to any tariff plans and stretch the provided megabytes for the period of time as needed. You can easily automate the entire process and not interfere with the operation of the application, or make adjustments if necessary, when necessary.
In addition to setting a limit on megabytes, you can optimize consumption by
