The cold will come very soon and you will have to get warm jackets, coats, boots and scarves with hats. My least favorite of these are hats.
Not all women like traditional hats, and there are many reasons why we do not want to wear them in everyday life. For example, the fear of ruining your hair, headaches from tight fitting, and so on.
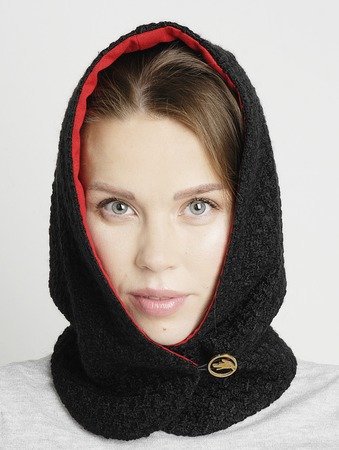
But recently I found the perfect solution for myself - a hat-hood, it's also a hood. This headdress very comfortable, practical and original. One of the main advantages of the hood is that it combines two accessories - a hat and a scarf.
It warms well not only the head, forehead and ears, but also the entire neck, and sometimes the shoulders and back, if the hood is elongated.
bonnet
Caps-bonnets were used in the 19th century. Then this headdress was like a hat and cap with hard brim. It was fixed at the neck with satin ribbon ties. Over time, its style has changed, the hood has become a more popular and comfortable headdress.
The hood began to be made from comfortable materials and without satin ribbons. In the 90s of the XX century, this model was incredibly popular and was included in the wardrobe of almost every woman.
Fashion is cyclical, and now the bonnet is once again becoming a hit, many women who follow current fashion trends are beginning to acquire it. And they are absolutely right!

Not only fashion designers, but also famous actors are actively taking up the idea of such a comfortable headdress. For example, Ekaterina Volkova created her personal brand based on the hood.
The actress says that once, having unfastened the hood from her coat at the request of her mother, she tried it on as a separate headdress. I looked in the mirror, tweaked this “hat” on my head a little - so the idea arose to create such an interesting and unusual headdress.
 Soon Ekaterina developed a whole collection of hats for all occasions and for every taste. The trick is that such a hood has two sides, each can be worn depending on the mood.
This is a combination of different textures - lace with wool, lace with silk, wool and silk ... This headpiece is perfect for both everyday wear and special occasions. For example, by making a bonnet from silk or lace, you will get a great wedding accessory. And fleece hooded hats are perfect for children and even for men.

We were impressed by this idea, and we have prepared for you simple patterns that will help you sew trendy handmade headwear. Perfect for those who don't like hats!
The pattern is one for all sizes (fortunately, the size of the head is approximately the same for everyone) and consists of three parts: two side and back. For each layer, you need to cut out 1 insert piece and 2 side pieces. Seams can be omitted, as they will not be visible in the finished product.
This is convenient for those who have not acquired an overlock or a machine with a zigzag stitch.
 The loop should be sewn immediately on the right side before the product is turned inside out, but it is better to sew on the button after trying it on. This will allow you to adjust the tension and position of the hood on your head.
 Here's what the end result should be.
 And how do you like such a stylish solution?
 And I just love this one. Perhaps this is the hat I will sew in the fall.
 There are also options for a hat-hood made of fur.
 Or these original knitted hoods.

As you can see, such a headdress is so versatile that it can fit any look, it will be appropriate in any season and weather. From what material to sew a fashionable hood - you decide, think about your needs. It can be an easy option for a summer evening in silk and lace, or it can be insulated. fleece for winter or fur.
In any case, it is very convenient, practical and fashionable.
We want to tell you about a new trend, which was invented by the famous theater and film actress Ekaterina Volkova. And offer a ready-made pattern of a fashionable headdress.
The actress opened a project to launch a brand of fashion accessories WOLKA, raising about 1.5 million rubles for it by crowdfunding. I will not go into the stunning economic details of this news. The very idea of Catherine seemed interesting to me. As she put it - an idea from the rubric "everything ingenious is simple."
Once Ekaterina, having unfastened the hood from her coat at the request of her mother, tried it on as a separate headdress. I looked in the mirror, tweaked this “hat” on my head a little, and ... an idea was born. The idea of creating a new headdress. The first person who accepted this idea was her little daughter, who immediately ran up to her mother and said, “I also want this for myself.”
It was 2 years ago. Catherine did not know how to sew or cut. Therefore, I decided to turn to designers to bring this idea to life. But due to the workload of her creative plans, everyone she turned to refused to help. Then the actress herself became a designer and organized the WOLKA trademark. And the headdress itself is called a wolf.
There can be a large number of options for wolves for every taste, says Ekaterina. This and a different combination of different textures - lace with wool, lace with silk, wool and silk, ... Based on this, there may be different types of wolves for different seasons. Festive wolves - lace or silk, for example, for a wedding. Fleece wolf hats for children and even for men. Wolves unisex, under jeans from textured fabric "Missoni".
See how she talks about it herself:
We were impressed by this story. We immediately remembered the patterns of simple hoods. Slightly modify and you can start sewing. Who is with us, join us! We offer here such a pattern.
It consists of three parts: two side and back. The pattern is one for all sizes, since the head sizes are approximately the same for everyone. We make a tuck at will. We insert the loop into the seam of the right half of the wolf (we will now call it that). The location of the button is determined after the product is ready.


Hats have always been an integral part of clothing. And in the tsarist centuries, and during the years of Soviet power, and now.
Such is the climate in our country that in the summer you have to wear hats, caps, berets to protect yourself from the scorching best sun, so as not to get a sunstroke. In winter, we put on warm hats with earflaps, mink hats, fur hoods to protect the most important part of the human body - the head - from frost!
As a rule, a headdress is the first thing that the interlocutor pays attention to. Therefore, it should look unique, stylish, and most importantly, be combined with your clothes. Due to the fact that the same products occupy the shelves of clothing stores and boutiques every year, women have a desire to make do-it-yourself headdress one that no one else will have. In order to sew a headdress, you need not only material, a great mood and a desire to create. Need more and headwear patterns which are not so easy to get today.
So, if you are a woman and decide to make yourself a unique headdress for the summer or winter, which no one else in your city will have, then you have two ways. Buy a knitting or sewing magazine and find it there headwear patterns. It will cost a lot of time and it will take a lot of time until the exact pattern that you need is published in the magazine. You can also use the sections of our site and find the right headdress pattern absolutely free with minimal time investment! I think you choose the second way!
So! Introducing our collection headwear patterns, which will, of course, be replenished. Now you can sew a hat with your own hands and be on top in any company!
Hello dear blog readers. I hope you have a little time to miss our articles on the topic Leisure and hobbies. Today I want to talk about hats again. In the last article we talked about, and today I want to introduce you to a new trend among hats.
Talking with friends and acquaintances, I came to the conclusion that not all women like the usual hats, and there are many reasons that do not allow them to wear them in everyday life. For example, fear of ruining your hair, headaches when wearing it, or lack of choice when buying. What to do?
Quite unexpectedly, I came across a very curious model of a headdress, which has already become a trend in Russia. And I immediately thought that this version of the headdress would certainly come in handy and appeal to many.
The famous actress Ekaterina Volkova came up with this headdress and created a brand in her own name, which is called Wolka. If you haven't met him yet, this will be a pleasant surprise for you.
If you give all the benefits of the Wolf's hood, you get an impressive list. Here are just a few of what I think are the most important:
- unusual and unique headdress
- emphasizes femininity
- easy to put on, can be worn around the neck without taking off, for example, indoors
- individual unique design for each model
- no one will have these for sure.
- goes well with dresses and sporty style
- the hairstyle does not deteriorate, as from hats
- in cold weather allows you to hide from the wind
This is how Catherine herself talks about her hood.
For those who wish, but are not ready to purchase the famous Wolka hood from the author, I suggest reading this article to the end. I just thought that one of you would probably want to sew such a hood with your own hands. So buy a beautiful fabric and sew a new fashionable warm headdress for yourself. The pattern of the model is universal for all sizes. Some cutting, sewing and design skills will of course be needed.

When sewing my hood, I used the pattern below. The pattern seemed to me close to the original.
I think for those who sew it will not be difficult to figure out the technology of tailoring. I want to note that the hood is double-sided, which means that the details are cut out in 2 copies from different fabrics.
For each layer, you need to cut out 1 insert piece and 2 side pieces. Seams can be omitted, as they will not be visible in the finished product. This is convenient for those who have not acquired an overlock or a machine with a zigzag stitch.
The only thing I would like to add from myself. Sew the loop immediately on the right side before turning the product inside out, but I recommend sewing on the button after trying it on. This will allow you to adjust the tension and position of the hood on your head.
Wolka hood pattern (not original)
 The pattern is taken from the site http://blogportnoy.ru
What fabric to use for the hood?
There are many options for using various textures and for every taste. Lace with wool, knitwear, silk, fleece look great. I recommend choosing a fabric for sewing a hood based on what time of the year and for what occasion you plan to wear it.
For example, a wedding hood can be made of lace, silk, fine knitwear. For winter and sports, options with wool, fleece, tight knitwear, in combination with each other, as well as with the same lace, are perfect. One way or another, the choice of companion fabric will always depend on your personal preferences and capabilities.
I present to you my version of a sewn hood. I hope you appreciate my first experience in tailoring. For a trial version of the hood, I used dense black fleece and thin knitwear on top. The hood is quite warm and comfortable to wear. Next time I plan to pick up a woolen knitted fabric and lace. I want to sew something more tender and light.

For ease of perception, I have prepared a small table of the most necessary hood for sewing:
|
for one hood ≈ it takes 2 cuts of fabric of different textures 50 cm with a width of 100 cm) Total 1 m per 1 m of fabric. |
||
|
Sewing threads |
||
Despite the fact that the hood has become almost a mandatory attribute of modern urban style, hats, caps and scarves still do not go out of fashion. A flirty hat will complement an elegant autumn coat, a cap will help you feel confident on a sunny summer day, and a hairpin hat can be a spectacular decoration for a ball or wedding dress. Even a novice needlewoman can make original fabric hats with her own hands. How to do this, you will learn from our article.
What is needed for this?
Making your own hats is fun, but you'll need a few things:
- sewing machine;
- a set of needles for a sewing machine;
- a set of needles for hand sewing;
- tailor's scissors;
- tape measure;
- chalk or soap;
- wooden ruler;
- thick paper (preferably graph paper);
- pieces of fabric;
- threads of suitable color and quality;
- interlining;
- cardboard;
- glue;
- decoration materials.
Sewing machine
Any sewing machine will do, even grandmother's manual Singer. The main thing is that you feel confident behind it and can easily perform the simplest operations.
Important! The machine must be debugged and equipped - it is better to immediately buy a set of needles of different thicknesses in order to change them depending on the fabric.
Textile
Any fabric is suitable for the manufacture of hats. The most important thing is to choose a model. For example, making a hat with a brim of crepe de chine or gauze is hardly advisable, but something soft in an oriental style is no problem.
Accordingly, there should be threads of different thicknesses and different qualities at hand so that it is possible to sew both natural and synthetic materials (nylon is better to sew with nylon, silk with silk, etc.)
Let's start simple
The simplest option is an Arabic-style scarf. To make oriental headdresses for women with your own hands, you need soft fabrics that can drape well. Suitable for you:
- thin silk;
- crepe de chine;
- thin knitwear;
- muslin;
Important! If you are making a headdress for the first time, it is better to refuse knitwear, unless you already have a ready-made knitted scarf with swept edges. To work with this material, you need a special needle.
An oriental-style scarf is a long strip closed into a ring. First you need to make the strip itself. It can be single or double, manufacturing methods will differ.
Option 1
To make a single oriental scarf, you will need a strip 40-50 cm wide and about 1 m 20 cm long:
- Finish the seams with an overlock or overcast by hand with a buttonhole.
- Stitch the short edges to make a ring.
Important! Make sure the strip is not twisted.
Option 2
If the fabric is very thin, you can make a double scarf:
- Cut out a strip of the same length, but 1 m wide.
- Fold the panel right side inward, aligning the long sections.
- Trim long sections.
- Trim the seam allowance 1mm from the seam.
- Turn the strip inside out.
- Gently iron the seam if the fabric allows it.
- Fold the workpiece in half, aligning the short cuts.
- Stitch a short seam.
- Iron the seam.
- Sweep allowances.
Important! Such a scarf is put on the head, then a long loop is thrown over the head, which covers the shoulders and chest.
Turban
A popular oriental cloth headdress is a turban. They sew it directly on the head, so you will most likely need an assistant to work. A wide scarf or scarf made of thin fabric is used as a blank.
The manufacture of such a headdress from fabric is carried out as follows:
- Fold the scarf in half, matching the long sides.
- Attach it to the head so that the middle falls on the forehead.
- Draw both ends to the back of the head, twisting them slightly.
- Make a single knot at the back of the head (you can secure it with a couple of basting stitches).
- Draw the ends to the forehead towards each other.
- Tuck the left end under the right end so that the edge is not visible.
- Pin the layers together with a few stitches.
- Tuck the right end under the top layer of fabric and pin together.
- Remove the turban.
- Where there was a basting, lay more reliable seams.
- Decorate the turban.
Important! Suitable for decoration:
- brooch;
- feathers;
- rhinestones;
- sequins.
The brooch can be pinned to one of the knots. If you choose rhinestones or sequins, it is better to finish the places where the seams are laid with them.
Bandana
Another simple do-it-yourself fabric headdress is a bandana. It can be sewn from a dense fabric, cotton is best. Suitable:
- chintz;
- satin;
- coarse calico;
Pattern
First you need to make a pattern. First you need to take measurements:
- head girth;
- distance from the middle of the forehead to the crown;
- distance between temples.
The pattern is best done on graph paper, because there is a grid:
- Draw a straight line, the length of which is half the circumference of the head.
- Mark the edges - for example, Z (back of the head) and L (forehead).
- Draw perpendiculars to both points in the same direction, set aside on them the distance from the middle of the forehead to the top of the head.
- Divide the distance between the temples in half.
- Set aside the resulting measurement from point L and also draw a perpendicular, marking the resulting point, for example, with the letter M.
- Connect points L and M with a smooth line.
- Extend the line from point 3 to the same length, put a point, for example, 31.
- Connect points M and Z1 with a smooth line.
The pattern of the main part of the bandana is ready, you can move on to the visor:
- Draw a line on a graph paper.
- Set aside on it a segment equal to half the distance between the temples.
- Mark points B (temple) and L (forehead).
- Draw a perpendicular to point L.
- Set aside 5 cm on the perpendicular and put a point, for example, L1.
- Connect points L1 and B with a straight line.
cutting
Fold the fabric right side inward and proceed as follows:
- Lay the pattern of the main part so that the fold of the fabric coincides with the fold line of the pattern.
- Circle the pattern with chalk or soap without an allowance.
- Cut out the piece.
Visor
It is cut in the same way as the main part, only 0.5 cm allowances must be made for all sections. To make the visor more rigid, it can be reinforced with non-woven fabric or a lining made of a denser fabric.
Assembly:
- Finish the seams of the body with an overlocker or by hand (the buttonhole is best, but the buttonholes should be even and close together).
- Strengthen the details of the visor with adhesive interlining.
- Lay them right sides up.
- Sweep and stitch along all cuts, except for the one that will be sewn to the main part.
- Trim the seam allowances so that no more than 2 mm is left before the seam.
- Cut the corners at a 45° angle.
- Turn out the visor.
- Iron the seams.
- Iron loose allowances inwards.
- Align the middle of the fold of the visor with the middle of the main part and pin with a tailor's pin.
- Attach the visor.
brim hat
For the manufacture of this headdress, more or less dense fabric is suitable - from chintz to velvet or brocade. In addition to it, you will need:
- hat tape;
- thin hard cardboard;
- compass;
- scissors;
- universal glue;
- awl;
- tape measure.
Important! Cardboard can be replaced with paraplene or penofol.
Taking measurements
To make a brim hat, you will need the following measurements:
- head girth;
- margin width;
- crown height;
- bottom diameter.
We remove the girth of the head in the usual way - by attaching the zero mark of the centimeter tape to the middle of the forehead, we draw it along the most convex parts of the skull - just above the ear, above the back of the head, above the second ear and again to the middle of the forehead.
All other measurements are optional. For example, the width of the fields can be 10 cm, the height of the crown is from 5 to 15 cm, the diameter of the bottom is 5-10 cm.
Important! The easiest way to make a hat with vertical brim - the diameter of the bottom will be exactly the same as the diameter of the hole in the brim. At the blank for the fields, we make allowances from those sides that will join the bottom and fields.
Pattern
To make a pattern, you need to know the radius of the hole. To do this, divide the head circumference by 6.28. Farther:

We make blanks
It is necessary to make one detail of the bottom and crown:
- Lay the fabric in one layer, right side down.
- Circle the patterns.
- Cut out the details.
fields
The fields are fitted on both sides, so you need two parts:
- Fold the fabric in half right side inward.
- Circle the cardboard circle, leaving 1 cm allowances on the outer and inner circles.
- Cut out the pieces according to the allowances.
Assembly
We start the assembly by stitching the fields:
- Lay the pieces right sides together.
- Stitch the outer edge.
- If the fabric is stiff, the allowance can be trimmed at a distance of 1 mm from the seam.
- Insert cardboard liner.
- Iron the hole allowances to one side.
Important! We cover the fields by smearing the allowances on the fabric with glue and pressing them to the allowances on the cardboard. Make sure that the fabric does not gather in folds. We iron the bottom allowance on the wrong side, grease it with glue, insert a cardboard pattern and press it tightly. We are waiting for it all to dry.
Finish assembly
All work must be carried out very carefully, trying to ensure that the glue does not get on the front side of the fabric:
- We glue the crown with an overlap - the cut of the fabric in this place should be perfectly even, you can pre-process it with an overlock.
- We bend the top allowance of the crown to the wrong side at an angle of 90 °, grease it with glue and attach the bottom.
- We bend the lower allowance of the crown outward at the same angle and grease it with glue.
- We put the margin allowance between the cardboard blank and the top layer of fabric.
- We press firmly.
- We close the junction of the crown and fields with a hat ribbon.
- We decorate the hat.
Important! You can make a miniature hairpin hat according to the same principle - the technology is the same, but a clip from an old hairpin is still attached to the bottom.
DIY headwear jewelry
From ancient times, they tried to effectively decorate headdresses - with flowers, precious stones, exquisite overlays made of precious metals. A modern woman can also make her hat elegant and unique.
Traditional elements:
- bows;
- flowers;
- feathers;
- fantasy compositions from different elements.
Bows
The bow can be made from the same hat ribbon that you closed the seam with. It is made very simply - you do not even need to overcast the edges, since the tape has an edge:
- Cut a piece of tape 15-20 cm long.
- Fold it in half right side out, but do not iron anything.
- Bend the free edges to the middle.
- Iron the folds.
- Sew the cuts.
- Sweep the layers along the already made seam and pull off a little.
- Cut another piece, 5-8 cm long.
- Close them up.
- Bend the free edges to the side of the bow where the seam is.
- Sew them.
- Attach the bow to the hat.
Important! Instead of a bow, other elements can be attached to a hat ribbon - a spectacular buckle or brooch.
Flowers
Perhaps the most favorite women's jewelry for a headdress. They can be made from different materials:
- fabrics;
- skin;
- suede;
- artificial stones;
- beads.
Important! To make flowers from fabric, special tools are needed. Buying them is not difficult, but it takes time to get used to them. But plant elements from leather can be made without special equipment.
You will need:
- pieces of leather of different colors;
- shoe knife;
- scissors;
- awl;
- cotton threads;
- skin glue;
- ball pen;
- pattern paper;
- material for the middle - beads, for example.
- pan.
Training:
- The skin must first be put in order - cleaned and tinted, if necessary.
- It is best to dye with special dyes for this material - you will certainly find them in the nearest good shoe store.
- The simplest flower consists of five individual round petals. It is best to cut them according to the template so that they are the same. Draw around the template on the wrong side with a ballpoint pen. The petals are cut out with a shoe or any other short sharp knife.
Important! To make the petals convex, they can be “fried”:
- Place the pastry on the pan with the wrong side down.
- Heat slowly until the petals begin to curl inward.
- As soon as you like the shape, take out the blanks (it is best to use wooden tongs).
Assembly
Petals need to be collected together. It is done like this:
- Determine the connection point.
- Make one puncture on each petal at a distance of 2-3 mm from the edge.
- Sew the blanks with a strong cotton thread.
- Close the junction with a bead or a leather circle.
- You can insert additional decorations between the petals and the middle - dyed feathers or fur.
- To make the flower look more impressive, it can be supplemented with leaves - made of leather of the same or a different color, suede, feathers, etc.
Important! You can fry in a pan only genuine leather, the leather substitute melts from this.
Scarves
A popular headdress is a scarf. You don’t need to sew it on purpose, you can always buy a ready-made one in the store, and if there is nothing suitable, just cut a square out of the fabric and overcast the edges. Scarves can be tied in a variety of ways.
Matryoshka
The most classic version of all:
- Fold the scarf in half.
- Put it on your head.
- Tie the edges under the chin.
Komsomolskaya Pravda
It was fashionable to tie scarves or scarves in this way in the first half of the last century. The scarf is tied at the back of the head, the corner remains on top or is removed under the knot.
Cossack
To tie a scarf in this way, it must be quite large. Bring the edges back, make a single knot, then draw them over the forehead and tie them with a double knot to make “ears”.
From this article, you have learned a lot of ideas on how to make DIY fabric hats and decorate them. We hope you have seen how simple and interesting it is, and now from time to time you will practice in order to easily and in an original way give your image sophistication and special beauty.
