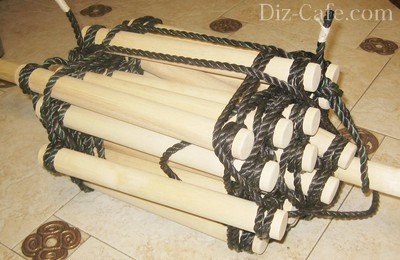
In many areas of activity, one way or another, it is customary to use rope ladders. Making such a device with your own hands is quite simple. You just need to stock up on the necessary materials, tools and follow a clear algorithm, and in a short period of time you will have an excellent rope ladder that you can use for your needs.
Where it will come in handy
Although today such products have somewhat lost their relevance, there are still some areas in which they are used. These include:

These are just the most popular areas in which it is customary to use rope ladders. Of course, such a device is not used in most cases due to its inconvenience. However, due to its simplicity, compactness and versatility, there are many situations where such a product is useful.
Security measures
It is easy to guess that rope ladders do not have high level security. Therefore, there is a whole list of precautions that must be observed:

The main material for a rope ladder is obviously rope. You need to find a durable model made of nylon, nylon, lavsan or similar resources. They are the most practical and durable.
If the product is made for a child’s sports corner, then it is better to use cotton rope. For marine decoration, materials such as linen and hemp are more suitable

Wood is perfect for steps. But you can use metal or plastic. It all depends on your preferences. You can also do without this and simply tie loops or knots as the steps of your stairs.
It is worth selecting materials that are more suitable for the area of use of the stairs. So, frost-resistant and durable resources are more suitable for climbers, fire-resistant ones are more suitable for firefighters, and so on.
Manufacturing methods
Exists a large number of methods for making wooden stairs. Each of them involves the use of different materials and manufacturing techniques. The most popular of them are universal method, using rectangular steps and without steps.
A ladder made using this method will be useful in any household. First of all, prepare the following materials:

Now you can begin the manufacturing process. First of all, cut the cuttings to make bars about 30 cm long. Make 25 of these objects. The remaining wooden material can be used at the final stage to secure the structure.
Carefully go over each step with sandpaper. Make sure it is completely smooth and level. You can varnish the surface, but you must remember that it should not be slippery.
Then cut out recesses on the edge of each step. Their depth should be about 4-5 mm and width 10-15 mm. This will prevent the rope from slipping off the steps.
Next, you can do the ropes. As you remember, it was necessary to prepare two ropes of the same length and size. Tie a 4-5 cm loop at the end of each of them. This is done to secure the ladder in the future.
Now lay out all the steps the way they will look on the stairs. Remember the safety rules for rope products. There must be more than 45 cm between each step in cases where the product will be used by adults. The optimal distance between steps for children is 30 cm. Lay out the steps strictly parallel to each other.
On last stage ropes must be secured to the steps. Since round bars are used, there will be no need to drill individual holes and the like. You just need to use the “Constrictor” knot. He is the most suitable for this matter.
Tie the rope securely on each step. After this, the process can be considered completed. All that remains is to find a suitable place for the ladder, if this has not already been done, and secure it there.
This method differs from the previous one in that flat steps will be used. Plus, there is now no need to weave knots. The rope will pass through the holes made by the drill.
 In general, the process is almost the same. Prepare the required number of rectangular wooden blocks about 40 cm long and nylon rope. Using a drill, make holes slightly wider than the diameter of the ropes on the edge of each block.
Now you can lay out all the steps, not forgetting about safety measures and the minimum distances between fragments, and thread the rope through the holes. After threading the rope through each step, tie a standard knot on it so that the step does not roll down and stays firmly in place.
If for some reason the first two methods do not work, you can make a staircase without using wooden steps. Here the role of the steps will be played by the rope itself.
Most in a suitable way weaving is the “Burlatskaya” loop. Its advantage is that it is a loop, which means you can easily place your foot in it when lifting.

In addition, such a loop is quite easy to untie if you know how. And this will not harm the quality and strength of the rope in any way.
If you know how to weave such a loop, then you can easily make a similar product. It all depends on your preferences and imagination. Otherwise, it is better to use the previous methods, which will be much simpler and more effective.
As you can see, making a rope ladder with your own hands is quite simple. Moreover, all the tools and materials are very easy to find. All you have to do is choose suitable option products and begin the production process.
A rope ladder is a convenient and necessary household device. When folded, it takes up minimal space, but if necessary, when other marching structures cannot be used for some reason, it always comes to the rescue. A rope ladder is indispensable when repairing hard-to-reach areas on the roof. You can’t do without it if you need to go down into a narrow well. In a house where there is a child, such a ladder will serve as sports equipment, while becoming the baby’s favorite toy. We propose to consider the three simplest options for making a rope ladder, which anyone can implement in practice.
Rope ladders consist of two main elements - steps and rope. Some craftsmen use shovel cuttings, which they purchase at gardening or construction centers, to create a homemade rope ladder. Instead of wooden slats, it is also convenient to use tubes made of plastic or light metal alloys. Regardless of the material they are made of, the steps should not have sharp corners that could interfere with movement and injure a person.
In most cases, the steps of the stairs are made of wooden blocks 4-7 mm thick with a round or square section
Ropes for hanging stairs are made from both natural and synthetic materials. Natural fibers of flax, hemp and cotton are durable. They are perfect for arranging a Swedish wall and a sports corner. Synthetic materials such as nylon, polyester, nylon are considered more practical because they are wear-resistant and have increased tensile strength. In addition, they are famous for their resistance to solvents, including turpentine, gasoline, and alcohol. Synthetic materials do not lose their qualities even if wet.
The optimal thickness of ropes for a rope ladder is from 7 to 9 mm. Ropes of this thickness will not cut your hands during operation and will ensure sufficient reliability of the structure.

The choice of rope ladder materials depends only on the purpose for which the product will be used: for work in the open air or in an enclosed dry or wet room
In any case, the hanging ladder is made no more than 15 meters long, keeping the distance between steps within 25-35 cm. Since the rope ladder is a mobile structure, the weight of the finished structure should not exceed 20 kg. It is advisable to equip a suspended staircase with stops that will prevent the structure from touching the wall. The length of the stops can vary in the range of 11-22 cm.
- Two pieces of strong rope 20 m long;
- 7 wooden slats 35 cm long and 3-6 cm thick;
- 1 roll of thick coarse thread;
- Power tools (drill, jigsaw);
- Fine-grained sandpaper;
- and a construction knife.
All cuttings that will serve as steps of the staircase are connected to each other using two ropes. The surface of the cut cuttings should be polished. This will help you avoid future troubles such as scratches and splinters in your palms. The length of the rope should be calculated taking into account that after tying the knots, the finished ladder will be half as long as the original length of the rope.
Making a reliable and durable rope ladder that can easily support the weight of an adult is quite simple.
To prevent the ropes from unraveling during the weaving process, their ends must be singed. This can be accomplished by using a hot knife to cut the material. Wrapping the ends with thick, coarse thread will also help prevent the rope from unraveling.
Let's get to work. Before tying the first crossbar, at the end of each rope we tie a loop with a diameter of 6 cm, from which we will later hang the ladder. Now we take the first step and tie a rope on it. We fasten the rope using the technique of knitting a self-tightening “constrictor” knot, which provides very good fixation of the crossbars.
A visual guide to tying a constrictor knot:
But even if you fix the steps with a reliable constrictor knot, there is always a possibility that the steps may slip. To prevent this, it is advisable to make grooves on both edges of each step. To extend the service life of the crossbars, it is advisable to coat the cuttings with paint or treat them with a special compound that will protect the wood, but will not make it slippery.
An overview of wood protection products will also be useful:

At a distance of one or two centimeters from the edge, using a knife, we first make cuts 1.5 cm wide and 3 cm deep. Then we form small grooves with rounded edges from them.
Having retreated a distance of 25-30 cm from the first step, we tie the second crossbar. Using the same technology, we fix all the other steps until the staircase reaches the desired length.
Before tying tight knots around each rung, make sure that the steps are parallel to each other. After all, it is extremely difficult to untie the “constrictor” in order to re-weave the knot.

A special device allows you to place the steps at the same distance parallel to each other: just fix the rungs between the slats and tie the edges sticking out with a rope
Having connected all the steps one by one, we also form the ends of the ropes in the form of loops. The result should be a staircase about 11 meters long.
Option #2 – crossbars with through holes
A feature of the second method of making a suspended staircase is the need to make holes in the steps. We will stretch ropes through them, collecting all the crossbars into a single structure.
In the proposed option, we will use square wooden cross-sections 40 cm long and synthetic nylon rope. In each cutting, retreating 3 cm from both edges, use a drill to make holes with a diameter of 1.5 cm. After making a couple of holes, do not forget to make sure that their diameter corresponds to the thickness of the rope. After this, carefully sand the crossbars using sandpaper or a grinder and treat them with an antiseptic solution.
We cut a nylon rope, the length of which is 10 meters, into 2 equal parts. We process the edges with harsh thread or hot metal.

Let's start assembling the structure: we make loops or tie knots at the ends of both ropes. We pull the free ends of the rope through the through holes of the first crossbar
When assembling the structure, we use the same device, fixing the crossbars between wooden blocks nailed to the board.

We fold the long “tail” of the rope into a loop, lift it above the crossbar and wrap it around the rope knot. As a result, we get the first step, fixed between two nodes. We use the same technology to assemble the remaining steps.
Option #3 – rope ladder without rungs
If there is no point or time to build a rope ladder with rungs, you can make a structure in which the role of steps will be played by a rope tied in loops.
Also interesting is the option of a staircase with “burlatsky” loops. This weaving technique is good because the result is not a knot, but a convenient loop. You can place your feet and wrists in the loops to support your weight and rest when you get tired.
Making a “burlat” loop is not difficult: we twist the rope twice, forming something similar to a figure eight. We stretch the lower “tails” of the figure eight, and stretch them into the resulting circle top part twisted loop. After use, the loop can be easily untied and the rope can be used for other purposes.
Step-by-step guide to making a “burlat loop”:
Knowing the simple secrets of weaving a rope ladder, you can at any time build a convenient structure, which is sometimes so indispensable in the household.
A rope ladder is a useful thing. It can be useful around the house; it can be used to equip children’s sports Complex. Making a rope ladder is not at all difficult, even in camping conditions.
Despite the fact that this device is not universally popular and in demand, in some cases it is impossible to do without a rope ladder.
The rope ladder in these structures helps develop flexibility, dexterity and endurance in the child. Also serves as additional entertainment.

For people with various motor pathologies. These devices help a person lying down to take sitting position without outside help.

Rope ladders are actively used by rescue services of the Ministry of Emergency Situations and fire departments to rescue people.
For household needs. Rope ladders can be used for cleaning wells and for repair work in hard-to-reach places, such as the facade of a house or roof.

Rope ladders are included in the equipment of climbers, and ships should also be equipped with lightweight and durable structures. The ladders are intended for boarding lifeboats in emergency situations.
Sometimes rope ladders can be made for decorative purposes if, for example, a children's room or living room is decorated in a marine style.

Material from which the structure is made
Crossbars.

These staircase elements can be made of various materials: metal, plastic, wood, rope. The main thing is that they fully fulfill the function assigned to them: they can withstand the weight of a person without deformation or kinks. Sidewalls or bowstring.
These elements are made from rope. The material is selected depending on the application of the product: for children's sports corners it is better to use natural rope. For household needs, it is recommended to use synthetic options: lavsan, nylon, nylon. These materials are designed for high loads, they are not afraid of humidity and temperature changes. It's worth knowing that there are special types ropes having certain characteristics. Thus, ladders for the Ministry of Emergency Situations and firefighters are made of high-strength and non-flammable material. Mountaineering ropes can withstand low temperatures
, and thin, strong and lightweight ropes have been developed for climbers. When making a rope ladder, you can use special models of ropes, this will help make the structure strong and durable.

Requirements for a rope structure

Rope ladder with wooden rungs
To make the structure, you need rectangular wooden blocks, 2.5 cm thick and 3.5 cm wide. It is not recommended to use glued or tenoned blanks for the crossbars. Under load, they can fall apart into fragments. It is best to use solid wood without knots. The width of the workpieces should not be more than 40 cm. The number of crossbars depends on the required length of the structure. You also need to take into account the acceptable distance between steps - no more than 36 cm.
The bars require preliminary preparation. Sharp edges need to be sanded to give the crossbars a smooth finish. Then, using a drill, holes are drilled at the ends of the workpieces. It is important that the holes are not located at the very edge of the wooden beams; it is best to drill 3-4 cm from the edge.
If the ladder will be used outdoors, it is recommended to treat the wood with protective materials.
Ladder rope should not stretch, even when wet or under heavy loads. Therefore, it is best to use non-elastic synthetic options, for example, nylon rope 8-9 mm in diameter. The length of the rope is calculated very simply: the length of the entire staircase structure multiplied by two + 1-1.5 meters by the nodes on the rungs. It is best to leave more material on the joints; the remainder will be easily cut off.

You need to start making the stairs from the bottom rung. The rope must be passed through the holes, its ends must be the same length. The steps are fixed with knots. Then, 35-40 cm from the bottom crossbar, the following knots are tied. They must be strictly parallel to each other so that the crossbar does not warp. The nodes will be located under the second crossbar. After the second wooden step is strung on ropes, it must be tied with a special knot, this will protect it from breakage during

In the same way, the remaining crossbars are strung onto the rope at the same distance and secured with reliable knots.
When the ladder is ready, you should not immediately test it at high altitude. It is better to conduct preliminary strength tests at 1.5-2 meters. To do this, hang the structure on a horizontal bar or on a tree branch and check its safety and reliability.

For this design, it is advisable to use round wooden blanks. You can buy shovel handles at a hardware store; their diameter is ideal for stair rungs, and the wood is already processed and sanded.
The cuttings are cut into fragments 40 cm long. At a distance of 3-4 cm from the ends of the crossbars, you need to cut indentations around the circumference using a knife or chisel. These grooves are needed to secure the rope to the wooden step. Thus, each workpiece must be processed.

The rope for this staircase design needs a synthetic, non-stretchable rope with a diameter of at least 8 mm. The length depends on the structure being manufactured. It is also worth remembering that the knots for fixing also require about 2 meters of rope.
To make a ladder, you need to make a wooden template that will help you accurately position the rungs from each other. The template is also needed to ensure that the steps are parallel to each other, without distortions.
The template is placed on a flat surface. The rope is cut into 2 pieces of equal length. The ends are singed and wrapped with thick thread. Then the crossbars are placed between the wooden planks of the template. A rope is tied to the bottom step on both sides and securely fixed. Ropes are pulled to the second step and secured in the grooves using a knot called a “Constrictor”.
Video - How to tie a Constrictor knot correctly
The rest of the ladder rungs are connected in the same way. Loops are woven at the ends of the ropes, to which the ladder will be attached. It is important to maintain the same distance between the steps; this will ensure the safety of using the suspended structure.
A ladder with rungs on which grooves are cut is the fastest and easiest way to make a suspended structure. You can make such a ladder even on a hike if you have a strong rope, a knife and an ax with you.

In order to quickly make a ladder in the field, you need branches with a diameter of at least 4 cm. You can simply cut them down with an ax. It is important not to use dry and brittle workpieces that may not support a person’s weight. It is better to look for strong and healthy wood.
The branches need to be cut into pieces, and using a knife, cut grooves along the edges for attaching ropes. There is no need to remove the bark from the rungs; under the bark the wood is slippery and smooth; climbing the stairs will be difficult and inconvenient.
After making the crossbars, you can start attaching the rope. There will be no template in the forest, so you need to carefully calculate the gap between the steps.
If desired, such a simple staircase can be easily made in an hour and a half.
Hanging staircase with plastic steps
This design requires a PVC pipe with an outer diameter of 26 mm and an inner diameter of 20 mm. Wall thickness - 6 mm. Using a grinder, the pipe is cut into fragments of the required size - 35-40 cm. It is advisable to clean the ends of the workpieces with sandpaper or a grinding machine after cutting, since sharp edges can wear out the rope over time during intensive use.

For the stairs you need a strong, non-stretchy synthetic rope with a diameter of at least 3-4 mm. To weave the sides you need 3 ropes, two of the same size but different color, one half more: 10 m (blue) +10 m (blue) + 15 m (black).
The bottom crossbar is attached first. Two 10-meter ropes are passed through the tube, and the 15-meter rope is let down over the top. At the edges of the crossbar, the ropes are connected and a braid is woven from them. To avoid confusion, you can use twine of different colors. The braids on both sides are braided to the beginning of the second crossbar.

Then the second crossbar is attached. A rope 15 m long is made into a loop and pushed into the cavity of the tube. Another piece of long black rope is threaded through the end of the loop protruding from the other side. It turns out that the 2 ends of a long rope are fastened inside the tube. Then a braid is again braided from 3 ropes on both sides of the stairs, until the next crossbar. The third step is attached in a similar way.

It is important to maintain the same distance between the rungs so that the stairs do not warp and the steps do not have different levels.
When the ladder is ready, you can make loops at the end of the ropes or attach carabiners. This will simplify the use of the suspended structure.

If you only have rope, you can use it to make a simple and reliable ladder, called a fire ladder.

Video - Rope fire escape
A rope ladder can be a great find for a summer house; in addition, it will be an excellent attribute for the sports development of a child, which can be hung even in a city apartment. Making such a design is not at all difficult, even with your own hands, following the instructions outlined in the photo and video tutorials.
Design advantages

Rope ladder on the playground
If we talk about using a rope ladder in a private house or country house, its advantages are obvious:
- This design is very light, almost weightless. Even a child can lift it without difficulty;
- in addition, such a ladder is quite compact, it can be stored on a mezzanine or in a barn, because when folded it will take up very little space;
- a rope ladder can be easily made at home on your own, and the manufacturing process will not be too long and tedious.

Fastening to the step
In addition, such a staircase fits perfectly into the country interior, giving it a special flavor, which is well illustrated in the photo.
First manufacturing method

Before you start making a rope ladder with your own hands, you need to prepare the working materials. So, you will need:
- a pair of spools of strong rope approximately twenty meters long. It is best to purchase a rope made of polypropylene, since this material is characterized by the greatest wear resistance and reliability;
- seven cuttings, pre-polished, about three centimeters in diameter and a little more than a meter long;
- hacksaw with fine teeth;
- sandpaper, preferably fine-grained;
- a skein of coarse thread.

Having prepared the necessary equipment, you can already begin to make the stairs. Its production will take place in several simple steps:
- Using a hacksaw, cut the prepared cuttings into pieces, each length should be approximately thirty centimeters. Also leave one long cutting (about one meter), which will then be used to secure the structure;
- you need to fix the steps to the rope using a special “constrictor” knot, with the use of which there is no need to drill holes in the steps;
- Make special grooves along the edges of the cuttings that will prevent the rope from slipping. Stepping back three to four centimeters from the edge, make a slot about one and a half centimeters wide and sand the step;
- To assemble the structure, first prepare a rope. Cut it with a hot knife or singe its ends after cutting;
- now tie a knot and make a six-centimeter loop. Do this with both ends of the rope;
- fix the steps at a distance of forty-five centimeters from each other using constrictor knots.

Making a rope ladder using the described technology is not difficult, but during the process you may still encounter certain difficulties. In particular, there may be a problem with the parallelism of the steps, to eliminate which the knot will have to be tied. As a result, you should have a comfortable and lightweight structure about eleven meters long.
Second manufacturing method

A rope ladder can be made with your own hands and using a different technology, which is also very simple and can be done even by a novice home craftsman. The work steps here are as follows:
- cut bars 35 centimeters long for future steps;
- Make a hole on both sides of the steps using a drill, stepping back three centimeters from the edge;
- carefully sand the surface of the bars so that in the future it will be convenient to step on them and hold them with your hands;
- dig the prepared steps with drying oil - this will increase their service life;
- prepare a rope of eight meters and divide it into two parts;
- Make knots at the ends of the ropes, then pass them through the holes in the steps and additionally secure them with knots;
- secure all the bars in this way at a distance of about thirty centimeters from each other.
The rope ladder is an irreplaceable invention of mankind. They are used in households, during technical work in wells and mines, for playgrounds, as ship's tackle, by mountaineers, rock climbers, rescuers of the Ministry of Emergency Situations and so on.
Features and purpose
Rope ladders are used in cases where it is impossible to use stationary and attached structures, and it is also necessary to reach hard to reach places: climb onto the roof, go down the well, move to another place as if on a suspension bridge. These are also children's favorite toys. And they are also used for the rehabilitation of bedridden patients.
Such stairs have a number of undeniable advantages:
- they are universal in use;
- are light in weight;
- convenient for storage;
- easy to manufacture;
- It is possible to adjust the length;
- affordable.


Kinds
Depending on the intended purpose of using the staircase, materials, type of processing and manufacturing method are selected.
- Stairs for children. It is advisable to take ropes with a cross-section of at least 12 mm. The crossbars need to be carefully processed by special means so that your hands do not slip.
- For bedridden patients. With the help of such a ladder, a person will be able to sit up on the bed himself. Please note that the crossbars are very short, about 25 cm.
- For household needs. Such a staircase must meet many parameters. Ropes must maintain their length and be moisture resistant, crossbars must also be treated special compounds so that they do not gain moisture. The design must withstand heavy weight (up to 300 kg) and be resistant to temperature changes. Nylon and nylon meet these requirements.
- Stairs for climbers and climbers. A rope ladder is included in the mandatory equipment. Its main quality should be as light a weight as possible; the ropes should not stretch or absorb moisture.
- Decorative stairs to the garden or room. They are not burdened with any special requirements, since they do not imply full use. If you intend to use the stairs outdoors, you should consider treating them with a water-repellent agent.
- Ship stairs. They are subject to requirements in accordance with the established GOST standards.


Required tools and materials
The ladder includes 3 components: ropes, crossbars, fastenings.
The rope is selected based on the circumstances of the intended use. For children's attractions and decorative use in rooms, it is recommended to use ropes made from natural materials. For household needs, synthetic materials are best suited. They have increased resistance to solvents. Steps can be made of wood, rope, metal (light alloys) or plastic tubes.
Regardless of the material, they should not be damaged or deformed. The crossbars can be round or square.


At self-production we will need:
- chisel;
- power tools (for example, drill);
- saw (for “cutting” steps);
- grater with sandpaper (for sanding wooden steps);
- metal scissors;
- a skein of thick thread.
We will also need two pieces of rope (their length is calculated based on the fact that each piece will be halved due to the cost of knots). And the required number of crossbars.


How to do it?


Let's proceed to the first manufacturing option.
First, let's determine how long the ladder we need and prepare the ropes. We need to process the cuts so that they do not unravel. To do this, heat up the scissors for cutting metal and cut off one centimeter from each end, and then wrap them with a thick layer of thread.
The next step is to prepare the crossbars. For this purpose, you can use cuttings from shovels and straight branches. It is necessary to process the entire surface of the step so that there are no snags or roughness. Then, at a distance of 3-4 cm from the ends of the steps, make grooves 2 cm wide and 0.5 cm deep. We treat the entire step with a water-repellent compound.
Before you start assembling the structure, try tying a test knot and see what length of rope it takes.
And the last thing is securing the suspended structure. In this simple way you can make a staircase.

The second option is made using a very similar technology, but differs in the way the crossbars are attached. We will need to use a drill to make holes at the ends of the crossbars. Make sure that the holes are larger than the cross-section of the rope, and do not forget to treat them with a water-repellent agent. They are secured using a whole set of knots: the first knot is tied a couple of centimeters below the level of the intended crossbar, and should be larger than the diameter of the hole. The second knot is tied as a safety knot around the crossbar itself. And we make the third knot above the crossbar. The bowline knot works well for this.


The third method involves using hollow tubes made of metal or plastic as crossbars. The length of the rope for such a ladder is calculated as the sum of the distance between the rungs and the length of all rungs. Technique for assembling a ladder: Mark the ropes for the spaces between the rungs and those areas that are supposed to pass through the rungs. Then put all the rungs on one rope one by one and lay them out on a straight surface as the ladder will look like. Pass the second rope through the crossbars, but with reverse side. Tie a knot on each side of the crossbar to better secure the structure.

The fourth method does not involve the use of crossbars at all. They are made from rope. This method may cause difficulties, but there is nothing complicated about it. Knotting skills will be an advantage.
One of the ropes is taken as a basis, after which loops are “strung” onto the section allocated for the step. You can tie such a loop using a “burlatk knot.” A safety knot is made before the front and last loop. Dimensions for steps are calculated from the thickness of the rope.
After this the situation changes a little. For the base of the next step, we take the rope from which we knitted the loops. And from the rope that was at the base, we begin to knit loops.
The requirements for the rope depend on the situation, but to prevent it from rotting, treat it with a water-repellent agent. total length stairs - no more than 10 m.


Fifth way. This staircase will not have a standard appearance. Only one rope is used for its manufacture. Its processing occurs in the same way as in other cases: we melt the sections on a rope and fix them with thread. The role of the steps will be performed by loops woven using a “fisherman’s knot”. It is recommended to place them at a distance of 35 cm. The loops must have a diameter of at least 10 cm. It is most convenient to attach such a ladder in an open space, using hooks, carabiners or loops.

How to install?
Let's look at installation methods. For fastening, we can use rings (if we plan to hang them from the ceiling), carabiners, hooks, an additional crossbar, or simply loops from the same rope.
If you need to secure the ladder to a tree branch or attach it to a ring, we recommend using knots such as the Prusik grasping knot, guide knot, or figure eight knot.
It is advisable to use an additional crossbar when the ladder is fixed for a relatively long period of time. In this case, you simply nail the crossbar to a wall, tree or other surface.


Carabiners are used when connecting ladders to other ropes or structures. Used when constructing obstacle courses or forest houses.
It makes sense to use hooks when the structure is hung for a relatively short period of time. To facilitate fastening, connect them with a rigid crossbar.
Despite all the advantages, using this design can lead to injury. To prevent this from happening, follow safety precautions:
- follow manufacturing technology;
- do not exceed the weight capacity of the ladder;
- if you plan to mount it along any surface, then consider special fastenings so that the ladder moves slightly away from the wall (10-15 cm);
- square steps must have smoothed corners, and round ones must have a cross-section of at least 2.5 cm;
- Before using the ladder, carefully inspect it for damage;
- do not use the design in a state alcohol intoxication or if there is physical damage.

