Article 498. Workman B (1999) Safe injection techniques. Nursing standard. 13, 39, 47-53.
In this article, Barbara Workman describes the correct technique for intradermal, subcutaneous, and intramuscular injections.
Objectives and expected learning outcomes
As knowledge of nurses' daily practice routines grows, it is prudent to review some of the routine procedures.
This publication provides an overview of the principles of intradermal, subcutaneous and intramuscular injections. It is shown how to choose the right anatomical injection site, anticipate the possibility of drug intolerance, as well as the special needs of the patient, which may affect the choice of injection site. Aspects of patient and skin preparation, as well as equipment features, and ways to reduce patient discomfort during the procedure are highlighted.
The main purpose of the article is to encourage the nurse to critically review their own injection technique, based on the principles of evidence-based medicine, and to provide the patient with effective and safe care.
After reading this article, the nurse should know and be able to:
- Determine safe anatomical areas for intradermal, subcutaneous and intramuscular injections;
- Identify muscles - anatomical landmarks for performing intramuscular injections, and explain why they are used for this;
- Explain what this or that method of processing the patient's skin is based on;
- Discuss ways to reduce patient discomfort during an injection;
- Describe the nurse's actions aimed at preventing injection complications.
Introduction
Injection is a routine, and perhaps the most frequent work nurses, and good injection technique can make this procedure relatively painless for the patient. However, technical proficiency without understanding the manipulation exposes the patient to unnecessary risk of complications. Initially, injections were medical manipulation but, with the invention of penicillin in the 1940s, the responsibilities of the nurse expanded considerably (Beyea and Nicholl 1995). Currently, most nurses perform this manipulation. automatically. Since nursing practice is now becoming evidence-based, it is logical reconsider this fundamental procedure from the standpoint of evidence-based medicine.
Drugs are administered parenterally because they are usually absorbed faster than from gastrointestinal tract, or, like insulin, are destroyed by the action of digestive enzymes. Some drugs, such as medoxy-progesterone acetate or fluphenazine, are released over a long period of time and require a route of administration that ensures continued absorption of the drug.
There are four main characteristics of an injection: injection site, route of administration, injection technique, and equipment.
intradermal route of administration
The intradermal route of administration is intended to provide local rather than systemic drug action, and is generally used primarily for diagnostic purposes, such as allergy and tuberculin tests, or for the administration of local anesthetics.
To perform an intradermal injection, a 25G needle with a cut up is inserted into the skin at an angle of 10-15°, exclusively under the epidermis and injected up to 0.5 ml of the solution until the so-called “lemon peel” appears on the skin surface (Fig. 1). This route of administration is used to perform allergy tests, and the injection site must be marked in order to track the allergic reaction after a certain period of time.
Intradermal injection sites are similar to those for subcutaneous injections (Figure 2), but can also be performed on the inside of the forearm and under the collarbone (Springhouse Corporation 1993).
When performing allergy testing, it is very important to ensure that an anti-shock kit is readily available if the patient has a hypersensitivity reaction or anaphylactic shock (Campbell 1995).

Rice. 1. "Lemon peel", which is formed during intradermal injection.
IMPORTANT (1):
Review the symptoms and signs of anaphylactic reactions.
What will you do in case of anaphylactic shock?
What medications are you taking that can trigger an allergic reaction?
Subcutaneous route of administration
The subcutaneous route of administration of drugs is used when slow, uniform absorption of the drug into the blood is necessary, while 1-2 ml of the drug is injected under the skin. This route of administration is ideal for drugs such as insulin, which require a slow steady release, are relatively painless, and are suitable for frequent injections (Springhouse Corporation 1993).
On Fig. 2 shows sites suitable for performing subcutaneous injections.
Traditionally, subcutaneous injections are performed by inserting a needle at a 45-degree angle into the skin fold(Thow and Home 1990). However, with the introduction of shorter insulin needles (5, 6, or 8 mm long), insulin injections are now recommended to be performed with a 90-degree needle (Burden 1994). Be sure to take the skin in a fold in order to separate adipose tissue from the underlying muscles, especially in thin patients (Fig. 3). Some studies using computed tomography to track the direction of the injection needle have shown that sometimes the drug is inadvertently injected into the muscle when administered subcutaneously, especially when injected into the anterior abdominal wall in lean patients (Peragallo-Dittko 1997).
Insulin administered intramuscularly is absorbed much faster and this can lead to unstable glycemia and possibly even hypoglycemia. Hypoglycemic episodes can also be observed if the anatomical site of the injection changes, since insulin is absorbed from different sites at different rates (Peragallo-Dittko 1997).
For this reason, there should be constant change Insulin injection sites, for example, the shoulder or abdomen area is used for several months, then the injection site is changed (Burden 1994). When a patient with diabetes is admitted to the hospital, one should look for signs of inflammation, swelling, redness, or lipoatrophy at the insulin injection sites, and be sure to note this in the medical record.
Aspiration of the contents of the needle during subcutaneous injection is currently recognized as inappropriate. Peragallo-Dittko (1997) reports that blood vessel puncture prior to subcutaneous injection is very rare.
Educational materials for patients with diabetes do not contain information about the need for aspiration. It has also been noted that aspiration prior to heparin administration increases the risk of hematoma formation (Springhouse Corporation 1993).
Intramuscular route of administration
At intramuscular injection the drug is in a well-perfused muscle, which ensures its rapid systemic action, and the absorption of sufficiently large doses, from 1 ml from the deltoid muscle to 5 ml in other muscles in adults (for children, these values \u200b\u200bshould be halved). The choice of injection site should be based on the general condition of the patient, his age and volume of solution. medicinal product to be entered.
The proposed injection site should be examined for signs of inflammation, swelling and infection, and injection of the drug into areas of skin lesions should be avoided. Similarly, 2-4 hours after the manipulation, the injection site should be examined to ensure that there are no adverse events. If injections are frequently repeated, then it is necessary to mark the injection sites in order to change them.
This reduces patient discomfort and reduces the chance of developing complications such as muscle atrophy or sterile abscesses due to poor drug absorption (Springhouse Corporation 1993).
IMPORTANT (2):
When diabetic patients are hospitalized, special medical records should be maintained.
How do you mark injection rotation sites?
How do you monitor the suitability of the injection site?
Discuss this with your colleagues.

Rice. 2. Anatomical areas for intradermal and subcutaneous injections. Red dots are sites for subcutaneous and intradermal injections, black crosses are sites for performing only intradermal injections.

Rice. 3. Capturing a skin fold when performing subcutaneous injection.
In elderly and malnourished people muscle mass less than in younger, more active people, so before performing an intramuscular injection, it is necessary to assess whether muscle mass is sufficient for this. If the patient has little muscle, the muscle can be folded before the injection (Fig. 4).

Rice. 4. How to take the muscle in the fold in malnourished or elderly patients.
There are five anatomical regions suitable for intramuscular injections.
On Fig. 5(a-d) shows in detail how to determine the anatomical landmarks of all these areas. These anatomical regions are:
- The deltoid muscle on the shoulder, this area is used mainly for the administration of vaccines, in particular the hepatitis B vaccine and the ATP toxoid.
- The gluteal region, the gluteus maximus (upper outer quadrant of the buttock), is the traditional site for intramuscular injections (Campbell 1995). Unfortunately, there are complications when using this anatomical region, damage to the sciatic nerve or superior gluteal artery is possible if the needle insertion point is incorrectly determined. Beyea and Nicholl (1995) in their publication cite data from several researchers who used computed tomography and confirmed the fact that even in patients with moderate obesity, injections into the gluteal region more often lead to the fact that the drug is in adipose tissue, and not in muscle, which certainly slows down the absorption of the drug.
- The anterior gluteal region, the gluteus medius muscle is more safe way performing intramuscular injections. It is recommended because there are no large nerves and vessels, and there are no reports of complications due to damage to them (Beyea and Nicholl 1995). In addition, the thickness of adipose tissue is more or less constant here, at 3.75 cm compared to 1-9 cm in the gluteus maximus, suggesting that a standard 21 G intramuscular needle (green) will end up in the gluteus medius.
- Lateral head of the quadriceps femoris. This anatomical region is most commonly used for injections in children and carries the risk of inadvertent injury to the femoral nerve with subsequent muscle atrophy (Springhouse Corporation 1993). Beyea and Nicholl (1995) suggested that this area is safe in children up to seven months of age, then the upper outer quadrant of the buttock is best used.

Rice. 5a. Determination of the position of the deltoid muscle.
The densest part of the muscle is defined as follows: a line is drawn from the acromial process to a point on the shoulder at armpit level. The needle is inserted approximately 2.5 cm below the acromion to a depth of 90º.
The radial nerve and brachial artery should be avoided (Springhouse Corporation 1993).
You can ask the patient to put the hand on the thigh (as models do during the shows), which makes it easier to find the muscle.
To identify the gluteus maximus: the patient may lie on their side with knees slightly bent, or with thumbs legs inward. If the legs are slightly bent, then the muscles are more relaxed and the injection is less painful (Covington and Trattler 1997).

Rice. 5b. Definition of the outer upper quadrant of the buttock.
Draw an imaginary horizontal line from the beginning of the intergluteal gap to greater trochanter hips. Then draw another imaginary line vertically in the middle of the previous one, and at the top laterally will be the upper outer quadrant of the buttock (Campbell 1995). The muscle that lies in it is the gluteus maximus muscle. An error during the injection can damage the superior gluteal artery and sciatic nerve. The typical volume of fluid to be administered in this area is 2-4 ml.

Rice. 5c. Definition of the anterior-gluteal region.
Place the palm of your right hand on the greater trochanter of the patient's left thigh (and vice versa). With your index finger, feel for the superior anterior iliac crest and move your middle finger back to form a V (Beyea and Nicholl 1995). If you have small hands this may not always work, so simply move your hand towards the comb (Covington and Trattler 1997).
The needle is inserted into the gluteus medius in the middle of the V at a 90º angle. A typical volume of drug solution for administration in this area is 1-4 ml.

Rice. 5d. Definition of the lateral head of the quadriceps femoris and rectus femoris.
In adults, the lateral head of the quadriceps femoris can be located a hand below and lateral to the greater trochanter, and a hand above the knee, in the middle third of the quadriceps femoris. The rectus femoris muscle is located in the middle third of the anterior surface of the thigh. In children and the elderly, or in malnourished adults, this muscle may sometimes need to be folded in order to provide sufficient depth of injection (Springhouse Corporation 1993). The first solution of the drug is 1-5 ml, for infants - 1-3 ml.
The rectus femoris is part of the anterior quadriceps femoris and is rarely used for injections by nurses, but is often used in self-administered drugs or in infants (Springhouse Corporation 1993).
IMPORTANT (3):
Learn to identify anatomical landmarks for each of these five intramuscular injection sites.
If you are accustomed to injecting drugs only in the upper-outer quadrant of the buttocks, then learn to use new areas and regularly improve your practice.
Methodology
The pain from the injection depends on the angle of the needle insertion. The needle for intramuscular injection should be inserted at an angle of 90 ° and make sure that the needle reaches the muscle - this allows you to reduce the pain of the injection. A study by Katsma and Smith (1997) found that not all nurses insert the needle at a 90° angle, believing that this technique makes the injection more painful, as the needle quickly passes through the tissues. Stretching the skin reduces the chance of needle injury and improves the accuracy of drug administration.
To correctly insert the needle, place the non-working hand and stretch the skin over the injection site with the index and middle fingers, and place the wrist of the working hand on thumb non-working. Hold the syringe between the pads of your thumb and forefinger, this is how you can insert the needle accurately and at the right angle (Fig. 6).

Rice. 6. Technique for performing intramuscular injection, needle insertion angle 90º, anterior-gluteal region.
There has been little research on this topic in the UK, so nurses may have very different injection skills and techniques (MacGabhann 1998). The traditional technique for performing intramuscular injections was to stretch the skin over the puncture site to desensitize the nerve endings (Stilwell 1992) and quickly prick the needle at a 90° angle to the skin.
However, a review of the literature by Beyea and Nicholls' (1995) indicated that the use of the Z-technique resulted in less discomfort and fewer complications compared to the conventional technique.
Z—method
This technique was originally proposed for the administration of drugs that color the skin or are strong irritants. It is now recommended for the intramuscular administration of any medication (Beyea and Nicholl 1995) because it is believed to reduce soreness and the likelihood of drug leakage (Keen 1986).
In this case, the skin at the injection site is pulled down or to the side (Fig. 7). This shifts the skin and subcutaneous tissue by about 1-2 cm. It is very important to remember that the direction of the needle changes and you may not get to the right place.
Therefore, after determining the injection site, you need to find out which muscle is under the surface tissues, and not what skin landmarks you see. After injecting the drug, wait 10 seconds before removing the needle so that the drug is absorbed into the muscle. After removing the needle, release the skin. The tissue over the injection site will close the deposit of the drug solution and prevent leakage. It is believed that if the limb moves after the injection, the absorption of the drug will be accelerated, since blood flow will increase at the injection site (Beyea and Nicholl 1995).

Rice. 7. Z-method.
Air bubble technique
This technique was very popular in the USA. Historically, it was developed in the days of glass syringes, which required the use of an air bubble to ensure that the dose was correct. Dead space in a syringe is no longer considered necessary because plastic syringes are more accurately calibrated than glass syringes and this technique is no longer recommended by manufacturers (Beyea and Nicholl 1995).
Recently, two studies have been conducted in the UK on dummy (slow-release oil solution) (MacGabhann 1998, Quartermaine and Taylor 1995) comparing the Z-technique with an air bubble technique designed to prevent leakage of the solution after injection.
Quartermaine and Taylor (1995) suggested that the air bubble technique was more effective than the Z technique in preventing leakage, but the results of MacGabhann (1998) were inconclusive.
There are questions related to the accuracy of dosage when using this technique, since the dose of the drug in this case may increase substantially (Chaplin et al 1985). Further research is required on this technique as it is considered relatively new in the UK. However, if it is used, the nurse must ensure that she is administering the correct dose to the patient and that the technique is being used exactly as recommended.
Aspiration technique
Although the aspiration technique is not currently recommended for control of subcutaneous injections, it should be used for intramuscular injections. If the needle is mistakenly inserted into a blood vessel, the drug can be inadvertently injected intravenously, sometimes resulting in an embolism due to the specific chemical properties of the drugs. With intramuscular injection of the drug, aspiration of the contents of the needle should be carried out within a few seconds, especially if thin long needles are used (Torrance 1989a). If blood is visible in the syringe, then it is removed and a fresh preparation is prepared for injection in another place. If there is no blood, then the drug can be injected, at a rate of about 1 ml per 10 seconds, this seems a little slow, but allows muscle fibers move apart for proper distribution of the solution. Before removing the syringe, you must wait another 10 seconds, and then remove the syringe and press the injection site with a napkin with alcohol.
Massaging the injection site is not necessary, as this may cause leakage of the drug from the injection site and skin irritation (Beyea and Nicholl 1995).
Leather processing
Although it is known that cleaning the skin with an alcohol wipe prior to parenteral manipulation reduces the number of bacteria, in practice there are contradictions. Rubbing the skin for subcutaneous insulin administration predisposes to skin hardening under the influence of alcohol.
Previous studies suggest that such rubbing is not necessary and that the lack of skin preparation does not lead to infectious complications(Dann 1969, Koivisto and Felig 1978).
Some experts now believe that if the patient is clean, and the nurse strictly follows all hygiene and asepsis standards during the procedure, then disinfection of the skin when performing an intramuscular injection is not necessary. If skin disinfection is practiced, then the skin must be rubbed for at least 30 seconds, then allowed to dry for another 30 seconds, otherwise the whole procedure is ineffective (Simmonds 1983). In addition, injecting before the skin dries not only increases the soreness of the skin but also allows live bacteria from the skin to enter the tissue (Springhouse Corporation 1993).
IMPORTANT (4):
What are the guidelines for pre-injection skin preparation at your facility?
Find out what recommendations are there for insulin injections.
Are these recommendations consistent with the research data in the article?
What will you do?
IMPORTANT (5):
Imagine that you are watching a student who is about to perform his first injection. What prompts or tips will you use in this case to ensure that the trainee develops proper injection skills?
Equipment
Needles for intramuscular injections should be long enough to reach the muscle, while at least a quarter of the needle should remain above the skin. The most commonly used intramuscular injections are 21G (green) or 23 (blue) gauge needles, 3 to 5 cm long. If the patient has a lot of adipose tissue, then longer needles are required for intramuscular injections to reach the muscle. Cockshott et al (1982) found that the thickness of subcutaneous fat in women in the gluteal region can be 2.5 cm more than in men, so a standard 21 G injection needle 5 cm long reaches the gluteus maximus muscle in only 5% of women and 15 % men!
If the rubber cap of the vial has already been pierced with a needle, then it becomes blunt, in which case the injection will be more painful, since the skin has to be pierced with great effort.
The size of the syringe is determined by the volume of the injected solution. For intramuscular administration of solutions in volumes less than 1 ml, only small volume syringes are used to accurately measure the desired dose of the drug (Beyea and Nicholl 1995). For the introduction of solutions with a volume of 5 ml or more, it is better to divide the solution into 2 syringes and inject into different areas(Springhouse Corporation 1993). Pay attention to the tips of the syringes - they have different purposes.
Gloves and accessories
In some institutions, regulations require the use of gloves and aprons during injections. It should be remembered that gloves protect the nurse from patient secretions, from the development of drug allergies, but they do not provide protection from damage from needles.
Some nurses complain that it is inconvenient for them to work with gloves, especially if they initially learned to perform this or that manipulation without them. If a nurse works without gloves, then care must be taken to ensure that nothing gets into her hands - neither medicines nor patients' blood. Even clean needles must be disposed of immediately, in no case should they be re-capped, the needles are discarded only in special containers. Be aware that needles can fall from injection trays onto the patient's bed, which can cause injury to both patients and staff.
Clean disposable aprons can be used to protect workwear from splashes of blood or injection solutions, and this is also useful in cases where a special sanitary epidemiological regime is needed (to prevent the transfer of microorganisms from one patient to another). It is necessary to carefully remove the apron after the procedure so that the dirt that has fallen on it does not come into contact with the skin.
IMPORTANT (6):
Make a list of all the things that help reduce the pain of injections. Compare with Table 1.
How can you use more ways to reduce injection pain in your practice?
Table 1. Twelve steps to make injections less painful
| 1 | Prepare the patient, explain to him the essence of the procedure, so that he understands what will happen and clearly follows all your instructions |
| 2 | Change the needle after you have taken the drug from the vial or ampoule and make sure it is sharp, clean and long enough |
| 3 | In adults and children older than seven months, the injection site of choice is the anterior gluteal region. |
| 4 | Position the patient so that one leg is slightly bent - this reduces pain during the injection |
| 5 | If you are using alcohol wipes, make sure the skin is completely dry before injecting. |
| 6 | Ice or a freezing spray can be used to numb the skin, especially for young children and patients who are phobic of injections. |
| 7 | Use the Z-method (Beyea and Nicholl 1995) |
| 8 | Change sides of injections and note this in medical records |
| 9 | Puncture the skin gently, at an angle close to 90 degrees, to prevent soreness and tissue displacement |
| 10 | Gently and slowly inject the solution, at a rate of 1 ml in 10 seconds, so that it is distributed in the muscle |
| 11 | Before withdrawing the needle, wait 10 seconds and pull the needle out at the same angle as it was inserted. |
| 12 | Do not massage the injection site after it is completed, just press the injection site with a gauze pad |
Pain Reduction
Patients are very often afraid of performing injections because they assume that it hurts. Pain usually results from irritation of pain receptors in the skin, or pressure receptors in the muscle.
Torrance (1989b) lists factors that can cause pain:
- The chemical composition of the drug solution
- Injection technique
- The rate of administration of the drug
- The volume of the drug solution
Table 1 lists ways to reduce pain from the injection of the drug.
Patients may have a strong fear of injections and needles, fear, anxiety - all this greatly increases the pain during injections (Pollilio and Kiley 1997). good technique performing the procedure, adequately informing the patient and a calm, confident nurse are the best way to reduce the pain of manipulation and reduce the patient's reaction. Behavior modification techniques can also be used, especially when the patient has long courses of treatment and sometimes needle-free systems have to be used (Pollilio and Kiley 1997).
Anesthetizing the skin with ice or cold sprays prior to injection has been suggested to reduce pain (Springhouse Corporation 1993), although there is currently no research evidence to support this technique.
Nurses should be aware that patients may even experience syncope or fainting after conventional injections, even if they are otherwise perfectly healthy. It is necessary to find out if this has happened before, and it is desirable that there is a couch nearby on which the patient can lie down - this reduces the risk of injury. Most often, such fainting occurs in adolescents and young men.
Complications
Complications that develop as a result of infection can be prevented by strict observance of asepsis measures and thorough hand washing. Sterile abscesses can result from frequent injections or poor local blood flow. If the injection site is edematous or this area of the body is paralyzed, then the drug will be poorly absorbed, and such sites should not be used for injection (Springhouse Corporation 1993).
Careful selection of the injection site will avoid nerve damage by accident. intravenous injection and subsequent embolism with drug components (Beyea and Nicholl 1995). Systematic changing of the injection site prevents complications such as injection myopathy and lipohypertrophy (Burden 1994). The appropriate length of the needle and the use of the anterior gluteal region for injections allows the drug to be injected precisely into the muscle, and not into the subcutaneous fat. The use of the Z-technique reduces pain and skin discoloration associated with the use of certain drugs (Beyea and Nicholl 1995).
Professional Responsibility
If the drug is administered parenterally, then it is no longer possible to “return” it. Therefore, it is always necessary to check the dose, the correctness of the appointment, and clarify the patient's name with the patient so as not to confuse the appointment. So: the right medicine the right patient, the right dose, in right time, and in the right way - this will avoid medical errors. All drugs should be prepared according to the manufacturer's instructions, all nurses should know how these drugs work, contraindications for their use and side effects. The nurse should evaluate whether the drug can be used at all in this patient at present (UKCC 1992).
conclusions
The safe administration of injections is one of the primary functions of a nurse and requires knowledge of anatomy and physiology, pharmacology, psychology, communication skills, and practical experience.
There are studies that prove the effectiveness of injection techniques to prevent complications, but there are still “white spots” that need additional research. This article focuses on research-proven techniques so that nurses can incorporate these procedures into their daily practice.
Bibliography
Beyea SC, Nicholl LH (1995) Administration of medications via the intramuscular route: an integrative review of the literature and research-based protocol for the procedure. Applied Nursing Research. 5, 1, 23-33.
Burden M (1994) A practical guide to insulin injections. Nursing standard. 8, 29, 25-29.
Campbell J (1995) Injections. Professional nurse. 10, 7, 455-458.
Chaplin G et al (1985) How safe is the air bubble technique for IM injections? Not very say these experts. Nursing. 15, 9, 59.
Cockshott WP et al (1982) Intramuscular or intralipomatous injections. New England Journal of Medicine. 307, 6, 356-358.
Covington TP, Trattler MR (1997) Learn how to zero in on the safest site for an intramuscular injection. Nursing. January, 62-63.
Dann TC (1969) Routine skin preparation before injection. An procedure unnecessary. Lancet. ii, 96-98.
Katsma D, Smith G (1997) Analysis of needle path during intramuscular injection. nursing research. 46, 5, 288-292.
Keen MF (1986) Comparison of Intramuscular injection techniques to reduce site Koivisto VA, Felig P (1978) Is skin preparation necessary before insulin injection? Lancet. i, 1072-1073.
MacGabhann L (1998) A comparison of two injection techniques. Nursing standard. 12, 37, 39-41.
Peragallo-Dittko V (1997) Rethinking subcutaneous injection technique. American Journal of Nursing. 97, 5, 71-72.
Polillio AM, Kiley J (1997) Does a needless injection system reduce anxiety in children receiving intramuscular injections? Pediatric Nursing. 23:1, 46-49.
Quartermaine S, Taylor R (1995) A comparative study of depot injection techniques. Nursing Times. 91, 30, 36-39.
Simmonds BP (1983) CDC guidelines for the prevention and control of nosocomial infections: guidelines for prevention of intravascular infections. American Journal of Infection Control. 11, 5, 183-189.
Springhouse Corporation (1993) Medication Administration and IV Therapy Manual. second edition. Pennsylvania, Springhouse Corporation.
Stilwell B (1992) Skills Update. London, MacMillan Magazines.
Thow J, Home P (1990) Insulin injection technique. british medical journal. 301, 7, July 3-4.
Torrance C (1989a) Intramuscular injection Part 2. Surgical Nurse. 2, 6, 24-27.
Torrance C (1989b) Intramuscular injection Part 1. Surgical Nurse. 2, 5, 6-10.
United Kingdom Central Council for Nursing, Midwifery and Health Visiting (1992) Standards for Administration of Medicine. London, UKCC.
Injection (synonymous with injection, injection) is one of the types of parenteral administration of solutions into the body in small quantities. The injection is made into the skin, subcutaneous tissue, muscle, spinal canal,. Benefits of drug injection over oral administration: more fast action these substances; dosing accuracy; shutdown of the barrier function of the liver; the possibility of administering drugs in any condition of the patient. A relative disadvantage of injection is the possibility anaphylactic shock at (see). If the patient is conscious, he should be warned about the upcoming injection. The injection is made in certain places of the body in which there is no risk of damaging blood vessels or nerves - in the outer surfaces of the limbs, the skin of the subscapularis, the skin of the abdomen, the upper outer quadrant of the gluteal region.
Compliance with the rules of asepsis is mandatory. The injection is mainly done using disposable syringes. The paramedic performing the injection should thoroughly wash their hands with soap and a brush and wipe them with alcohol before taking the syringe. Do not touch the bottom of the needle with your hands.
Liquid drug solutions are sucked up with a needle from a glass ampoule or vial (Fig. 2), following the rules (see) and (see). Oily and thick medicinal substances are sucked up without a needle. Typing medicinal solution, the syringe must be held with the needle up and, slowly pulling out the piston, push air and part of the solution out of it so that no air bubbles remain in it (Fig. 3). Even a small air bubble remaining in the syringe can cause suppuration with intradermal and subcutaneous injections and with intravenous injections. The area of the skin intended for injection is thoroughly wiped with cotton wool moistened with alcohol or iodine. The technique and site of injection depend on the type of injection.
Rice. 2. Pumping liquid into the ampoules

Rice. 3. Removing air bubbles from the syringe

Rice. 4. Intradermal injection

Rice. 5. Subcutaneous injection

Rice. 6. Intramuscular injection
For intradermal injection, a thin needle is inserted into the skin at an acute angle to a shallow depth (Fig. 4). With the correct setting of the needle after the introduction of the solution, a small rounded elevation is formed, resembling a lemon peel. Intradermal injection is used for surface anesthesia and with diagnostic purpose( , samples of Casoni, McClure - Aldrich).
For subcutaneous injection, the needle is inserted 2-3 cm into the fold of skin taken between the fingers (Fig. 5). Solutions are injected under the skin in an amount of 0.5-10 ml; drugs prepared in isotonic sodium chloride solution ( physiological saline), are absorbed quickly, in oil - slowly.
Intramuscular injections are made to a great depth and in certain anatomical areas: usually in the gluteal (Fig. 6) region and less often along the outer surface of the thigh. In order not to damage, the injection site is chosen as follows: the buttock is mentally divided by vertical and horizontal lines perpendicular to it into four parts. The injection is made in the area of the outer upper quadrant. Take the syringe in the right hand with the first, second and third fingers. At the same time, the skin at the injection site is pulled with the thumb and forefinger of the left hand. Then, with a sharp movement of the right hand perpendicular to the surface of the skin, the needle is injected into the thickness of the muscle to a depth of 4-6 cm and, by pressing the piston, the medicinal substance is injected. Care must be taken that the needle does not go too deep to the sleeve, as this may break off. For a warning allergic reaction some intramuscular injections medicines(bicillin, etc.), you must first make an injection with one needle (without a syringe with a solution) and wait a while to make sure that blood does not flow through the needle. If a drop of blood appears in the lumen of the needle, inject the solution medicinal substance should not, and the injection with the same needle must be repeated in another place with the same precautions.
Injection into the spinal canal - see.
An intracardiac injection is made in the middle of the IV and V intercostal spaces at the left edge of the sternum or under the sternum, as with a pericardial puncture. The needle is inserted into the right ventricle. The needle should be long (6-10 cm) and thin. Intracardiac injection is performed urgently in case of sudden cardiac arrest (lesion electric shock, gas poisoning, anesthesia). A 0.1% solution (0.5-1 ml) or corazole (2 ml) is injected into the heart.
See also Infusion.
Throughout life, every person has to deal with many diseases. There are various pharmaceuticals, which have a wide range actions, and are used in the treatment of many diseases. Some of them are available in the form of tablets and capsules intended for oral administration.
Others can be applied transdermally, that is, by application to the skin. But the drugs that are produced in the form of injections are most effective.
Injections can be administered intravenously or intramuscularly. But some drugs are recommended to be administered subcutaneously. This is due to the fact that the subcutaneous fat is saturated with blood vessels. Therefore, the therapeutic effect is achieved within half an hour after administration. medicinal product. However, it is necessary to strictly follow the algorithm for performing subcutaneous injection, which will avoid adverse effects on human health.
Choice of injection sites
The introduction of injections should be made only in places of accumulation of subcutaneous fat. These include:
- upper outer part of the shoulder or thigh;
- anterior abdomen;
- area under the shoulder blade.

It should be noted that injections under the scapula are most often done in medical institutions during vaccination. Also this way indicated for people in whom the remaining permitted areas are covered with a significant layer of adipose tissue.
At home, injections are most often given in the shoulder, thigh or abdomen. In these places, a person can inject on their own, without resorting to the help of outsiders.
Tool preparation
To avoid infection, before the introduction of injections, it is necessary to prepare inventory. For these purposes, you will need the following:
- two trays, one of which is intended for prepared sterile instruments, and the other for waste materials;
- syringe with a needle;
- ampoule with medicine;
- sterile cotton swabs - 3 pcs.;
- alcohol 70%.

Ordinary plates can act as trays, which should be disinfected alcohol solution. A wide range of disposable syringes eliminates the need to boil inventory.
Cotton swabs should be purchased ready-made in a pharmacy. In this case, two swabs must be moistened with alcohol, and the third must be left dry. If necessary, you can use sterile gloves. If there are none, then you should also prepare either an antibacterial soap or a liquid antiseptic.
It should be remembered that during the injection process, a puncture of the skin is provided, as a result of which the integrity of the tissues is violated. An infection that enters the bloodstream can lead to infection or tissue necrosis. Therefore, careful preparation is necessary.
First of all, you need to wash your hands with soap and treat them antiseptic solution. And everything that is intended for direct injection should be placed on a sterile tray.
It is very important to make sure that the medicine and syringe are suitable for use. Therefore, it is necessary to check their expiration date and make sure that the packaging of the medicine and the syringe is not damaged.

- mechanical damage in the form of wounds and scratches;
- puffiness;
- rashes and other signs of dermatological diseases.
If any changes are found, another place should be chosen for the injection.
Rules for taking medication into a syringe
Before taking a drug into a syringe, you need to make sure that it corresponds to the doctor's prescription, and also clarify the dosage. Next, treat the bottleneck of the ampoule with a cotton swab dipped in alcohol. After that, with a special nail file supplied with all drugs intended for injection, make a notch and open the ampoule. In this case, its upper part should be placed in a tray designed for waste materials.
It should be remembered that breaking off the upper part of the ampoule should be in the direction away from you. And the neck is captured not with bare hands, but with a cotton swab. Next, follow the following sequence of actions:
- open the syringe;
- remove the needle;
- put the cannula of the needle on the tip of the syringe;
- remove the protective case from the needle;
- immerse the needle into the ampoule;
- draw the drug into the syringe by pulling its piston up with your thumb;
- release air from the syringe by lightly tapping it with your finger, and then pressing on the piston until the first drops of medicine appear on the tip of the needle;
- put a case on the needle;
- put the syringe in a sterile tray for used instruments.
Rules for the administration of the drug
After the place intended for injection is completely exposed, it is treated with alcohol. And first, a large area is lubricated with a cotton swab dipped in alcohol, and then, taking another swab, the injection site is treated directly. The tampon can be moved either from top to bottom or centrifugally. After that, you must wait until the treated surface dries.
The subcutaneous injection algorithm consists of the following steps:
- the left hand should take the skin at the injection site, collecting it in a fold;
- the needle is inserted under the skin at an angle of 45°;
- the needle should enter 1.5 cm under the skin;
- after that, the left hand holding the fold is transferred to the syringe plunger;
- pressing on the piston, you should slowly inject the medicine;
- the needle is removed while supporting the puncture site with a cotton swab dipped in alcohol;
- a dry cotton swab is applied to the injection site:
- the syringe, needle and cotton swab are placed in the waste tray.

It should be remembered that for safety reasons, it is necessary to hold its cannula at the time of insertion of the needle, medication and removal of the needle. index finger. After all the manipulations, it is necessary to remove gloves, if they were worn, and wash your hands again with soap and water.
If the injection is given to a stranger, he must first be laid down, or given another comfortable position.
Features of the introduction of oil solutions
Preparations made on the basis of oil formulations must not be administered intravenously. They are able to clog the vessel, which will lead to the development of necrosis. When such a composition enters the blood, emboli are formed, which, together with the blood flow, are able to penetrate into the pulmonary arteries. When blocked pulmonary artery suffocation occurs, which very often ends in death.
Since oil formulations are poorly absorbed under the skin, subcutaneous seals form after their administration. To avoid this, it is necessary to pre-heat the ampoule to 38 °, and after the injection, apply a warming compress to the puncture site.
In general, the injection rules are no different from those described above. However, to avoid the formation of emboli inside the vessels, after inserting the needle under the skin, you should slightly pull the syringe plunger up and make sure that no blood enters the syringe. If blood appears in the syringe, it means that the needle has entered the vessel. Therefore, for manipulations, you need to choose another place. In this case, according to the safety rules, it is recommended to change the needle to a sterile one.

To exclude the occurrence unpleasant consequences, it is advisable to entrust the introduction of oil solutions to professionals. Contacting medical institution, you can be sure that in the event of complications, the patient will be provided with qualified assistance.
How to inject insulin
Most often injected into the anterior wall of the peritoneum. However, if a person does not have the opportunity to retire, then you can stab in the shoulder or thigh. The dosage of the drug should be determined by the doctor. It is not recommended to inject more than 2 ml of insulin at a time. If the dosage exceeds this indicator, it is divided into several parts, introducing them one by one. Moreover, each subsequent injection is recommended to be administered in a different place.
Given that insulin syringes are supplied with a short needle, it should be inserted all the way, constantly holding its cannula with your finger.

Conclusion
To avoid the possibility of infection, after the injection, all used materials, including rubber gloves, must be discarded. You can not press on the injection site, it also cannot be rubbed. It is also important to remember that it is necessary to apply a dry cotton swab to the injection site. This precaution will help avoid burns.
The introduction of subcutaneous injections is not particularly difficult. But in order to achieve a positive effect in the treatment and exclude possible complications, you need to follow the proposed algorithm exactly. It should be remembered that any manipulations associated with damage skin, require careful processing and sterilization. If, however, a seal has formed at the puncture site, an iodine mesh or a compress with magnesia will help eliminate it.
Purpose: curative, preventive
Indications: determined by the doctor
The subcutaneous injection is deeper than the intradermal injection and is made to a depth of 15 mm.
The subcutaneous tissue has a good blood supply, so drugs are absorbed and act faster. Maximum effect subcutaneously administered medication usually occurs after 30 minutes.
Injection sites for subcutaneous injection: upper third of the outer surface of the shoulder, back (subscapular region), anterolateral surface of the thigh, lateral surface of the abdominal wall.
Prepare equipment:
- soap, individual towel, gloves, mask, skin antiseptic (for example: Lizanin, AHD-200 Special)
- an ampoule with a medicinal product, a nail file for opening the ampoule
– sterile tray, waste material tray
- a disposable syringe with a volume of 2 - 5 ml, (a needle with a diameter of 0.5 mm and a length of 16 mm is recommended)
- cotton balls in 70% alcohol
- first aid kit "Anti-HIV", as well as containers with des. solutions (3% solution of chloramine, 5% solution of chloramine), rags
Preparation for manipulation:
1. Explain to the patient the purpose, the course of the upcoming manipulation, obtain the patient's consent to perform the manipulation.
2. Treat your hands at a hygienic level.
3.Help the patient into position.
Subcutaneous Injection Algorithm:
1. Check the expiration date and tightness of the syringe package. Open the package, assemble the syringe and place it in a sterile patch.
2. Check the expiration date, name, physical properties and dosage of the drug. Check with destination sheet.
3. Take 2 cotton balls with alcohol with sterile tweezers, process and open the ampoule.
4. Draw the required amount of the drug into the syringe, release the air and put the syringe in a sterile patch.
5. Lay out 3 cotton balls with sterile tweezers.
6. Put on gloves and rub the ball in 70% alcohol, drop the balls into the waste tray.
7. Treat centrifugally (or from bottom to top) with the first ball in alcohol a large area of skin, treat the puncture site directly with the second ball, wait until the skin dries from alcohol.
8. Discard the balls into the waste tray.
9. With your left hand, grasp the skin at the injection site in the warehouse.
10. Bring the needle under the skin at the base of the skin fold at an angle of 45 degrees to the skin surface with a cut to a depth of 15 mm or 2/3 of the needle length (depending on the length of the needle, the indicator may be different); index finger; hold the cannula of the needle with your index finger.
11. Move the hand that fixes the fold to the plunger and slowly inject the drug, try not to shift the syringe from hand to hand.
12. Remove the needle, continuing to hold it by the cannula, hold the puncture site with a sterile cotton swab moistened with alcohol. Put the needle in a special container; if a disposable syringe is used, break the needle and cannula of the syringe; take off your gloves.
13. Make sure that the patient feels comfortable, take the 3 balloon from him and escort the patient.
The subcutaneous fat layer is well supplied with blood vessels, therefore, subcutaneous injections (s / c) are used for a faster action of the drug. Subcutaneously administered medicinal substances are absorbed faster than when administered through the mouth. Subcutaneous injections are made with a needle to a depth of 15 mm and up to 2 ml of drugs are injected, which are quickly absorbed in loose subcutaneous tissue and do not have a harmful effect on it.
Characteristics of needles, syringes for s / c injections :
Needle length -20 mm
Cross section -0.4 mm
Syringe volume - 1; 2 ml Sites for subcutaneous injection:
The middle third of the anterolateral surface of the shoulder;
The middle third of the anterolateral surface of the thigh;
Subscapular region;
Anterior abdominal wall.
In these places, the skin is easily captured in the fold and there is no danger of damage to blood vessels, nerves and periosteum. It is not recommended to make injections: in places with edematous subcutaneous fat; in seals from poorly absorbed previous injections.
Equipment:
Execution algorithm:
Put on a clean gown, mask, treat your hands at a hygienic level, put on gloves.
Take the medicine, release the air from the syringe, put it in the tray.
Sit or lay the patient down, depending on the choice of injection site and drug.
Inspect and palpate the injection site.
Treat the injection site sequentially in one direction with 2 cotton balls moistened with a 70% alcohol solution: first a large area, then the second ball directly at the injection site, put it under the little finger of the left hand.
Take the syringe in your right hand (hold the cannula of the needle with the index finger of the right hand, hold the syringe plunger with the little finger, hold the cylinder with fingers 1,3,4).
Gather the skin into a fold with your left hand triangular shape, bottom down.
Insert the needle at an angle of 45° with the cut up into the base of the skin fold to a depth of 1-2 cm (2/3 of the length of the needle), hold the cannula of the needle with your index finger.
Place your left hand on the plunger and inject the drug (do not switch the syringe from one hand to the other).
Remove gloves, place in
Wash hands, dry.
Note. During the injection and after it, after 15-30 minutes, ask the patient about his well-being and about the reaction to the injected drug (detection of complications and reactions).
Fig.1.Places for s / c injections
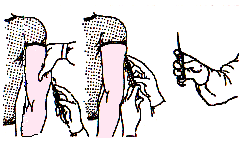
Fig.2. Technique of subcutaneous injection.
The introduction of oil solutions subcutaneously.
Target: medical.
Indications: the introduction of hormonal drugs, solutions of fat-soluble vitamin preparations.
Equipment:
Sterile: a tray with gauze tuffs or cotton balls, a 1.0 or 2.0 ml syringe, 2 needles, 70% alcohol, drugs, gloves.
Non-sterile: scissors, couch or chair, containers for disinfection of needles, syringes, dressings.
Execution algorithm:
Explain to the patient the course of the manipulation, get his consent.
Put on a clean gown, mask, treat your hands at a hygienic level, put on gloves.
Before use, dip the ampoule into a container with warm water, heat up to 38°C.
Draw the medicine into the syringe, release the air from the syringe.
Treat the tufikomi injection site twice with 70% alcohol.
Inject with a needle, pull the plunger towards you - make sure that no blood enters the syringe - prevention of drug embolism (oil).
Slowly inject the solution (t° oil solution 38°C).
Press the injection site with a cotton ball with 70% alcohol.
Remove the needle by holding it by the cannula.
Discard the disposable syringe and needle in a container of 3% chloramine for 60 minutes.
Remove gloves, place a container with a disinfectant solution.
Wash hands, dry.
